Introduction:
This blog post will look at a practical example of how to implement asynchronous background tasks in a Flask environment, with an example taken from my ongoing project of building a Destiny the game inventory management web application.
During the design of DestinyVaultRaider.com one of the main pain points was manually updating my production environment every time the Destiny Manifest was changed. The development crew in Bungie were very active and were updating the Manifest right up to the launch of Destiny 2.
Before adding the background tasks, I had a small Python script running from my Raspberry Pi, which would send a request to Bungie, every 10 minutes, for the current Manifest version – if the stored Manifest version was different, the script would send me a message on a private Slack channel to notify me that the Manifest had changed and I’d need to update my Heroku environment.
If the Manifest version stored on my production environment didn’t match the current revision of the Manifest Bungie were using, this would cause an error in my Flask application, sending the user a HTTP 500 internal error response and be diverting them to a generic error page. This leads to a negative user experience, and with the Manifest being updated randomly – sometimes twice a week, I was left scrambling to update it as quickly as possible.
I store the Manifest in a Redis database, so using Redis as a Message Broker (see below) made sense for my application.
Introduction to Celery:
From the Celery docs: “Celery is an asynchronous task queue/job queue based on distributed message passing. It is focused on real-time operation, but supports scheduling as well”.
From the perspective of my app, I will be using Celery to create a scheduled task, which checks the Destiny Manifest every few minutes, and updates my Redis database as needed. I will also be creating an asynchronous task that will check the Manifest every time an authorised user sends a request to a specific endpoint on my server, such as https://www.destinyvaultraider.com/updateManifest.
For another look at implementing Celery with Flask, have a read of Miguel Grinberg’s blog on Celery with Flask.
How Celery works:
The asynchronous tasks will be set up as follows.
- Celery client:
- This will be connect your Flask application to the Celery task. The client will issue the commands for the task.
- Celery worker:
- A process that runs a background task, I will have 2 workers, a scheduled task and an asynchronous task called every time I visit a particular endpoint (/updateManifest).
- Message broker:
- The Celery client communicates to the Celery worker through a message broker, I will be using Redis but you can also use RabbitMQ or RQ.
Installing Celery and Redis:
An important note: One of the main reasons I went with Celery and Redis; is because I do all of my development work on a Windows laptop – most of the libraries and tutorials I found were geared on developing in a Linux environment (which makes sense as your web application is most likely deployed on a Linux system). Celery has dropped Windows support but you can still install an earlier version to allow development on a Windows system.
Shout out to /u/WTRipper on Reddit for this information.
Installing Celery:
Celery can be installed from pip, version 3.1.25 supports Windows and worked well for me:
pip uninstall celery
pip install celery==3.1.25
Installing Redis:
Redis is not officially supported on windows – but the Microsoft open tech group maintain a Windows port, which you can download here. (I downloaded the installer Redis-x64-3.0.504.msi).
The Flask application factory:
The Flask application factory concept is a methodology of structuring your app as a series of Blueprints, which can run individually, or together (even with different configurations). More than just this, it sets out a more standardised approach to designing an application.
This can also add a bit of complexity to designing an application, as most Celery tutorials focus on standalone applications and ignore the detail of integrating Celery into a large Flask application.
In my case, I will have a Blueprint for my API and a Main Blueprint for everything else.
Destiny Vault Raider app structure:
As Destiny Vault Raider uses the Flask application factory structure, each Blueprint is contained in it’s own folder. For DVR, I only need a “main” and “api” Blueprint, as I don’t require separate views for unauthenticated visitors (although it’s probably something I’ll add in future).
The main items to look out for are highlighted in red.
DestinyVaultRaider
│   celery_worker.py
│   config.py
│   manage.py
│
├───app
│   │   email.py
│   │   getManifest.py
│   │   models.py
│   │   __init__.py
│   │
│   ├───api_1_0
│   │       views.py
│   │       __init__.py
│   │
│   ├───main
│   │       errors.py
│   │       forms.py
│   │       Inventory_Management.py
│   │       OAuth_functions.py
│   │       views.py
│   │       __init__.py
│   │
│   ├───static
│   │   │   style.css
│   │
│   └───templates
│       │   index.html
│
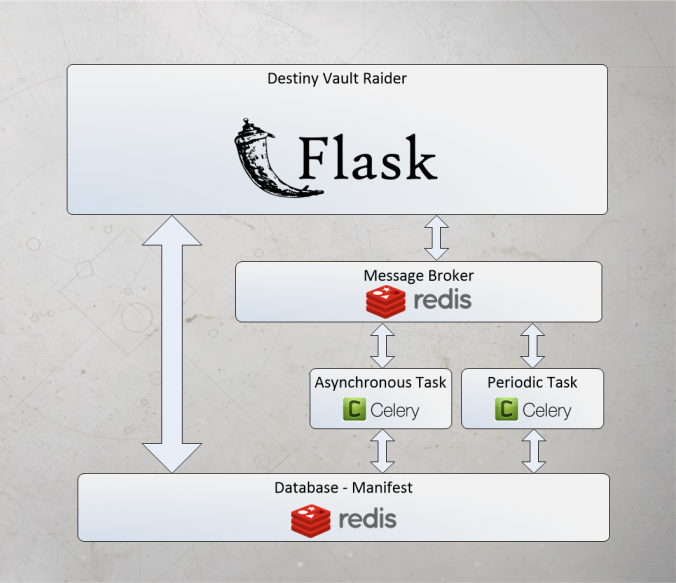
Destiny Vault Raider updating manifest flow chart:

Flask application with Redis and Celery.
From the diagram, we can see:
- How the Flask application connects to the Redis message broker.
- The Message broker talks to the Celery worker.
- The Celery worker calls (either the asynchronous or periodic) Python function to update the Redis Manifest database.
- The Flask application can access the Manifest database directly, when a user makes a request to view their items.
Now, lets tun these ideas into code!
Creating the Celery worker:
Create an instance of the Celery worker, add the Celery configuration. The Celery configuration will be defined a little later in config.py.
app/__init__.py:
from celery import Celery

celery = Celery(__name__, broker=Config.CELERY_BROKER_URL)

def create_app(config_name):
    app = Flask(__name__)
    :
    :
    celery.conf.update(app.config)
    :
Adding the Celery worker to the app instance:
Take the instance of the celery object we created and and add it to the app context (read about the app_context here).
celery_worker.py:
import os
from app import celery, create_app

app = create_app(os.getenv('FLASK_CONFIG') or 'default')
app.app_context().push()
Configuring Celery and Redis:
During development, your Celery client and Redis broker will be running on your local machine, however during deployment – these connections will be to a remote server. As you’ll need 2 setups, you’ll need to create the Config setup for both development and deployment. On DVR, I set an environment variable “is_prod” to True, which allows me to test if I’m in the deployed environment.
All of this configuration will be added to the Celery object in app/__init__.py, when we create the celery object and pass in the config with the command: celery.conf.update(app.config).
config.py:
First, I create the setup for the Celery beat schedule, I set the schedule for 5 minutes, which is 300 seconds.
# Create Celery beat schedule:
celery_get_manifest_schedule = {
    'schedule-name': {
        'task': 'app.getManifest.periodic_run_get_manifest',
        'schedule': timedelta(seconds=300),
    },
}
Note: The task is named app.getManifest.periodic_run_get_manifest, the task is located in the “app” folder, in the “getManifest” file, and the function is called periodic_run_get_manifest.
Next, I create the Config object, with the Celery and Redis settings, for both production and development.
class Config:
    CELERYBEAT_SCHEDULE = celery_get_manifest_schedule
    # Development setup:
    if not is_prod:
        CELERY_BROKER_URL = 'redis://localhost:6379/0'
        CELERY_RESULT_BACKEND = 'redis://localhost:6379/0'
        REDIS_HOST = 'localhost'
        REDIS_PASSWORD = ''
        REDIS_PORT = 6379
        REDIS_URL = 'redis://localhost:6379/0'

    # Production setup:
    else:
        # Celery:
        CELERY_BROKER_URL = os.environ.get('REDIS_URL')
        CELERY_RESULT_BACKEND = os.environ.get('REDIS_URL')
        # Redis:
        REDIS_URL = os.environ.get('REDIS_URL')
Note: Both the Celery Broker URL is the same as the Redis URL (I’m using Redis as my messge Broker) the environment variable “REDIS_URL” is used for this.
Connecting to the Celery and Redis server:
Now that we’ve created the setup for the Celery and Redis we need to instantiate the Redis object and create the connection to the Redis server.
I also ping the Redis server to check the connection.
getManifest.py:
from . import celery
from celery.task.base import periodic_task
from config import config, Config

# Set Redis connection:
redis_url = urlparse.urlparse(Config.REDIS_URL)
r = redis.StrictRedis(host=redis_url.hostname, port=redis_url.port, db=1, password=redis_url.password)

# Test the Redis connection:
try:
    r.ping()
    print "Redis is connected!"
except redis.ConnectionError:
    print "Redis connection error!"
Note: I tried to manually add the hostname, port and password as strings and populate the redis.StrictRedis command, however, this wouldn’t work for me and I could only connect to the Redis server if I used urlparse to format the URL for me (I presume it’s looking for a URL object and not a String object but couldn’t I figure out why).
The db=1 sets the database table number to 1, it defaults to 0 if not added.
REDIS_URL:
redis://h:p0dc...449@ec2-...-123.compute-1.amazonaws.com:48079
which is on the format of:
redis://<username>:<PASSWORD>@<HOST>:<PORT>
You can set this as an environment variable on Heroku by using the following command:
heroku config:set REDIS_URL redis://h:p0dc...449@ec2-...-123.compute-1.amazonaws.com:48079
Creating the asynchronous task:
Here is the definition of the run_get_manifest() function, it’s pretty huge so I won’t include all of the code.
However, the important thing to note is the @celery.task decorator.
@celery.task(name='tasks.async_run_get_manifest')
def run_get_manifest():
    """ Run the entire get_manifest flow as a single function """
    build_path()
    manifest_version = request_manifest_version()
    if check_manifest(manifest_version) is True:
        getManifest()
        buildTable()
        manifest_type = "full"
        all_data = buildDict(DB_HASH)
        writeManifest(all_data, manifest_type)
        cleanUp()
    else:
        print "No change detected!"

    return
To create the asynchronous function, I create a new function async_run_get_manifest().
Inside this function, I call the original run_get_manifest function but add the delay() method, we can access the delay() method as we have wrapped the run_get_manifest() function in the @celery_task decorator.
def async_run_get_manifest():
    """ Asynchronous task, called from API endpoint. """
    run_get_manifest.delay()
    return
Creating the periodic task:
To create the periodic function, I create a new function periodic_run_get_manifest().
This function is decorated with the @periodic_task decorator. The “run_every” parameter is required and sets the time interval.
@periodic_task(run_every=timedelta(seconds=300))
def periodic_run_get_manifest():
    """ Perodic task, run by Celery Beat process """
    run_get_manifest()
    return
So now I have 2 functions, that do the same thing, but with some important differences:
- periodic_run_get_manifest(): This is the periodic task that is run every 5 minutes.
- async_run_get_manifest(): This is the asynchronous task that will run in the background when a request is sent to the /updateManifest endpoint.
Starting the Celery workers:
To start the Celery workers, you need both a Celery worker and a Beat instance running in parallel. Here are the commands for running them:
worker -A celery_worker.celery --loglevel=info
celery beat -A celery_worker.celery --loglevel=info
Now that they are running, we can execute the tasks.
Calling the asynchronous task:
The asynchronous task will be called anytime an authorised account visits a designated endpoint, I’m using the endpoint “/updateManifest”. This will call the asynchronous task “async_run_get_manifest()” which will be executed in the background.
api_1_0/views.py:
You’ll need to implement a feature to detect if the user is authorised to access this endpoint, I’ve left that out for clarity’s sake.
In this case I return back to the index.html page, depending on how your API is setup, you may return a text or JSON response. I had a system in place where I would receive update messages on a private Slack channel – depending on how the update went.
@api.route('/updateManifest')
@login_required
def updateManifest():
    async_run_get_manifest()
    return render_template('index.html',
                            site_details    = site_details,
                            )
Executing the periodic task:
The Periodic task will be executed every 5 minutes when the Celery Beat scheduler is running. Here I can check the progress from the Celery output:
[2017-11-22 13:38:08,000: INFO/MainProcess] Received task: app.getManifest.periodic_run_get_manifest[97a82703-af22-4a43-b189-8dc192f55b84]
[2017-11-22 13:38:08,059: INFO/Worker-1] Starting new HTTPS connection (1): www.bungie.net
[2017-11-22 13:38:10,039: WARNING/Worker-1] Detected a change in version number: 60480.17.10.23.1314-2
[2017-11-22 13:38:10,042: INFO/Worker-1] Starting new HTTPS connection (1): slack.com
[2017-11-22 13:38:10,803: WARNING/Worker-1] Detected a change in mobileWorldContentPaths: [u'en']
We can see from here:
- Recieved the task: app.getManifest.periodic_run_get_manifest()
- Created a new HTTPS connection to www.bungie.net – this is the request to check the Manifest version.
- Next I check the version number of the Manifest, and print the line “Detected a change in version number: 60480.17.10.23.1314-2”
- Created a new HTTPS connection to www.slack.com and I send this line to Slack as a message.
- Next I check the mobileWorldContentPaths version for the English Manifest, and print the line “Detected a change in mobileWorldContentPaths: [u’en’]”
In my case I didn’t need my app to keep track of the task status or check if it’s completed correctly, but Celery has that option. I get updates from the Slack messages.
Creating a development Start up script:
Here’s the script I use to start up the development server, Redis server, Celery worker and Celery Beat worker. Save the following into a file called “Startup.bat” and you can just double click on the file icon to start each process, in it’s own window, in your development environment.
This can save a lot of time as opening 4 command windows and starting each process separately.
C:\
cd /d "C:\Users\AllynH\Documents\Python\Flask\DestinyVaultRaider_Redis_Celery_API"
start /K redis-cli shutdown
start timeout 5
start CMD /K redis-server
start CMD /K celery worker -A celery_worker.celery --loglevel=info
start CMD /K celery beat -A celery_worker.celery --loglevel=info
start CMD /K python manage.py runserver
Here’s a breakdown of what the script is doing:
- The first line changes to our working directory.
- Next I shutdown any existing Redis server (sometimes Redis wouldn’t start correctly unless I had done a shutdown first).
- Then I wait for 5 seconds to allow the Redis server to shutdown.
- The next 4 commands are used to start the Redis server, Celery worker, Celery Beat worker, and Flask server – each started in their own command shell.
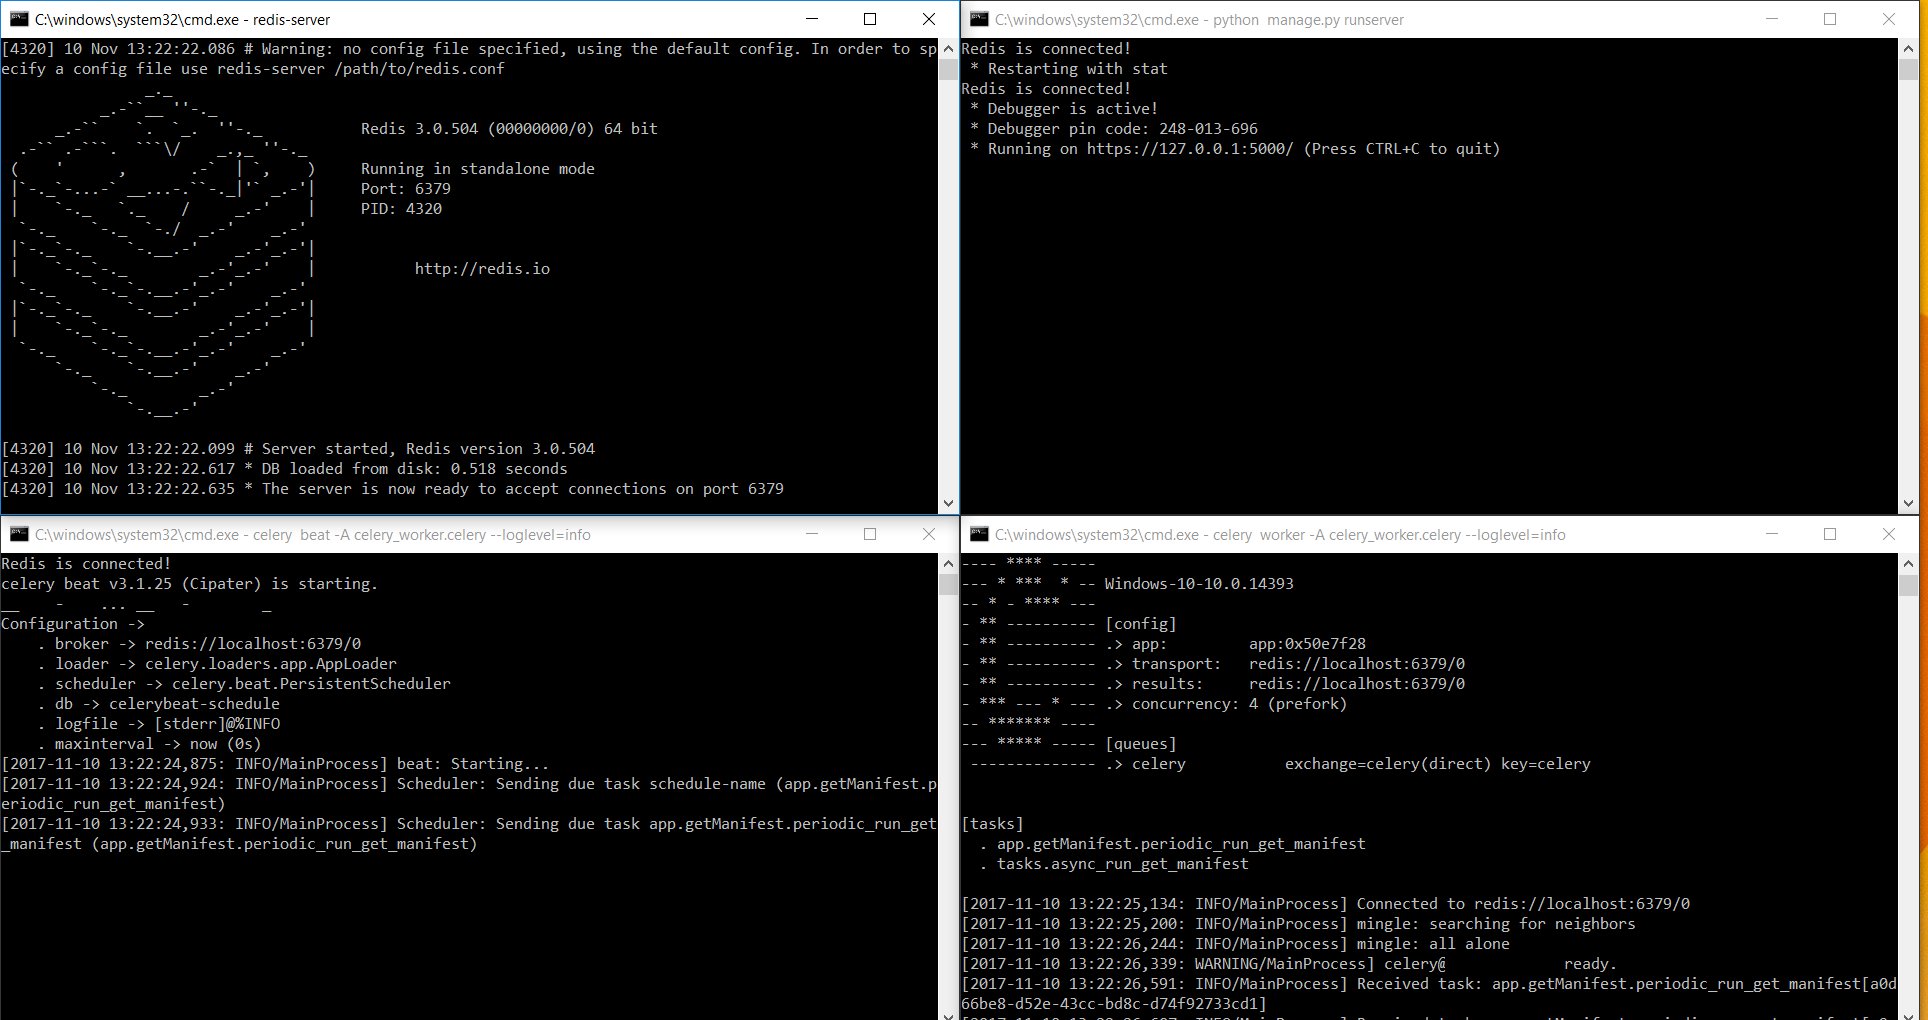
Redis server, Celery workers and Flask server started via the Startup.bat script.
Running on Heroku:
Here are some Heroku specific changes, you can skip these if you’re not running on Heroku.
Creating a Redis broker and adding it to the app:
You’ll need to create a Redis broker and attach it to your app, this will give you the REDIS_URL mentioned above.
heroku addons:create heroku-redis -a destinyvaultraiderEditing the procfile:
To start the Celery worker and Beat processes, add the following to your procfile:
worker: celery worker -A celery_worker.celery --beat --loglevel=info
Note: we can kick off both the Celery worker and Beat scheduler in one command here, whereas we couldn’t on Windows.
Scaling the Worker dyno:
To start the process, you need to enable the Celery worker Dyno:
heroku ps:scale worker=1Now your background tasks should be up and running!
Note on running Celery and Redis on Heroku:
The pricing on Heroku is really expensive to the point of being prohibitive, from my perspective I have had to disable the Redis database and Celery worker as Heroku require you to pay separately for each of these.
For example the pricing for the package I wanted worked out like this (as of November 2017), all figures are per month:
- Hobby Dyno: $7 (Required for HTTPS certification).
- Celery worker: $7.
- Redis database 100MB: $30 (80MB required).
This is obviously not feasible for a hobby project that isn’t making any money.
In comparison, a Digital Ocean, Vultr or OVH also provide Virtual Private Server services from ~$5 per month, which would allow you to run Redis and Celery inclusive of that price.
So before you invest your time in Heroku, research some of the alternatives 🙂