
Introduction:
Flask and Flask SQL Alchemy have lots of cool functionality built into them, that a lot of developers probably weren’t even aware of. If you’ve followed any of the main Flask tutorials (such as Miguel Grinbergs amazing tutorial), you probably already have all of the necessary setup completed.
I’ll also be building this code off the Flask large application structure. So this will take care of creating my application configuration and database connections, in both development and production modes.
Let’s look at a common Flask use-case for creating a dashboard application:
- You have a list of files (test results, for example).
- You have some Python code that scrapes these files.
- You want to create a Flask application to display these test results.
Dashboard application structure:
This all seems pretty straight forward when you start to design your application. You design a working development environment. It’s looking pretty good, you spend some time adding custom CSS and JavaScript features.
Soon you realise, you’ve hit a roadblock:
- My application is hosted in the cloud.
- My database is hosted in (a different) the cloud.
- My test results are split across several computers / servers.
Either way, it was easy to build your application in the development environment because the test results, web application and database were all on the same computer. You didn’t need to worry about getting access to the files, file permission, file sizes, long run times, etc…
Using the Flask app context:
You can invoke your Flask application with different contexts. Flask applications are normally used with the Request context – a web server waits for a GET request and sends a response.
The application context keeps track of the application-level data during a request, CLI command, or other activity. Rather than passing the application around to each function, the
Read about the Flask application context herecurrent_appandgproxies are accessed instead.
Set your database free!:
Flask and SQL Alchemy allow you to separate your database from your Flask application.
If you’ve read any Flask / SQL Alchemy tutorials, you’ve probably heard the advice “don’t bind your SQLAlchemy object to the Flask application”. Binding your application to the Flask application, means you can only access the database through the Request context.
So in this case, we want to avoid binding our SQL Alchemy to the Request context – so we can use it in a custom context.
Don’t bind your SQL Alchemy object to the Flask application
def create_app(config_name):
    app = Flask(__name__)
    app.config.from_object(config[config_name])
    db = SQLAlchemy(app)
For example, you may have seen the above code in the SQL Alchemy quickstart guide. Let’s make some small changes.
Attach your SQL Alchemy object to your Flask application:
Instead of binding we can use the init_app function to attach the SQL Alchemy “db” object to our application
db = SQLAlchemy()

def create_app(config_name):
    app = Flask(__name__)
    app.config.from_object(config[config_name])
    db.init_app(app)
Note:
- Line 1: We are defining the SQL Alchemy object globally and attaching it to the application via the init_app function.
- Line 6: The init_app function prepares the application to work with SQL Alchemy.
- But it does not bind the SQL Alchemy object to your application!
What does init_app() do?
Flask SQL Alchemy is a “Flask extension“, a 3rd party library that has been designed to work with Flask.
init_app() is a common function, every Flask extension must provide, to initialise the extension to work with Flask.
Connecting to your database:
The development SQLite database is normally setup as below, usually defaulting to output to the “data-dev.sqlite” file (or you can even set up another external database).
class DevelopmentConfig(Config):
	DEBUG = True
	SQLALCHEMY_DATABASE_URI = os.environ.get('DEV_DATABASE_URL') or \
		'sqlite:///' + os.path.join(basedir, 'data-dev.sqlite')
Let’s set up our external production database, first set the environment variables:
set POSTGRES_USER=USERNAME
set POSTGRES_PASS=PASSWORD
set POSTGRES_HOST=123xxx.cloud.provider.com
set POSTGRES_PORT=1234
set POSTGRES_DB_NAME=DB_NAME
Note: I’m developing on Windows, so I set environment variables with the “set” command. You will need to use the correct command for your OS, for example: set, setenv or export.
In the config.py file, create a dict with the database details:
POSTGRES = {
	'user': os.environ.get('POSTGRES_USER'),
	'password': os.environ.get('POSTGRES_PASS'),
	'database': os.environ.get('POSTGRES_DB_NAME'),
	'host': os.environ.get('POSTGRES_HOST'),
	'port': os.environ.get('POSTGRES_PORT'),
}
Update the ProductionConfig class to use your parameters:
class ProductionConfig(Config):
	postgres_url = 'postgres://%(user)s:%(password)s@%(host)s:%(port)s/%(database)s' % POSTGRES
	SQLALCHEMY_DATABASE_URI = postgres_url or \
		'sqlite:///' + os.path.join(basedir, 'data.sqlite')
Accessing your database outside of the request context:
Now that we have correctly initialised out SQLAlchemy object:
- We can access our database outside of the web servers Request context.
- We don’t need to tie our code to a Request action.
- Easily swap between production and development databases.
Let’s look at an example of how I would query my database for a list of all items stored in the Files table.
Creating the “Files” table:
Here is an example SQL Alchemy model I use for storing details of tracked Files.
models.py:
class Files(db.Model):
	__tablename__ = 'files'
	id	= db.Column(db.Integer, primary_key=True)
	created = db.Column(db.DateTime, nullable=False, index=True, default=datetime.utcnow)
	run_dir	= db.Column(db.String(256), nullable=False)
	file_path = db.Column(db.String(256), nullable=False)
	file_name = db.Column(db.String(128), nullable=False)
	full_name = db.Column(db.String(512), nullable=False)
	file_type = db.Column(db.String(10), nullable=False)
	file_size = db.Column(db.String(20), nullable=False)
Now that we have the Files table created, let’s query it using the Manager shell (You could also use Flask CLI).
Development database:
In our local development environment, using the Flask shell context, we can simply query the Files table like so.
(venv) [AllynH_dev] C:\example_app\>python manage.py shell
>>> files = Files.query.all()
>>> print("Found", len(files), "files")
Found 4 files
>>> job_queue = Queue.query.all()
>>> print("There are", len(job_queue), "queue items.")
There are 4 queue items.
Above: My development environment is tracking 4 files.
Note: I’m using Flask-Script manager but this also works with the Flask-CLI tool.
Production database:
To switch to production, we can simply change the FLASK_CONFIG environment variable and query the Files object, like so.
(venv) [AllynH_dev] C:\example_app\>set FLASK_CONFIG=production
(venv) [AllynH_dev] C:\example_app\>python manage.py shell
>>> files = Files.query.all()
>>> print("Found", len(files), "files")
Found 46716 files
>>> job_queue = Queue.query.all()
>>> print("There are", len(job_queue), "queue items.")
There are 15 queue items.
Above: My production environment is tracking 46K files.
We can now see, we are pulling data directly from our production database.
We are also pulling data outside of the Request context – the Flask web server is not used, and we don’t need to wait for a GET request in order to execute the code.
Modifying the database contents:
Note: Obviously it’s not usually a great idea to modify production database contents from the Python interpreter, however, some times it can prevent you from having to drop the table and rebuilding the contents all over again.
Let’s look at an example of where I needed to remove old jobs from my schedulers Queue table, from the Flask shell interpreter.

Let’s say for this example, that I pushed a fix to my code recently but I have a lot of jobs running in the queue that I want to run with the fixed code. In order to do this I need to delete these waiting jobs from the schedulers Queue.
First, I need to find a list of jobs in the Queue.
(venv) [AllynH_dev] C:\example_app\>python manage.py shell

>>> job_queue = Queue.query.all()
>>> print("There are", len(job_queue), "queue items.")
There are 15 queue items.
Now let’s delete the problem items:
>>> from datetime import datetime, timedelta
>>> for q in job_queue:
...     later = datetime.now() + timedelta(hours=10)
...     if q.time_to_live > later:
...             db.session.delete(q)
...
>>> db.session.commit()
>>> job_queue = Queue.query.all()
>>> print("There are", len(job_queue), "queue items.")
There are 7 queue items.
In this case – any Queue item with a time_to_live value of > 10 hours from now will be deleted.
Now that we can successively access, read and modify the production database through the Python interpreter – the next step is to actually create a standalone script to handle the file parsing and database connections.
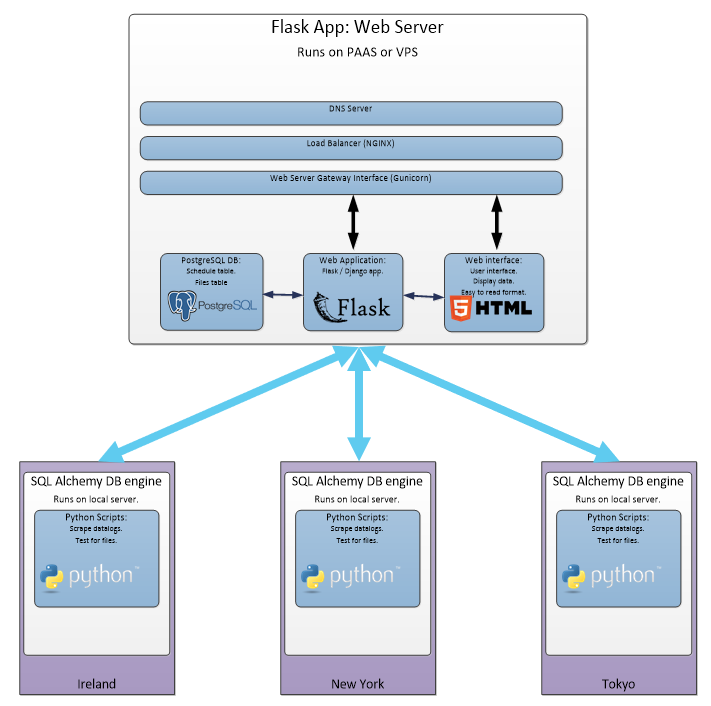
Creating the database engine:
In the diagram below, each of the servers are connected to the web application via a file called “DB engine”, let’s have a look at how to create this file.
Using what we know about app context and adding the database to the application, we can now create a new file, called “db_engine.py”:
/yourapplication
    config.py
    db_engine.py
    /app
        __init__.py
        views.py
        models.py
        /static
            style.css
        /templates
            layout.html
            index.html
            login.html
To access our SQL Alchemy database:
- We can import the create_app function.
- We can also import the Flask database models.
- When executing create_app, we push the app context to our db_engine app.
db_engine.py:
from app import create_app, db
from app.models import Users, Files, Queue # etc...:

create_app('production').app_context().push()
Note: The ‘production’ parameter can also be set to ‘development’ or ‘testing’ or any other configuration in your app. I normally set this via a command line argument.
We can now Query items from the database:
db_engine.py:
# code to open and parse files, etc.:
my_queue = Queue.query.all()
For queue in my_queue:
    output = parse_log_file(queue.run_dir, queue.owner, queue.run_tag, queue.user_tag)
Note: the parse_log_file function parses the file and returns some test results, implementation will depend on what you want to do.
We can also add items to the database:
db_engine.py:
# Add runs to the Queue database.:
add_run = Queue(
    time_to_live    = datetime.utcnow() + timedelta(hours=24))
    run_dir         = my_file[‘RUN_DIR'],
    owner           = my_file[‘OWNER'],
    site            = my_file['SITE'],
    host            = my_file['HOST_MACHINE'],
    run_tag         = my_file.get('run_tag', 'Development'),
    user_tag        = my_file.get('user_tag', ''),
    time_to_live    = datetime.utcnow() + timedelta(hours=24)
)

db.session.add(add_run)
db.session.commit()
Here I add an item to the task queue, these items are processed by a cron job that runs every 15 minutes.
Setting parameters with argparse :
In the code above, the create_app() function was hardcoded to ‘production’, in my case I use argparse to set this value with a command line argument.
db_engine.py:
parser.add_argument("-p", "--production", action="store_true",
					help="Select production server.")
args = parser.parse_args()

# Set user defined input options:
def parse_arguments():
	if args.production:
		# Create app:
		create_app('production').app_context().push()
	else:
		# Create app:
		create_app(os.getenv('FLASK_CONFIG') or 'default').app_context().push()
For more information on argparse, see here. See here for an example of how I use it in my automation code.
Executing the code:
As mentioned above, you can use the same code base for running the web server or the database engine. The app context controls how the application is run.
Running the web server:
When running the Flask webserver you’d use:
python manage.py runserver
Or, if you were using Flask CLI:
flask run
Or, if you were using gunicorn, something like this:
web: gunicorn --workers 4 manage:app
Running the database engine:
When running the database engine – you can do something like this:
# Run Engine in production mode - add schedule file:
python db_engine.py --schedule_file ..\Engine\queue_file.json --production
In my case, the schedule file is a list of files containing test results, that I want added to the database. These parameters are defined with argparse and can be whatever you need.
Conclusion:
To summarise, Flask and SQL Alchemy can do a lot of powerful stuff, with very little changes to your core code base.
- We can now push data from multiple servers to our database.
- We can reuse the Flask models and database structure, outside of the web application.
- Don’t need to write custom database code, so our applications will never be out of sync.
- The same code base can be used to run our web server or the db_engine – the code runs with different context.
If you’ve built your app structure following some of the main Flask tutorials – you may not even have to make changes to your code base.
0 Comments
1 Pingback