
Recently during a house move, I dropped my good old reliable Raspberry Pi – hard drive Network Attached Storage unit.
Basically I connected my external hard drive to a Raspberry Pi and had a Network Attached Storage drive which allowed me to access my media from any device on my home network.
I then realised it was time to buy a dedicated NAS.
I shelled out for the WE My Cloud 4 TB server, which by all reports is a great piece of gear – however I wanted something more than a standalone NAS and I wanted to be able to access the WD My Cloud from my Pi.
Here’s how I connected my Pi to the My Cloud! The guide below should work for any NAS – not just the WD My Cloud.
Find the IP address of your NAS:
If you don’t know the IP address of your NAS, you can perform an “arp-scan” from your Raspberry Pi to find it, here’s how I found mine:
# sudo arp-scan --localnet --interface=wlan0
If you still can’t find the IP address, for the WD My Cloud you can find the IP address in your settings, as per the instructions here.
In my case my NAS IP address was: 192.168.192.62
Mounting the NAS to the Raspberry Pi:
The first step to accessing the NAS from your Raspberry Pi is to mount the external HDD as a file system on the Raspberry Pi, this will allow you to view the NAS, as you would any directory on the Pi. This is pretty easy actually, as the CIFS (CIFS Common Internet File Share, a protocol dictating how different OS’ share files between them, including Windows and Linux) protocol takes care of everything.
First make a directory for the share:
# mkdir wdmycloud
Next mount the drive using the IP address and the Raspberry Pi directory you want to mount to:
# sudo mount -t cifs -o guest //192.168.192.62/Public /home/pi/wdmycloud

mount command
In this example, I am mounting the “Public” folder located on my NAS to the wdmycloud folder located on my Raspberry Pi.
The command syntax is:
mount -t <Mount Type> -o <Access> <SOURCE> <DESTINATION>
After executing the mount command, you should now be able to access the NAS file system as you would any other directory!
Automatically mount the NAS on power up:
Edit the FSTAB to mount your NAS automatically on power up:
To make the mount permanent, we need to add the NAS file system to the Raspberry Pi’s /etc/fstab file – the File System Table.
# sudo nano /etc/fstab
Edit the FSTAB file.
Add the NAS as a file system in the FSTAB file.
//192.168.192.62/Public /home/pi/wdmycloud cifs guest 0 0

Adding the NAS to the FSTAB.
You can see from the last line in the FSTAB file above, I have added the NAS as a file system in my FSTAB file.
This will automatically mount the NAS every time you power up your Raspberry Pi!
Testing the NAS is connected automatically on power up:
First step, reboot your Pi… :
# sudo reboot

Reboot your Pi.
Next step, check your NAS directory from the Pi:
# cd wdmycloud
# ls -larth
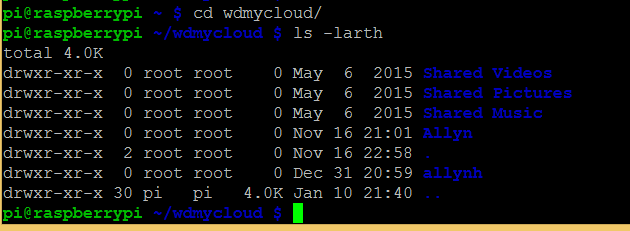
Confirm the share is working.
Success! The mount works, I can now access all of my pictures, music and movies from my Raspberry Pi. Everything is safely stored on my WD My Cloud, which keeps 2 copies of all of my data – so if anything goes wrong, I’ll always have my data backed up 😉