Making things, writing code, wasting time...

Tag: Python (Page 2 of 2)

Creating a Python app for Destiny – Part 3: Logging in to Bungie.net and authenticating with PSN

Introduction:

In the previous sections I showed how to:

  1. Send a request to read Xurs inventory.
  2. Send a HTML formatted email with Xurs inventory.

I want to build on the previously created code to create an app that can transfer an item to and from the vault, and equip items.

In order to do that, our code will need to log in to Bungie.net and authenticate the account with PSN.

Logging in to Bungie.net and authenticating with PSN:

We are going to use the Python “Requests” package to login to Bungie.net by using our PSN account details and OAuth 2.0 to authenticate our connection with PlayStation Network.,

The good people at BungieNetPlatform have put together some guides on how to connect with Bungie.net, get authenticated with PSN (or Xbox Live – but I’m on PS4) and grab the required cookies. For this example, I used the code provided by Quantum Ascend here.

You can also see his step by step instructions here.

Here are the steps to this section:

  1. Sign in on Bungie.net via PSN – this will redirect you to the PSN sign in page.
  2. Grab our PSN session ID.
  3. Login to PSN (via OAuth) using our PSN username, password and adding our session ID as a cookie.
  4. Receive PSN a unique sign in URL and updated JSESSIONID.
  5. Request PSN  X-NP-GRANT-CODE, using updated JSESSIONID.
  6. Sign in to Bungie.net by adding the grant code to our original URL.
  7. Grab our Bungie.net authentication cookies.

Here is a flow chart detailing these steps:

Future War Cult colours - representing!

Bungie.net Sign-in flow chart

Request 1 is done in this way, to accommodate both Playstation and Xbox accounts to log in – however as I only have a Playstation 4, I’m not working on the Xbox live sign in, you can find code for that in the BungieNetPlatform guide here.

request1 = requests.get(BUNGIE_SIGNIN_URI, allow_redirects=True)
jsessionid0 = request1.history[1].cookies["JSESSIONID"]
params = urlparse(request1.url).query
params64 = b64encode(params)

Request 2 sends a POST request to the PSN sign in page. Our log in credentials are passed in a dictionary format, these are then form-encoded (by the Requests package as a HTML form) when the request is made. We also create a cookie with the JESSIONID we received from Request 1.

The response from Request 2, returns an updated JSESSIONID, also stored in a cookie – we save this updated value. The if statement checks for an authentication error being returned – this confirms our log in credentials were correct and no errors were returned.

request2 = requests.post(PSN_OAUTH_URI, data={"j_username": username, "j_password": password, "params": params64}, cookies={"JSESSIONID": jsessionid0}, allow_redirects=False)
if "authentication_error" in request2.headers["location"]:
    logger.warning("Invalid credentials")
jsessionid1 = request2.cookies["JSESSIONID"]

Request 3 sends a GET request to the returned PSN OAtuh sign in URL, adding the updated JSESSION ID, to the header. This will give us our x-np-grant-code.

request3 = requests.get(request2.headers["location"], allow_redirects=False, cookies={"JSESSIONID": jsessionid1})
grant_code = request3.headers["x-np-grant-code"]

The PSN OAtuh sign in URL will look something like this:

https://auth.api.sonyentertainmentnetwork.com/2.0/oauth/authorize?response_type=code&client_id=78xxx&redirect_uri=https%3a%2f%2fwww.bungie.net%2fen%2fUser%2fSignIn%2fPsnid&scope=psn:s2s&request_locale=en

Request 4 makes the final request to the Bungie.net sign in page, attaching the x-np-grant-code to the URL. The “params” function in the requests library attaches this code to the URL.

request4 = requests.get(BUNGIE_SIGNIN_URI, params={"code": grant_code})

The Bungie.net sign in URL with the x-np-grant-code attached should look something like this:

https://www.bungie.net/en/User/SignIn/Psnid?code=Nxxxh

Now that we have authorised our Bungie.net account with PSN, we can create a persistent session and send multiple requests.

Creating a persistent HTTP Session:

A persistent HTTP session is used to keep our HTTP connection alive allowing us to make multiple requests without the need to sign in and authenticate each time. This means we will only need to authorise our account once and can make multiple requests – so long as we attach the relevant authorisation data. This authorisation data is stored in the cookies and header data we send in our requests. The python requests package has a “Session” object, used for just this thing!

To create a HTTP session, we need to do 2 things:

  1. Send the required HTTP header data:
    • X-API-Key – the Application Programming Interface key we got from registering at Bungie.net.
    • x-csrf – our Cross Site Request Forgery protection token, received from Bungie.net after we have authenticated out app with PSN.
  2. Attach the required cookies with the correct, authenticated data:
    • bungled – received from Bungie.net after we have authenticated out app with PSN (This is also our x-csrf token).
    • bungleatk – received from Bungie.net after we have authenticated out app with PSN.
    • bungledid – received from Bungie.net after we have authenticated out app with PSN.

Here’s what that looks like when translated into Python code – first we create a requests Session object:

session = requests.Session()

Next, we add our X-API-KEY and x-csrf token to the session header:

session.headers["X-API-Key"] = API_KEY
session.headers["x-csrf"] = request4.cookies["bungled"]

Then we create our Cookies and attach them to the requests session object:

session.cookies.update(
 {
    "bungleatk": request4.cookies["bungleatk"], 
    "bungled": request4.cookies["bungled"], 
    "bungledid": request4.cookies["bungledid"]
 })

That’s it! We’re done – our app can now log into Destiny via PSN. This will allow us to use all of the private endpoints provided by the API and do lots of cool stuff, such as transferring items, equipping items, locking items, etc.
I’ll build on this code again in my next blog post.

Running the code:

Here is the full set of Python code, this can be copied into a file called “PSN_login.py”, in the same directory as your own code, and implemented like so:

from PSN_login import login

username = emailaddr
password = mypassword
api_key = API_KEY

# Log in via PSN and create our persistant HTTP session: 
session = requests.Session()
session = login(username, password, api_key)

Here’s the link to the code on my GitHub account:

https://github.com/AllynH/Destiny_Equip_Item/blob/master/PSN_login.py

Here’s the GitHub Gist:

Creating a Python app for Destiny – Part 2: Emailing Xurs inventory.

Introduction:

In the previous tutorial, I showed how you could use Python to send a request using the Destiny API, to the Bungie servers and how to decrypt the JSON reply. If you haven’t read the previous tutorial, it’s right here. I’m going to gloss over how to write the HTML, as there are plenty of really good online resources for creating and styling websites, checkout codecademy if you’re interested in a free guide.

In this tutorial I will continue on with the program we have created, to:

  1. Change our Get_Xur_inventory.py program so it writes the output as a HTML file.
  2. Have the program send this HTML, via Gmail, directly to our  email.

By writing our output as HTML we have a lot more control over the design and formatting of the email. Using HTML will also allow us to directly embed the item pictures into out email, from the URL links provided in the JSON response from Xur.

The hard part of the code is already done, with a few minor tweaks, we can have our program output Xurs inventory into a HTML formatted email.


Outputting Xurs inventory as HTML:

In order to create our output HTML, we are going to use a template HTML file to store as much of the generic HTML as possible, and change all of the print statements in our code to output HTML formatted data.

HTML file structure is split into 3 main parts, such as HTML version information, <head>, and <body> tags. We are going to take advantage of that and save the HTML version information and <head> section in a template HTML file, which we can reuse every time we run the script. This would allow us to update any of the generic HTML code separately – for example if you wanted to change some styling or CSS information, without messing with your Python code

We can then use our script to generate only the HTML needed to display the items from Xurs inventory, this will change every week so needs to be generated every time we run our script.

Opening our template HTML file:

The following code will open a file called “template.html” for reading, and save all of the contents into a string object called “my_html”, then close the file.

template_file = open('template.html', "r")
my_html = template_file.read() template_file.close()

Outputting HTML from our Python code:

Below is an example of how we’d like to format the HTML code, essentially we wrap it in a couple of <div>’s and display the image and text.

<div class="col-md-4">
 <div class="thumbnail">
 <a href="item_url">
 <img src="item_url">
 </a>
 <h3>Item name: item_name</h3>
 <p>Item type is: item_type<p>
 <p>Description: item_description<p>
 </div>
</div>

Here’s what the corresponding Python code looks like:

my_html = my_html + "<div class=\"col-md-4\">\n"
my_html = my_html + "\t<div class=\"thumbnail\">\n"
my_html = my_html + "\t\t<a href=\"" + item_url + "\">\n"
my_html = my_html + "\t\t<img src=\"" + item_url + "\">\n"
my_html = my_html + "\t\t</a>\n"
my_html = my_html + "\t\t<h3>" + item_name + "</h3>\n"
my_html = my_html + "\t\t<p>" + item_type + "<p>\n"
my_html = my_html + "\t\t<p>" + item_description + "<p>\n"
my_html = my_html + "\t</div>\n"
my_html = my_html + "</div>\n"

We’ve wrapped each of the lines of HTML code in a write statement. We’ve already populated all of the item_url, item_name, item_type and item_description variables with our code.

So here’s what each line is doing. In this example we are creating a <h3> heading, with the text from our “item_name”. “\t” creates a tab and “\n” moves to a new line. All of this text is concatenated into one string, which we add on to the end of the “my_html” string object.

my_html = my_html + "\t\t<h3>" + item_name + "</h3>\n"

Closing the HTML:

Now that we have created and populated <div>’s with each of Xurs items, we can add the code to close the HTML </body> and </html> tags.

my_html = my_html + "\t\t</div> <!-- row -->\n"
my_html = my_html + "\t</div> <!-- container -->\n"
my_html = my_html + "</div> <!-- inventory-container -->\n"
my_html = my_html + "</body>\n"
my_html = my_html + "</html>\n"

The “my_html” string will store all of the HTML code used in the body of the email we send.

Sending an email with Python:

Python comes installed with a number of really useful libraries, including the smtplib (Simple Mail Transfer Protocol library) and the MIMEMultipart and MIMEText (Multipurpose Internet Mail Extensions, allows text, images and other options) libraries.

For this section I referenced two tutorials, here Nael Shaib shows how to make a basic email program, and here Darren Massena shows how to create a HTML formatted email and attach external pictures.

Some important notes:

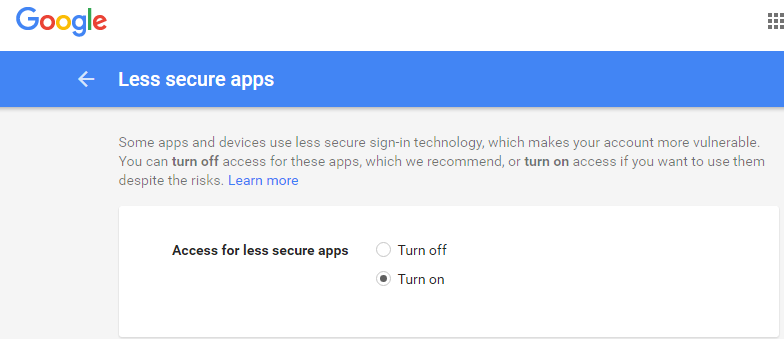
Google recently changed their security requirements, so to use this program, you will need to change your Google settings to allow less secure apps. I needed to do the following:

  1. Click here to allow less secure apps. Google will still reject access to your account, until you authorise it.
  2. Click here to authorise your app. This will authorise your app access to your Google account.
  3. Gmail and some other mail clients do not support CSS styling, so if you wanted to convert some existing CSS to inline HTML, you could use a tool like this. That being said, my iPad and Android phone both display mails with full CSS – so I’ve included some CSS styling in my code 🙂
Enable access for less secure apps.

Enable access for less secure apps.

Alright, that’s enough talk – lets get to coding!

Importing the required libraries:

First lets import the required libraries:

import smtplib
from email.MIMEMultipart import MIMEMultipart
from email.MIMEText import MIMEText

Next we’ll set up our email address parameters, enter your details as follows.

# Mail parameters:
fromaddr = "TO_ADDRESS"
toaddr = "FROM_ADDRESS"
password = "GMAIL_PASSWORD"

Next, lets create the email header information:

# Compose mail: 
msgRoot = MIMEMultipart() 
msgRoot['From'] = fromaddr 
msgRoot['To'] = toaddr 
msgRoot['Subject'] = "Xurs Inventory." 
msgRoot.preamble = "This is a multipart message in MIME format." 

The line:

msgRoot = MIMEMultipart()

creates an email MIMEMultipart object, we then set the [‘To’], [‘From’] and [‘Subject’] parameters of the email on the following 3 lines.

Creating the email body:

We’ve already populated the HTML into a string object called “my_html”.

The “my_html” string object is added to the body of the email with the following commands, the 2nd parameter  passed to the MIMEText object sets the email type as HTML:

msgText = MIMEText(my_html, 'html')
msgAlternative.attach(msgText)

The following commands create an SMTP mail object, connect to the Gmail SMTP server on port 587.

server = smtplib.SMTP('smtp.gmail.com', 587)
server.ehlo()
server.starttls()

The next line actually logs into our Gmail account, we pass our Gmail address and password as parameters to this.

server.login(fromaddr, password)

The next 2 lines actually send the email,

server.sendmail(fromaddr, toaddr, msgRoot.as_string())
server.quit()

Running the code:

Here is the full set of Python code, this can be copied into a file called “Get_Xur_inventory_email.py” and executed from the command prompt like so:

> python Get_Xur_inventory_email.py

The code can also be found on my GitHub page here: https://github.com/AllynH/Destiny_Get_Xur_inventory_email

As always, I’ll try to keep the GitHub repo up to date with any changes I make.

Creating a Python App for the Destiny API

Introduction:

I’m a huge fan of Bungie’s Destiny game, and have been playing it since launch. In Destiny there is a vendor, called Xur, who visits the game each week and sells exotic weapons and armour. Xur is only available from Friday to Sunday mornings, and appears in a different location each week – because of this he can be quite hard to track down. As with most people – I’m at work every Friday and usually busy with family time over the weekend, so I’m often left in a situation where I miss Xur or don’t have the time to log in and see what he’s selling.

This just wasn’t good enough, I couldn’t risk missing out on the next Gjallarhorn! So let’s built an app to find Xurs inventory each week.


API registration:

In order to build an app using the Bungie API, you need to create a Bungie.net account, and register as a developer. This only takes a few minutes, to register as a developer, follow this link: https://www.bungie.net/en/User/API

This will give you your unique X-API-Key. For every request we make to the Bungie servers, we need to send this API key in the HTTP header of the request.


App flow chart:

Finding Xurs inventory isn’t as straight-forward as expected. Bungie have implemented a method for reading Xurs inventory – but it returns the data in an encrypted format, as an item hash.

The reason behind this is, even items of the same type can have different perks. For example, each gun can have a different scope type, different perks, and different barrel modifications. So even 2 of the same guns can be completely different.

Because of this, we’ll need to send multiple requests to the Bungie servers and read multiple replies.

FWC representing!

Flow chart for the app.


Python HTTP requests:

Requests is a Python HTTP library, if you’re not familiar with it, start here. You may need to install it on your computer, If you have PIP installed on your computer requests can be installed by typing:

pip install requests


Sending our request to Xurs advisors page:

Our first HTTP request will be to Xurs Advisors page, here is the link https://www.bungie.net/Platform/Destiny/Advisors/Xur/

The X-API-Key is passed as a parameter with every HTTP request made to the Bungie servers:

HEADERS = {"X-API-Key":'MY-X-API-Key'}


Here is how we make the request:

xur_url = "https://www.bungie.net/Platform/Destiny/Advisors/Xur/"
print "\n\n\nConnecting to Bungie: " + xur_url + "\n"
print "Fetching data for: Xur's Inventory!"
res = requests.get(xur_url, headers=HEADERS)

It’s as simple as that.

So what are we doing? The line:

res = requests.get(xur_url, headers=HEADERS)

Makes a HTTP request to the URL stored in the “xur_url” string, the X-API-Key is also added to the request in the “headers” dictionary object.

Now the object “res” contains the JSON response received from the Bungie servers.


Parsing the JSON response:

The JSON response received from the request is pretty big, in my case it contained 1018 lines of text! So what do we do with this data? First things first, we need to know if our request was received and processed correctly. The JSON object contains a key called “ErrorStatus”, this key is used to store status of the request, so lets print the value of this key:

error_stat = res.json()['ErrorStatus']
print "Error status: " + error_stat + "\n"

Here is what the  code outputs:

Successful connection - whoop whoop!

Successful connection.

Here is an example of what the code would output if there was a successful request but Xur was not available (he’s only available from Friday to Sunday):

Office hours are Friday to Sunday morning!

Connection is successful but Xur is nowhere to be found.


Parsing the multidimensional JSON response:

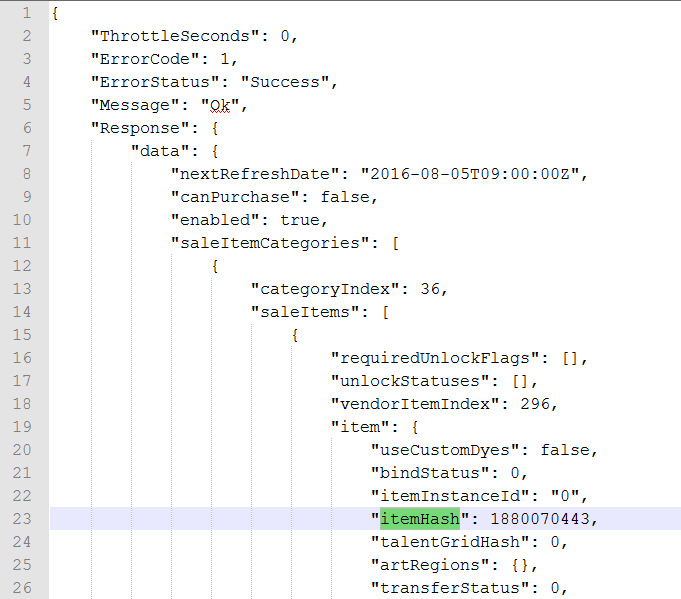
Looking through the “res” JSON object, we can see a key called “itemHash”, located in res[‘Response’][‘data’][‘saleItemCategories’][‘saleItem’][‘item’][‘itemHash’], shown on line 23. This is the location of the encoded item details we are looking for!

Here is where things get tricky… JSON data is used to represent key-value pairs, called dictionaries in Python. However the item “saleItemCategories”, shown on line 11 – itself contains a series of key-value pairs. Also the item “saleItems”, shown on line 14, is also a dictionary.

Our JSON object contains nested dictionaries, also known as a multidimensional array.

Lots and lots of data!

Decoding the JSON response for Xurs inventory.


So in order to make a list of each of the “itemHash” values, we need a for loop to iterate through each of the “saleItemCategories” and another for loop to iterate through each of the “saleItems”.

for saleItem in res.json()['Response']['data']['saleItemCategories']:
	mysaleItems = saleItem['saleItems']
	for myItem in mysaleItems:
		hashID = str(myItem['item']['itemHash'])


Request 2 – decoding the item hash:

Now that we have a list of our itemHash’s – we need to make send a request to the Bungie Destiny Manifest page for each of the hashes.

This request takes the form of: http://www.bungie.net/Platform/Destiny/Manifest/{type}/{id}/

Where the {id} is the itemHash we just took from Xurs inventory.

A list of the hash {type}’s can be found here: http://bungienetplatform.wikia.com/wiki/DestinyDefinitionType but for this example, we know {type} will be “6”, as we are searching for an “InventoryItem”.

We can add on another request to our nested loops above:

base_url = "https://www.bungie.net/platform/Destiny/"
for saleItem in res.json()['Response']['data']['saleItemCategories']:
	mysaleItems = saleItem['saleItems']
	for myItem in mysaleItems:
		hashID = str(myItem['item']['itemHash'])
		hashReqString = base_url + "Manifest/" + hashType + "/" + hashID
		res = requests.get(hashReqString, headers=HEADERS)
		item_name = res.json()['Response']['data']['inventoryItem']['itemName']
		item_type = res.json()['Response']['data']['inventoryItem']['itemTypeName']
		item_tier = res.json()['Response']['data']['inventoryItem']['tierTypeName']
		print "Item is: " + item_name
		print "Item type is: " + item_tier + " " + item_type + "\n"

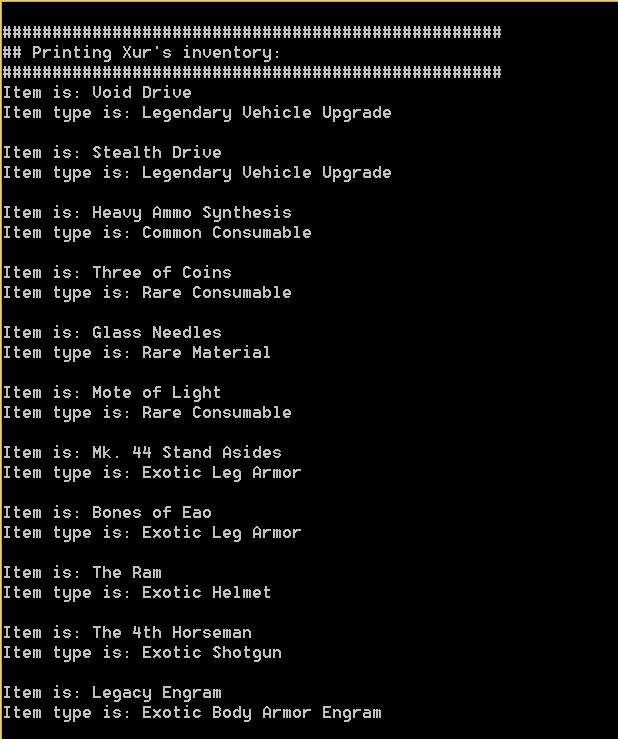
Here is what the output of our code looks like:

Here's what Xur is selling today.

Here’s what Xur is selling today.

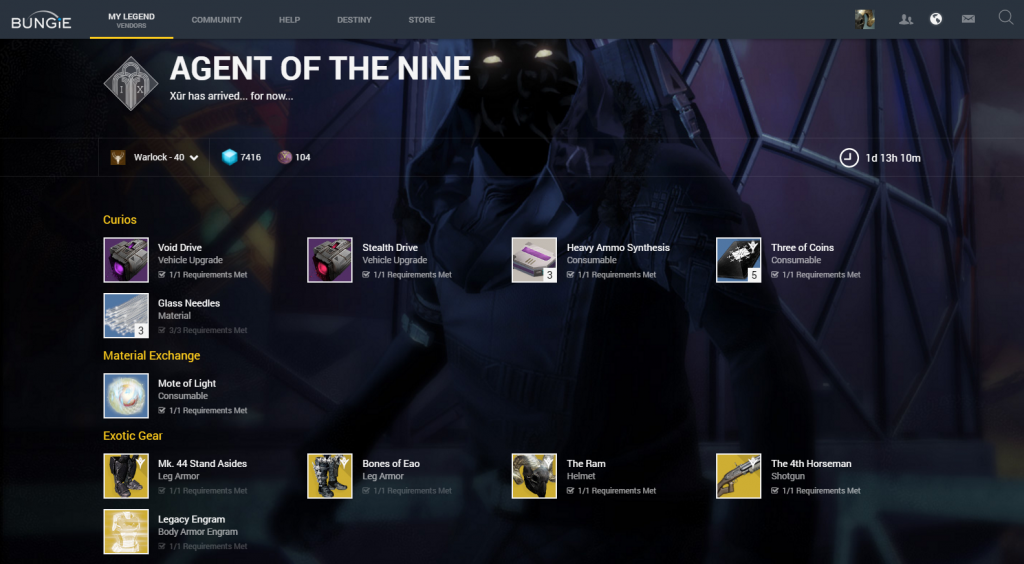
And when we checkout Xurs inventory on the Bungie.net vendors page, here’s what we see:

Xurs inventory, taken from the Bungie.net vendors page.

Xurs inventory, taken from the Bungie.net vendors page.

Yes! Our Python app can now send requests to Bungie and print the contents of Xurs inventory. (Also, if you haven’t got The Ram – get it)

There’s lots of cool stuff sent in the JSON objects, including hyperlinks to the item images and details on the price of each item. For now, this is good enough for me.

Running the code:

Here is our full set code,  we can copy this into a file called “Get_Xur_inventory.py” and execute it from the command prompt like so:

> python Get_Xur_inventory.py

The code can also be found on my GitHub page here: https://github.com/AllynH/Destiny_Get_Xur_inventory

I’ll keep the repo up to date with any improvements or changes.

from lxml import html
import requests
import json

# Uncomment this line to print JSON output to a file:
#f = open('output.txt', 'w')

HEADERS = {"X-API-Key":'YOUR-X-API-Key'}

base_url = "https://www.bungie.net/platform/Destiny/"
xur_url = "https://www.bungie.net/Platform/Destiny/Advisors/Xur/"
hashType = "6"

# Send the request and store the result in res:
print "\n\n\nConnecting to Bungie: " + xur_url + "\n"
print "Fetching data for: Xur's Inventory!"
res = requests.get(xur_url, headers=HEADERS)

# Print the error status:
error_stat = res.json()['ErrorStatus']
print "Error status: " + error_stat + "\n"

# Uncomment this line to print JSON output to a file:
#f.write(json.dumps(res.json(), indent=4))

print "##################################################"
print "## Printing Xur's inventory:"
print "##################################################"

for saleItem in res.json()['Response']['data']['saleItemCategories']:
	mysaleItems = saleItem['saleItems']
	for myItem in mysaleItems:
		hashID = str(myItem['item']['itemHash'])
		hashReqString = base_url + "Manifest/" + hashType + "/" + hashID
		res = requests.get(hashReqString, headers=HEADERS)
		item_name = res.json()['Response']['data']['inventoryItem']['itemName']
		print "Item is: " + item_name
		item_type = res.json()['Response']['data']['inventoryItem']['itemTypeName']
		item_tier = res.json()['Response']['data']['inventoryItem']['tierTypeName']
		print "Item type is: " + item_tier + " " + item_type + "\n"


Here are a few ideas for the next steps:

  1. Add e-mail function, so the script mails me automatically when Xur lands.
  2. Create a web server, so we can access the app from a web page.
  3. Find Xurs location and add it to the output.
  4. Play some Trials of Osiris and get ready for the Rise Of Iron expansion

I’m hoping to expand on this program and add features as I go, leave me a comment and let me know if there’s anything you’d like to see, or if you fancy carrying me to the Lighthouse!


Newer posts »

© 2024 Allyn H

Theme by Anders NorenUp ↑