Introduction:
Flask is great for quickly building server side application.
React is great for quickly building responsive user interfaces.
This post is part 2 of a 3 part series. I’m going to walk through setting up a Flask API project, adding a React frontend to the project and then adding some data visualization to the React frontend.
Here are the other sections:
- Adding an API to your Flask project.
- Adding a React frontend to your Flask project
- Adding data visualization to your Flask app with React Victory charts.
We’ll look at this from the perspective of a project that’s already in flight. As most people who are familiar with Flask, are already familiar with Miguel Grinbergs microblog application, I’ve cloned his project repository we will add a React frontend into it.
Flask and React work really well together:
With Flask we can:
- Run server side scripts and applications.
- Deliver generic HTML sections such as headers / footers / nav bar.
- Deliver raw JSON data via API endpoints.
- Make database connections and requests.
- Data processing / computation and packing data.
With React we can:
- React can build responsive, stateful components.
- Any component that needs memory, (remembering viewport height / width for example).
- Show / hide / update a div, or HTML section.
- Build a responsive user interface.
- Anything that changes or updates with user input
- Handle onClick functions.
- Extensive compatible library selection, such as drag and drop tools.
Why do we need JS?
Our goal is to create a modular application, with a seamless (as possible), user interface and user experience.
Normally with a Flask only application; if a user clicks on a link or refreshes some data – the entire HTML page is dumped, then all of the required data structures are regenerated on the server side, a HTML template is populated and reloaded in the users browser – this can take a long time from the users perspective.
In an ideal application – if a section of your app needed to be updated, your server would, asynchronously, resend the required data, then your application frontend would handle rerendering only the updated section.
Only the required <div> or HTML section would be updated – the rest of your webpage would remain unchanged. The user doesn’t see all of this magic happening in the background.
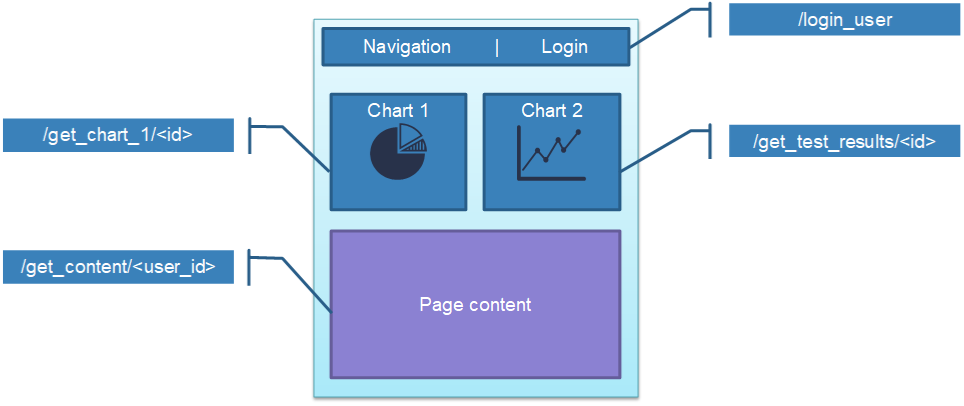
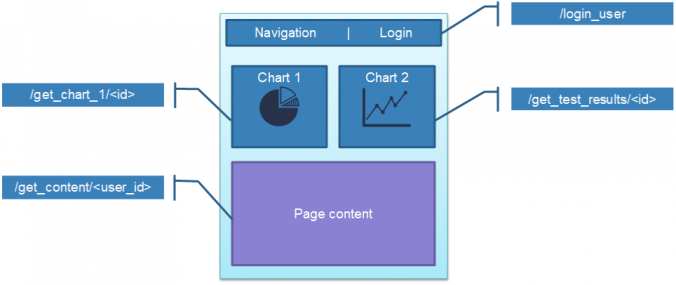
For example: if a user requested updated data for Chart 2 in the diagram above; we don’t want to regenerate the Navigation, Chart 1, and Page Content sections. We only want to update Chart 2, and have the data fetched in the background – so the user experience feels nice and smooth.
This is common practice in most client side applications but can become a bit tricky when you have a server side application.
Also if you’re like me and don’t have a background in Computer Science, you may not be aware that there is some additional optimization to be had in your applications.
Project structure:
Let’s build this from the Flask large application structure.
Here is the typical project structure for a Flask application.
Flask large application directory structure:
|   config.py
|   microblog.py
|
+---app
    |   cli.py
    |   models.py
    |   __init__.py
    |
    +---api_1_0
    |       routes.py
    |       __init__.py
    |
    +---main
    |       forms.py
    |       routes.py
    |       __init__.py
    |
    +---static
    |       loading.gif
    |
    +---templates
        |   base.html
        |   index.html
        |   user.html
        |
        \---errors
             404.html
             500.html
We’re going to add the React setup into the app/static folder.
Webpack and Babel:
While technically not required – these 2 tools make building a modern JavaScript frontend much easier.
We will, however, require Babel if we want to use React JSX (a syntax extension to JS, it looks like a mix of HTML and JavaScript). JSX simplifies much of the React development, so we want to use it.
Babel:
- What is Babel?
- Bable is a toolchain used to convert the latest versions of JavaScript code into backwards compatible code that all modern web browsers can understand.
- Why do I need to use Babel?
- Babel is required if you want to write React JSX (which we do).

(Picture https://babeljs.io/ )
Webpack:
- What is Webpack?
- Webpack is an open source JavaScript module bundler.
- It can also bundle HTML, CSS and images.
- When used with the Babel loader Webpack and Babel will transpile your code.
- Why do I need Webpack?
- React components are usually split across multiple files – we want Webpack to bundle all of our JS files into 1, minimized, file.
Picture (https://webpack.js.org/ )
Frontend directory structure:
app/static:
│   package-lock.json
│   package.json
│   webpack.config.js
│
├───css
│       style.css
│
├───dist
│       bundle.js
│
└───scripts
        index.js
        Finance.js
        HelloWorld.js
Installing Webpack and Babel:
We’ll use Node Package Manager to initialise our project and install Webpack and Babel.
Initialise your project:
npm init
This will create your package.json file. You’ll be asked to input basic information, such as author name, project name, description, project repository URL.
If you already have a package.json file – npm init will install any dependencies in that file – similar to how running python -m pip install -r requirements.txt would work in a Python application.
Install Webpack and Webpack CLI:
npm i webpack --save-dev
npm i webpack-cli --save-dev
Install Babel:
We will want to install 4 things here:
- babel core: The Babel core transpiler.
- babel-loader: The Webpack loader for Babel.
- @babel presets-env: This transpiles newer JS code into browser compatible JS (ECMA Script 5).
- @bable presets-react: This transpiles our React code into browser compatible JS.
npm i @babel/core --save-dev
npm i babel-loader --save-dev
npm i @babel/preset-env--save-dev
npm i @babel/preset-react --save-dev
Creating the config files:
To use Webpack and Babel, we need to create 2 config files:
- package.json
- webpack.config.js
Create package.json:
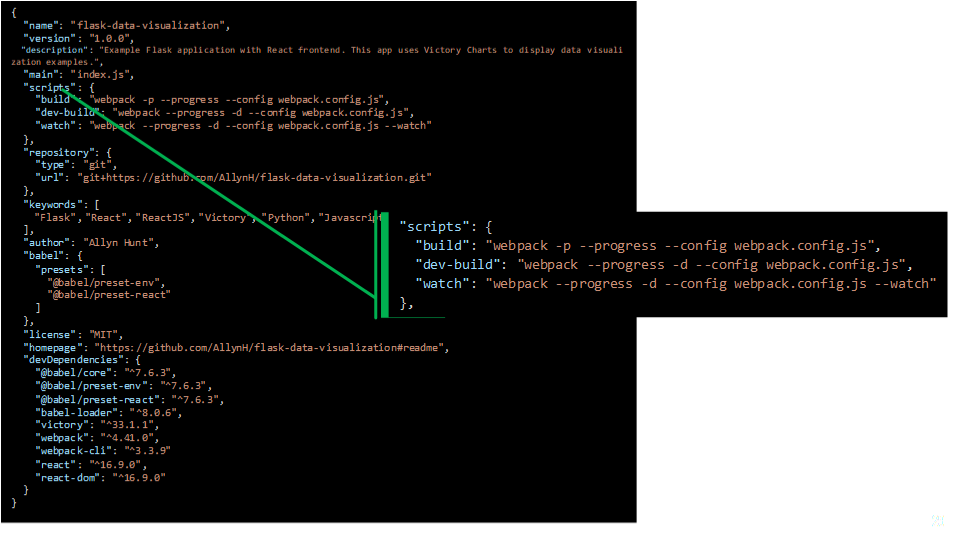
When running npm init, we created a package.json file. In this file we are going to tell Webpack how to run our frontend server.
We will do that by adding the following scripts section, which tells NPM how to run the app:
"scripts": {
  "build": "webpack -p --progress --config webpack.config.js",
  "dev-build": "webpack --progress -d --config webpack.config.js",
  "watch": "webpack --progress -d --config webpack.config.js --watch"
},
Top tip:
webpack --help
Will print the Webpack help information, where you can read in detail about the above commands.
Create webpack.config.js:
Our webpack.config.js file is going to provide Webpack with information on how our project is structured. Let’s look at the main sections:
- “entry“: This is the index.js file, that links all of our React code to the HTML frontent. We instantiate our React components here and attach them to the DOM.
- “output“: This is the bundle.js file, Webpack and Babel will output. This is our transpiled code that we actually include in our HTML file.
- “resolve“: We want Webpack and Babel to resolve all .js, .jsx files. (.jsx files are sometimes used when a developer wants to specifically show that these files are React specific – .js workes just fine for us).
- “module“: We want to use the babel-loader, and exclude any packages in ./node_modules (where all of our installed packages are located).
app/static/webpack.config.js
See highlighted sections below:
const webpack = require('webpack');
const config = {
    entry:  __dirname + '/scripts/index.js',
    output: {
        path: __dirname + '/dist',
        filename: 'bundle.js',
    },
    resolve: {
        extensions: ['.js', '.jsx', '.css']
    },

    module: {
        rules: [
            {
            test: /\.(js|jsx)?/,
                exclude: /node_modules/,
                use: 'babel-loader'
            }
        ]
    }
};
module.exports = config;
More information:
Here are links to the files I used in my application:
Here is some useful documentation:
Note: In the extensions section of the webpack.config.js – we can add other file extensions, such as CSS or images – as long as we have the relevant Webpack loaders installed.
React:
Installing React:
Now that we have a project setup with Weback and Babel – we need to install React. We can use NPM to install React and React DOM.
npm i react react-dom [--save-dev]
- react: This is the actual React library package – used to define and create your React components.
- react-dom: This mounts your React component into a HTML DOM object (usually a blank <div>).
- DOM refers to the Document Object Model.
- Used to identify and access DOM elements.
- Updates HTML elements with with React.DOM.render()
Note: We’ve installed both packages with 1 command. You don’t necessarily need to add –save-dev as these are required package and you’ll probable use React for other projects.
Creating our React Components:
Let’s start with the usual “Hello, World!” Example.
React “Hello, World!”:
For every React component we create, we need to do 2 things:
- Write the React JS code for that component.
- Create an instance of that component, in the index.js entry file (from our webpack.config.js).
Creating the HelloWorld.js component:
app/static/scripts/HelloWorld.js
import React from 'react';

class HelloWorld extends React.Component {
    render() {
        return (
            <h1>Hello, World!</h1>
        );
    }}
export default HelloWorld;
What is this code doing?:
- importing the React module.
- Creating (extending) a HelloWorld Class, from the React.Component class type.
- Rendering a <h1> element with the text “Hello, World!”
- When creating a React component – the render() function is the only function we are required to use.
- Exporting the HelloWorld function, so it can be imported by our index.js file.
When creating the component, we populated the render() function, React components have several built in methods and these are defined in the React component lifecycle.
Attaching the HelloWorld component to the DOM:
Now that our component is created – we need some way of creating an instance of that component and attaching it to a DOM element of our application.
app/static/scripts/index.js
import React from "react";
import ReactDOM from "react-dom";
import HelloWorld from "./HelloWorld";

ReactDOM.render(<HelloWorld />, document.getElementById("react-root"));
Running our code:
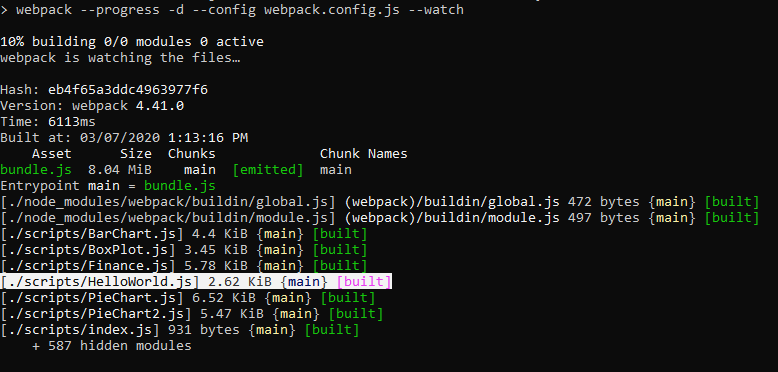
Now, when we run “npm run build” or “npm run watch”, NPM will run Webpack and Babel, transpile our index.js and HelloWorld.js file and output a ./dist/bundle.js file.
Adding React to our Flask application:
Now that we have the HelloWorld example completed, we want to hook that into our Flask application. In order to call our JS code, we need to update our Flask HTML templates with a <script> tag, pointing to our bundled JS code. There are 2 places we can do this:
- base.html: If we want every Flask HTML endpoint to use this code (recommended).
- Add to the footer of a specific template: If you don’t want every endpoint to call your React code.
- You may want to do this if you already have Flask templates (that extend base.html) populating nav bars, footers and other generic HTML code.
app/templates/base.html:
{% block app_content %}

<div id="react-root"></div>

<script src="{{ url_for('static', filename='dist/bundle.js') }}"></script>
{% endblock %}
What is this code doing?:
- {% block app_content %} creates a Jinja2 template, which is used by Flask to populate the HTML templates.
- Creating an empty <div> element with and ID attribute of “react-root”.
- This matches the ID element our React.DOM.render() function is looking for.
- Adding the script tag with a link to our bundle.js file.
Viewing our React app in the browser:

Note: All the other Flask rendered elements, from the microblog application, are there, for example the nav bar and search bar. However, now we also have rendered our first React component.
There’s not much here yet – but it’s a start!
React API:
Now that we can render React components – we want to be able to populate these components, with data from our Flask API.
First, let’s look at the React documentation for the recommended methodology for adding API requests into React components.
Our API component:
class Finance extends React.Component {
  constructor(props) {
    super(props);
    this.state = {
    error: null,
    isLoaded: false,
    items: []
    };
  }
  componentDidMount() {
    fetch("/api_1_0/finance/1/2018")
    .then(res => res.json())
    .then(
      (result) => {
      this.setState({
        isLoaded: true,
        items: result.items
      });
      },
      (error) => {
      this.setState({
        isLoaded: true,
        error
      });
      }
    )
  }
  render() {
    const { error, isLoaded, items } = this.state
    if (error) {
    return <div>Error: {error.message}</div>;
    } else if (!isLoaded) {
    return <div>Loading...</div>;
    } else {
    return (     );
    }
  }
}
What is this code doing?:
- We’ve added a constructor():
- This stores the component state.
- Stores error and isLoaded status – used in the render() function.
- Added the componentDidMount() built-in function:
- This is a React component built in function – using this function allows us to populate the component state with the output of from the API.
- Update the fetch() URL with the required API endpoint.
- Update component state with this.setState.
- Update isLoaded and error status – depending on the response from the API.
- Updated the render() function.
- Now handles error status from the API.
- Also has a loading section – we could add a loading animation here for example.
Note: The below code is an example of JavaScript “destructuring“.
const { error, isLoaded, items } = this.state
The state variable is a JS Object type, with the keys “error”, “isLoaded” and “items”.
We are populating const variables from the values of each of these keys in the components state.
Storing our API data in the Components state:
Now that we can make an API call – we need some way of storing this in our React component.
Storing the API response:
After making the API request – we store the response in the components state:
  componentDidMount() {
    fetch("/api_1_0/finance/1/2018")
:
      (result) => {
      this.setState({
        isLoaded: true,
        items: result.items
      });
      },
:
:
  }
We can store the state here, immediately, as we are using the React componentDidMount() function to make the API call.
Note: componentDidMount() is a React built-in function, which is allows us to set the component state value.
Retrieving the data from state:
Now that we have the API data stored in the component state – we can retrieve it like so:
make_chart_data(items) {

    let my_data_list = [];

    my_data_list.push(items.q1_earnings)
    my_data_list.push(items.q2_earnings)
    my_data_list.push(items.q3_earnings)
    my_data_list.push(items.q4_earnings)

    return my_data_list;
}
We can create an array, my_data_list, and populate it with the quarterly earnings.
Calling the make_chart_data function:
Inside the render function, we can call the make_chart_data() function. Obviously – we only want to call this function if there are no errors and the application has finished loading – so we put the function call in the “else” condition, as below:
render() {
	const { error, isLoaded, items } = this.state;
if (error) {
	return <div>Error loading data.</div>;
} else if (!isLoaded) {
	return <div>Loading...</div>;
} else {
	// Populate chart data:
	const finance_data = this.make_chart_data(items);
	const finance_axis = ["Q1", "Q2", "Q3", "Q4"];
:
	return (
:
:
      )
}
Debugging your application:
Some (maybe) obvious tips for debugging your application.
Based on issues I’ve found and conversations I’ve had with other people.
Chrome developer tips:
Viewing your API data in the Chrome developer tools may seem obvious to some people but as a lot of us are self-learning – I thought I’d show some tips:
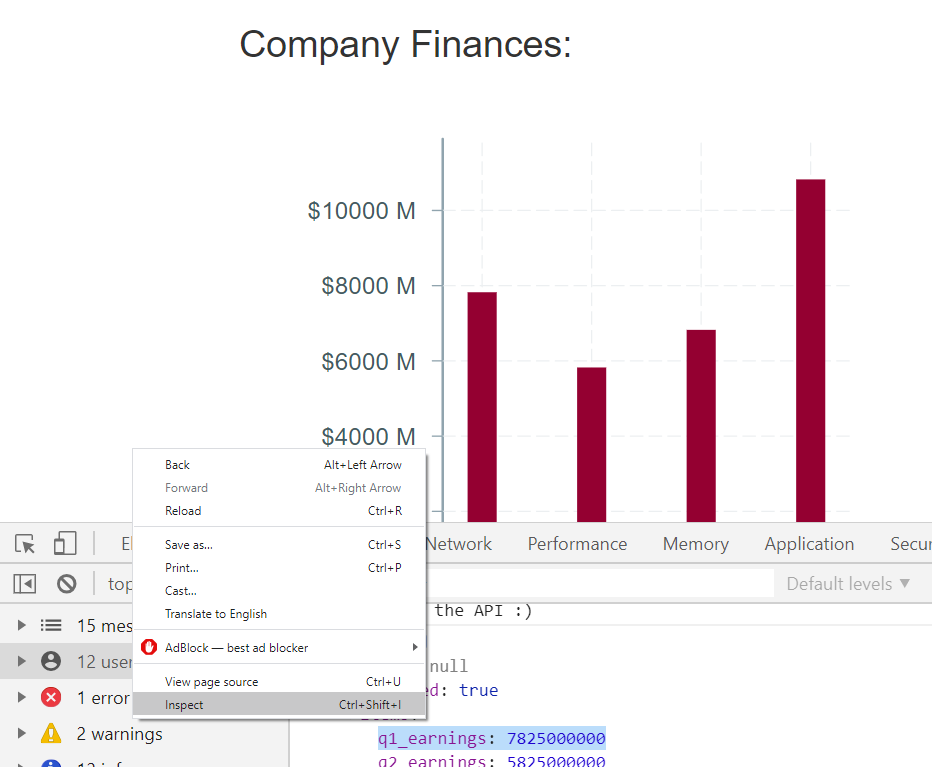
Right-click anywhere on the page, and select “inspect” to view the developer tools.
Printing the components State:
In the render() function – log the components state:
render() {
	console.log(this.state)
	const { error, isLoaded, items } = this.state;
:
}
You can view this in the developer tools Console section:
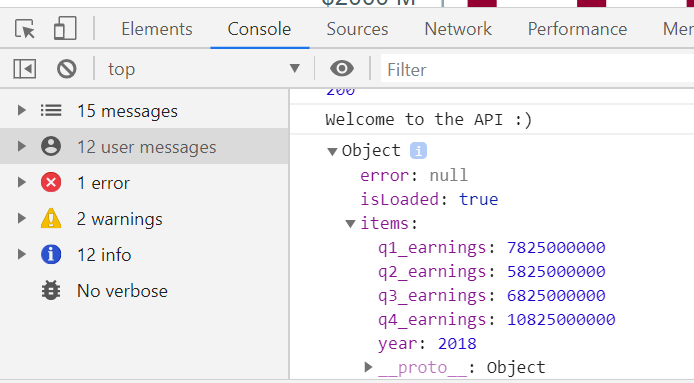
Some things to look out for:
- Has the component State been set correctly?
- error should be: null
- isLoaded should be: true
- items should contain the API response.
Some other issues that caught me out:
- Are the values and data types correct?
- Are you expecting and integer or String value?
- (in a previous iteration of code, I sent the earnings values – from the API – as Strings instead of integers).
- JavaScript only throws an error if you specifically type check.
- Are you comparing True == true?
- Python syntax versus JavaScript syntax.
- Uncaught TypeError: items.map is not a function
- You are trying using map to loop through an object, instead of an array.
- Did you mean to send an array from your API?
Conclusion:
We installed and configured Babel and Webpack for our project.
We successfully added a React frontend into a Flask application.
We can make API calls from our Flask data API to our React frontend.
Resources:
Part 3 – React Victory charts (coming soon) >
Next up, we’ll look at adding some data visualisation to our applications with the amazing React library – Victory charts
0 Comments
1 Pingback