Making things, writing code, wasting time...

Tag: Flask

Adding a React frontend to your Flask project

Introduction:

Flask is great for quickly building server side application.
React is great for quickly building responsive user interfaces.

This post is part 2 of a 3 part series. I’m going to walk through setting up a Flask API project, adding a React frontend to the project and then adding some data visualization to the React frontend.

Here are the other sections:

  1. Adding an API to your Flask project.
  2. Adding a React frontend to your Flask project
  3. Adding data visualization to your Flask app with React Victory charts.

We’ll look at this from the perspective of a project that’s already in flight. As most people who are familiar with Flask, are already familiar with Miguel Grinbergs microblog application, I’ve cloned his project repository we will add a React frontend into it.

Flask and React work really well together:

With Flask we can:

  • Run server side scripts and applications.
  • Deliver generic HTML sections such as headers / footers / nav bar.
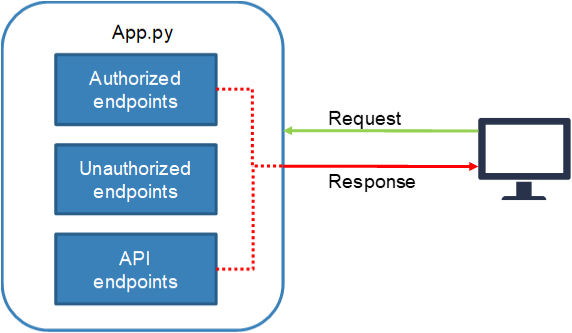
  • Deliver raw JSON data via API endpoints.
    • Make database connections and requests.
    • Data processing / computation and packing data.

With React we can:

  • React can build responsive, stateful components.
    • Any component that needs memory, (remembering viewport height / width for example).
    • Show / hide / update a div, or HTML section.
  • Build a responsive user interface.
    • Anything that changes or updates with user input
    • Handle onClick functions.
    • Extensive compatible library selection, such as drag and drop tools.

Why do we need JS?

Our goal is to create a modular application, with a seamless (as possible), user interface and user experience.

Normally with a Flask only application; if a user clicks on a link or refreshes some data – the entire HTML page is dumped, then all of the required data structures are regenerated on the server side, a HTML template is populated and reloaded in the users browser – this can take a long time from the users perspective.

In an ideal application – if a section of your app needed to be updated, your server would, asynchronously, resend the required data, then your application frontend would handle rerendering only the updated section.
Only the required <div> or HTML section would be updated – the rest of your webpage would remain unchanged. The user doesn’t see all of this magic happening in the background.

Create a modular application with JS and React

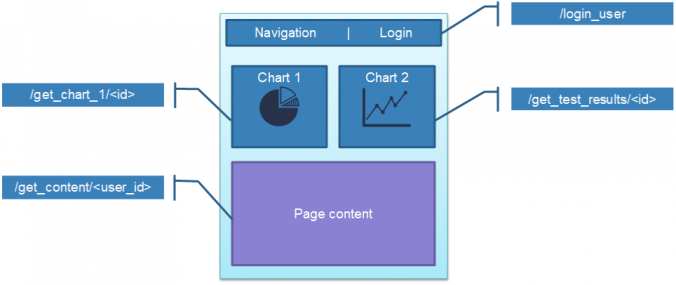
For example: if a user requested updated data for Chart 2 in the diagram above; we don’t want to regenerate the Navigation, Chart 1, and Page Content sections. We only want to update Chart 2, and have the data fetched in the background – so the user experience feels nice and smooth.

This is common practice in most client side applications but can become a bit tricky when you have a server side application.

Also if you’re like me and don’t have a background in Computer Science, you may not be aware that there is some additional optimization to be had in your applications.

Project structure:

Let’s build this from the Flask large application structure.

Here is the typical project structure for a Flask application.

Flask large application directory structure:

|   config.py
|   microblog.py
|
+---app
    |   cli.py
    |   models.py
    |   __init__.py
    |
    +---api_1_0
    |       routes.py
    |       __init__.py
    |
    +---main
    |       forms.py
    |       routes.py
    |       __init__.py
    |
    +---static
    |       loading.gif
    |
    +---templates
        |   base.html
        |   index.html
        |   user.html
        |
        \---errors
             404.html
             500.html

We’re going to add the React setup into the app/static folder.

Webpack and Babel:

While technically not required – these 2 tools make building a modern JavaScript frontend much easier.

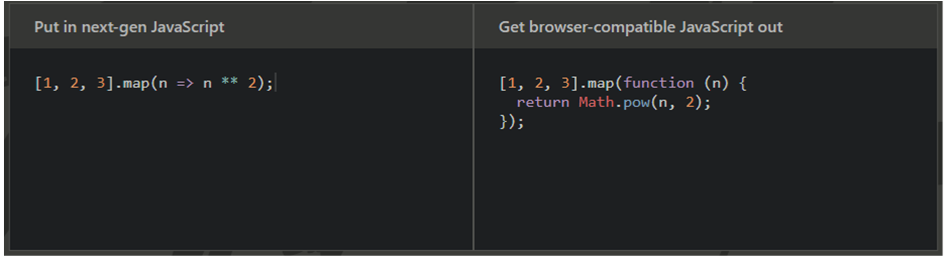
We will, however, require Babel if we want to use React JSX (a syntax extension to JS, it looks like a mix of HTML and JavaScript). JSX simplifies much of the React development, so we want to use it.

Babel:

  • What is Babel?
    • Bable is a toolchain used to convert the latest versions of JavaScript code into backwards compatible code that all modern web browsers can understand.
  • Why do I need to use Babel?
    • Babel is required if you want to write React JSX (which we do).
An example of Babel transpiling new JS to browser compatible JS.
(Picture https://babeljs.io/ )
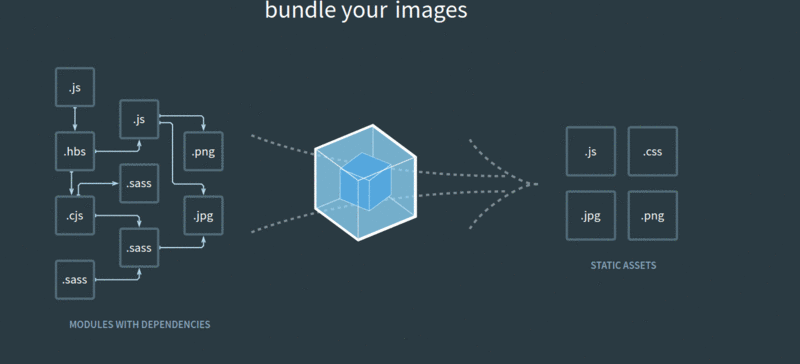
Webpack:

  • What is Webpack?
    • Webpack is an open source JavaScript module bundler.
    • It can also bundle HTML, CSS and images.
    • When used with the Babel loader Webpack and Babel will transpile your code.
  • Why do I need Webpack?
    • React components are usually split across multiple files – we want Webpack to bundle all of our JS files into 1, minimized, file.
Webpack bundles your JS, HTML, CSS and images.
Picture (https://webpack.js.org/ )

Frontend directory structure:

app/static:

│   package-lock.json
│   package.json
│   webpack.config.js
│
├───css
│       style.css
│
├───dist
│       bundle.js
│
└───scripts
        index.js
        Finance.js
        HelloWorld.js

Installing Webpack and Babel:

We’ll use Node Package Manager to initialise our project and install Webpack and Babel.

Initialise your project:

npm init

This will create your package.json file. You’ll be asked to input basic information, such as author name, project name, description, project repository URL.

If you already have a package.json file – npm init will install any dependencies in that file – similar to how running python -m pip install -r requirements.txt would work in a Python application.

Install Webpack and Webpack CLI:

npm i webpack --save-dev
npm i webpack-cli --save-dev

Install Babel:

We will want to install 4 things here:

  1. babel core: The Babel core transpiler.
  2. babel-loader: The Webpack loader for Babel.
  3. @babel presets-env: This transpiles newer JS code into browser compatible JS (ECMA Script 5).
  4. @bable presets-react: This transpiles our React code into browser compatible JS.
npm i @babel/core --save-dev
npm i babel-loader --save-dev
npm i @babel/preset-env--save-dev
npm i @babel/preset-react --save-dev

Creating the config files:

To use Webpack and Babel, we need to create 2 config files:

  1. package.json
  2. webpack.config.js

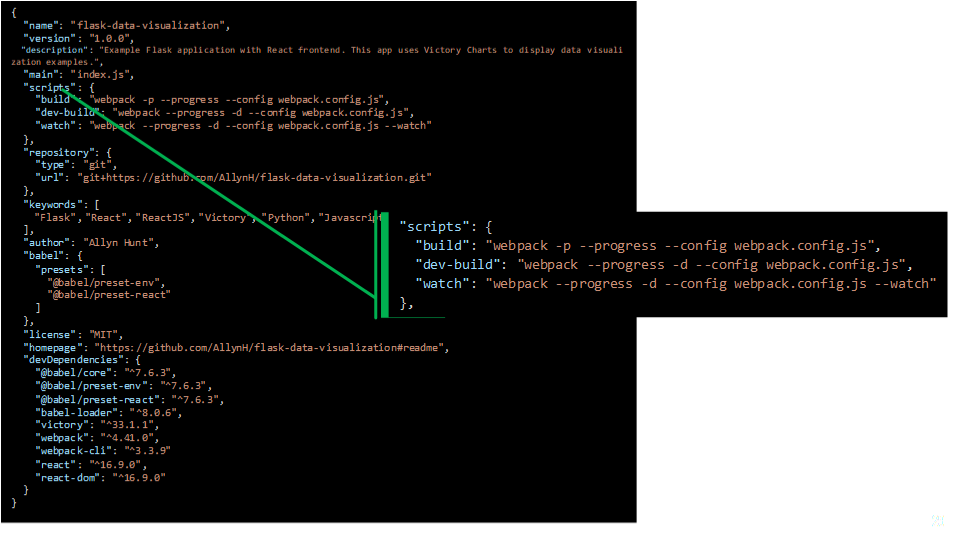
Create package.json:

When running npm init, we created a package.json file. In this file we are going to tell Webpack how to run our frontend server.

We will do that by adding the following scripts section, which tells NPM how to run the app:

"scripts": {
  "build": "webpack -p --progress --config webpack.config.js",
  "dev-build": "webpack --progress -d --config webpack.config.js",
  "watch": "webpack --progress -d --config webpack.config.js --watch"
},
Example scripts section from my package.json

Top tip:

webpack --help

Will print the Webpack help information, where you can read in detail about the above commands.

Create webpack.config.js:

Our webpack.config.js file is going to provide Webpack with information on how our project is structured. Let’s look at the main sections:

  1. entry“: This is the index.js file, that links all of our React code to the HTML frontent. We instantiate our React components here and attach them to the DOM.
  2. output“: This is the bundle.js file, Webpack and Babel will output. This is our transpiled code that we actually include in our HTML file.
  3. resolve“: We want Webpack and Babel to resolve all .js, .jsx files. (.jsx files are sometimes used when a developer wants to specifically show that these files are React specific – .js workes just fine for us).
  4. module“: We want to use the babel-loader, and exclude any packages in ./node_modules (where all of our installed packages are located).

app/static/webpack.config.js

See highlighted sections below:

const webpack = require('webpack');
const config = {
    entry:  __dirname + '/scripts/index.js',
    output: {
        path: __dirname + '/dist',
        filename: 'bundle.js',
    },
    resolve: {
        extensions: ['.js', '.jsx', '.css']
    },
 
    module: {
        rules: [
            {
            test: /\.(js|jsx)?/,
                exclude: /node_modules/,
                use: 'babel-loader'     
            }        
        ]
    }
};
module.exports = config;

More information:

Here are links to the files I used in my application:

Here is some useful documentation:

Note: In the extensions section of the webpack.config.js – we can add other file extensions, such as CSS or images – as long as we have the relevant Webpack loaders installed.

React:

Installing React:

Now that we have a project setup with Weback and Babel – we need to install React. We can use NPM to install React and React DOM.

npm i react react-dom [--save-dev]
  • react: This is the actual React library package – used to define and create your React components.
  • react-dom: This mounts your React component into a HTML DOM object (usually a blank <div>).
    • DOM refers to the Document Object Model.
    • Used to identify and access DOM elements.
    • Updates HTML elements with with React.DOM.render()

Note: We’ve installed both packages with 1 command. You don’t necessarily need to add –save-dev as these are required package and you’ll probable use React for other projects.

Creating our React Components:

Let’s start with the usual “Hello, World!” Example.

React “Hello, World!”:

For every React component we create, we need to do 2 things:

  1. Write the React JS code for that component.
  2. Create an instance of that component, in the index.js entry file (from our webpack.config.js).

Creating the HelloWorld.js component:

app/static/scripts/HelloWorld.js

import React from 'react';
 
class HelloWorld extends React.Component {
    render() {
        return (
            <h1>Hello, World!</h1>
        );
    }}
export default HelloWorld;

What is this code doing?:

  • importing the React module.
  • Creating (extending) a HelloWorld Class, from the React.Component class type.
  • Rendering a <h1> element with the text “Hello, World!”
    • When creating a React component – the render() function is the only function we are required to use.
  • Exporting the HelloWorld function, so it can be imported by our index.js file.

When creating the component, we populated the render() function, React components have several built in methods and these are defined in the React component lifecycle.

Attaching the HelloWorld component to the DOM:

Now that our component is created – we need some way of creating an instance of that component and attaching it to a DOM element of our application.

app/static/scripts/index.js

import React from "react";
import ReactDOM from "react-dom";
import HelloWorld from "./HelloWorld";
 
ReactDOM.render(<HelloWorld />, document.getElementById("react-root"));
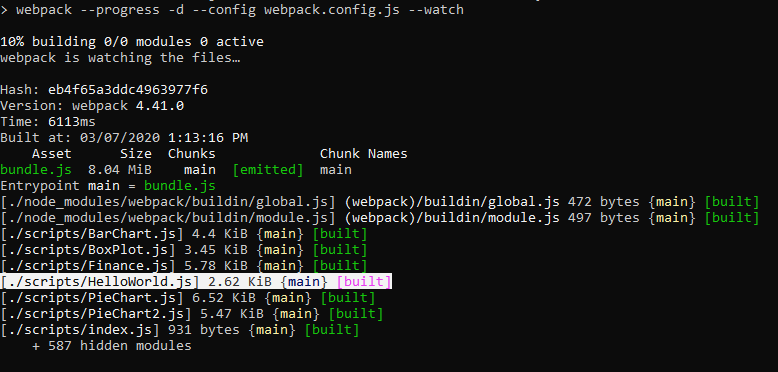
Running our code:

Now, when we run “npm run build” or “npm run watch”, NPM will run Webpack and Babel, transpile our index.js and HelloWorld.js file and output a ./dist/bundle.js file.

Output from npm run watch

Adding React to our Flask application:

Now that we have the HelloWorld example completed, we want to hook that into our Flask application. In order to call our JS code, we need to update our Flask HTML templates with a <script> tag, pointing to our bundled JS code. There are 2 places we can do this:

  1. base.html: If we want every Flask HTML endpoint to use this code (recommended).
  2. Add to the footer of a specific template: If you don’t want every endpoint to call your React code.
    1. You may want to do this if you already have Flask templates (that extend base.html) populating nav bars, footers and other generic HTML code.

app/templates/base.html:

{% block app_content %}
 
<div id="react-root"></div>
 
<script src="{{ url_for('static', filename='dist/bundle.js') }}"></script>
{% endblock %}

What is this code doing?:

  1. {% block app_content %} creates a Jinja2 template, which is used by Flask to populate the HTML templates.
  2. Creating an empty <div> element with and ID attribute of “react-root”.
    • This matches the ID element our React.DOM.render() function is looking for.
  3. Adding the script tag with a link to our bundle.js file.

Viewing our React app in the browser:

Our Hello World app in progress:

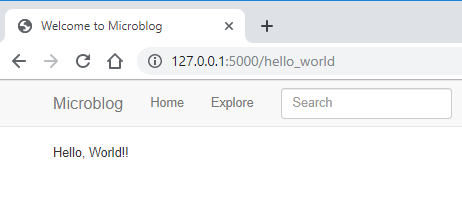
Note: All the other Flask rendered elements, from the microblog application, are there, for example the nav bar and search bar. However, now we also have rendered our first React component.

There’s not much here yet – but it’s a start!

React API:

Now that we can render React components – we want to be able to populate these components, with data from our Flask API.

First, let’s look at the React documentation for the recommended methodology for adding API requests into React components.

Our API component:

class Finance extends React.Component {
  constructor(props) {
    super(props);
    this.state = {
    error: null,
    isLoaded: false,
    items: []
    };
  }
  componentDidMount() {
    fetch("/api_1_0/finance/1/2018")
    .then(res => res.json())
    .then(
      (result) => {
      this.setState({
        isLoaded: true,
        items: result.items
      });
      },
      (error) => {
      this.setState({
        isLoaded: true,
        error
      });
      }
    )
  }
  render() {
    const { error, isLoaded, items } = this.state
    if (error) {
    return <div>Error: {error.message}</div>;
    } else if (!isLoaded) {
    return <div>Loading...</div>;
    } else {
    return (     );
    }
  }
}

What is this code doing?:

  1. We’ve added a constructor():
    1. This stores the component state.
    2. Stores error and isLoaded status – used in the render() function.
  2. Added the componentDidMount() built-in function:
    1. This is a React component built in function – using this function allows us to populate the component state with the output of from the API.
    2. Update the fetch() URL with the required API endpoint.
    3. Update component state with this.setState.
    4. Update isLoaded and error status – depending on the response from the API.
  3. Updated the render() function.
    1. Now handles error status from the API.
    2. Also has a loading section – we could add a loading animation here for example.

Note: The below code is an example of JavaScript “destructuring“.

const { error, isLoaded, items } = this.state

The state variable is a JS Object type, with the keys “error”, “isLoaded” and “items”.

We are populating const variables from the values of each of these keys in the components state.

Storing our API data in the Components state:

Now that we can make an API call – we need some way of storing this in our React component.

Storing the API response:

After making the API request – we store the response in the components state:

  componentDidMount() {
    fetch("/api_1_0/finance/1/2018")
:
      (result) => {
      this.setState({
        isLoaded: true,
        items: result.items
      });
      },
:
:
  }

We can store the state here, immediately, as we are using the React componentDidMount() function to make the API call.

Note: componentDidMount() is a React built-in function, which is allows us to set the component state value.

Retrieving the data from state:

Now that we have the API data stored in the component state – we can retrieve it like so:

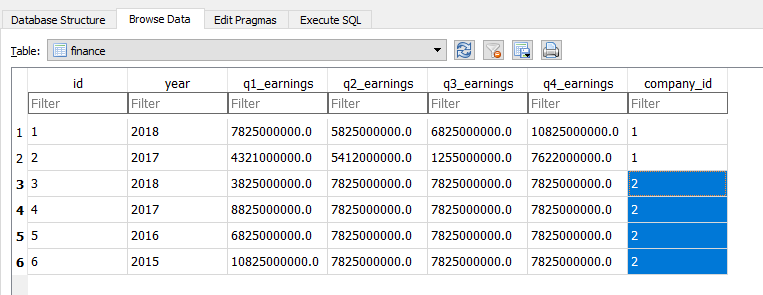
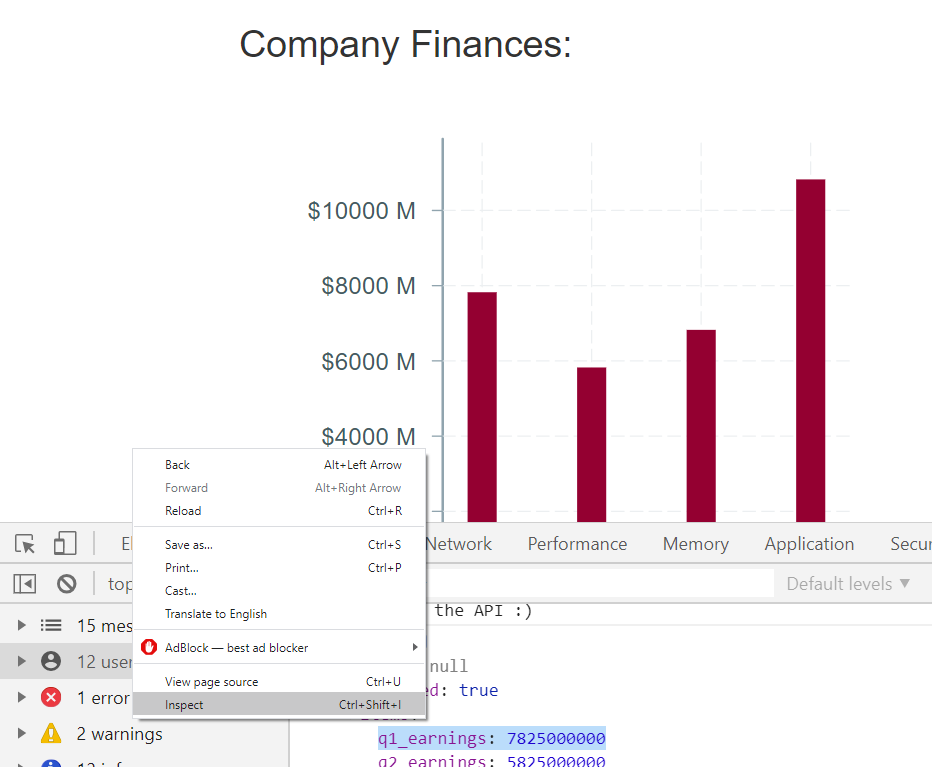
make_chart_data(items) {
        
    let my_data_list = [];

    my_data_list.push(items.q1_earnings)
    my_data_list.push(items.q2_earnings)
    my_data_list.push(items.q3_earnings)
    my_data_list.push(items.q4_earnings)

    return my_data_list;
}

We can create an array, my_data_list, and populate it with the quarterly earnings.

Calling the make_chart_data function:

Inside the render function, we can call the make_chart_data() function. Obviously – we only want to call this function if there are no errors and the application has finished loading – so we put the function call in the “else” condition, as below:

render() {
	const { error, isLoaded, items } = this.state;
if (error) {
	return <div>Error loading data.</div>;
} else if (!isLoaded) {
	return <div>Loading...</div>;
} else {
	// Populate chart data:
	const finance_data = this.make_chart_data(items);
	const finance_axis = ["Q1", "Q2", "Q3", "Q4"];
:
	return (
:
:
      )
}

Debugging your application:

Some (maybe) obvious tips for debugging your application.

Based on issues I’ve found and conversations I’ve had with other people.

Chrome developer tips:

Viewing your API data in the Chrome developer tools may seem obvious to some people but as a lot of us are self-learning – I thought I’d show some tips:

Open the Chrome or Firefox developer tools.

Right-click anywhere on the page, and select “inspect” to view the developer tools.

Printing the components State:

In the render() function – log the components state:

render() {
	console.log(this.state)
	const { error, isLoaded, items } = this.state;
:
}

You can view this in the developer tools Console section:

Viewing the console output
Viewing the console output.

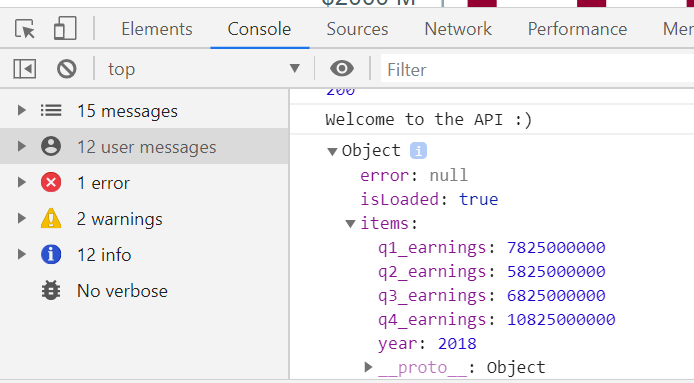
Some things to look out for:

  • Has the component State been set correctly?
    • error should be: null
    • isLoaded should be: true
    • items should contain the API response.

Some other issues that caught me out:

  • Are the values and data types correct?
    • Are you expecting and integer or String value?
    • (in a previous iteration of code, I sent the earnings values – from the API – as Strings instead of integers).
    • JavaScript only throws an error if you specifically type check.
  • Are you comparing True == true?
    • Python syntax versus JavaScript syntax.
  • Uncaught TypeError: items.map is not a function
    • You are trying using map to loop through an object, instead of an array.
    • Did you mean to send an array from your API?

Conclusion:

We installed and configured Babel and Webpack for our project.

We successfully added a React frontend into a Flask application.

We can make API calls from our Flask data API to our React frontend.

Resources:

Part 3 – React Victory charts (coming soon) >

Next up, we’ll look at adding some data visualisation to our applications with the amazing React library – Victory charts

Adding an API to your Flask project

Introduction:

This post is part 1 of a 3 part series. I’m going to walk through setting up a Flask API project, adding a React frontend to the project and then adding some data visualization to the React frontend.

If you’ve seen any of my previous blog posts, I’ve discussed setting up SQL databases, using Redis databases, setting up dashboard applications – so the next natural step would be to discuss displaying some of this data I’ve ben hoarding.

Here are the other chapters:

  1. Adding an API to your Flask project.
  2. Adding a React frontend to your Flask project (this section).
  3. Adding data visualization to your Flask app with React Victory charts.

Flask is great for creating server side applications and API projects.

In this blog post, I’m going to discuss some of the basic principals of adding an API to an existing Flask project. As most people who are familiar with Flask, are already familiar with Miguel Grinbergs microblog application, I’ve cloned his project repository we will add an API endpoint to it.

Flask large application structure:

Here’s the project structure for a large Flask application (this is Miguels’ microblog application).

For this project – we will be adding in the app/api_1_0 folder and associated code. We’ll also update the config.py to attach the API routes to our app.

|   config.py
|   microblog.py
|
+---app
    |   cli.py
    |   models.py
    |   __init__.py
    |
    +---api_1_0
    |       routes.py
    |       __init__.py
    |       load_junk_data.py
    |
    +---main
    |       forms.py
    |       routes.py
    |       __init__.py
    |
    +---static
    |       loading.gif
    |
    +---templates
        |   base.html
        |   index.html
        |   user.html
        |
        \---errors
             404.html
             500.html

Python data structures:

Let’s look at some Python dictionary data structures and I’ll show how I would add these to an SQL database. We’ll start off with a generic data structure.

Here we have a data structure (a Python dictionary), detailing information of some type of company. The Company dictionary contains a key “FINANCE”, which contains a list of Finance dictionaries.

{
    "BUSINESS_TYPE": "Manufacturing",
    "COMPANY": "Stark Industries",
    "COMPANY_CEO": "Pepper Potts",
    "FINANCE": [
        {
            "Q1_EARNINGS": 7825000000.0,
            "Q2_EARNINGS": 7825000000.0,
            "Q3_EARNINGS": 7825000000.0,
            "Q4_EARNINGS": 7825000000.0,
            "YEAR": 2018
        },
        {
            "Q1_EARNINGS": 7825000000.0,
            "Q2_EARNINGS": 7825000000.0,
            "Q3_EARNINGS": 7825000000.0,
            "Q4_EARNINGS": 7825000000.0,
            "YEAR": 2017
        },
        {
            "Q1_EARNINGS": 7825000000.0,
            "Q2_EARNINGS": 7825000000.0,
            "Q3_EARNINGS": 7825000000.0,
            "Q4_EARNINGS": 7825000000.0,
            "YEAR": 2016
        },
        {
            "Q1_EARNINGS": 7825000000.0,
            "Q2_EARNINGS": 7825000000.0,
            "Q3_EARNINGS": 7825000000.0,
            "Q4_EARNINGS": 7825000000.0,
            "YEAR": 2015
        }
    ]
}

Once we define the data structure, the next step for a Python developer would be looking at how to nest several Company dictionaries, inside another wrapper dictionary.

What use would our database be if we can only store 1 company – we want to be able to store data for a huge amount of companies – the more the better 🙂

{
    "DATA": [
        {
            "BUSINESS_TYPE": "Manufacturing",
            "COMPANY": "Stark Industries",
            "COMPANY_CEO": "Pepper Potts",
            "FINANCE": […
            ]
        },
        {
            "BUSINESS_TYPE": "Multinational Conglomerate",
            "COMPANY": "WayneCorp",
            "COMPANY_CEO": "Bruce Wayne",
            "FINANCE": [ …
            ]
        }
    ]
}

SQL Alchemy:

In SQL terms our Company dictionary is an example of a one-to-many relationship. 1 Company contains many Finance dictionaries.

One-to-many relationship.

Let’s look at how we would create this data structure with SQL Alchemy.

Creating the Company table:

The actual database connections are made in the config.py file – I’ve discussed this here before.

To add a database table, we create a class in the app/models.py file – we can then create instances of that class in our code.

I am loading the Python dictionaries via a function called load_junk_data – I wish I’d thought of a more professional name for this file but here we go:

app/models.py

class Company(db.Model):
    __tablename__ 	= 'company'
    id 			= db.Column(db.Integer, primary_key=True)
    name 		= db.Column(db.String(140))
    company_ceo 	= db.Column(db.String(140))
    business_type 	= db.Column(db.String(140))
    finances 	= db.relationship('Finance', backref='finance', lazy='dynamic')
 
    def __repr__(self):
        return '<Company {}>'.format(self.name)

What is this code doing?:

  • We are creating a class object named “Company”:
    • The Company class inherits the properties of the db.Model parent class.
  • We are giving the class a table name of “company”.
    • The SQL table “company” will be created when db.create_all() is called in config.py
  • The “id” column will be the primary key.
  • We are defining a “finances” column, which is a database relationship type:
    • It has a back reference to the “finance” table (we will make this next).
    • Setting the parameter lazy=dynamic is a dynamic loader, this will return a Query object when we call the filter() function.

Adding the Company object:

Now that we have created the table – how do we populate the data? Let’s create an instance of the Company object and store it in our SQL database.

Creating an instance of the Company object:

app\api_1_0\load_junk_data.py

my_wayne_company = Company(
	name		= company_waynecorp["COMPANY"],
	company_ceo	= company_waynecorp["COMPANY_CEO"],
	business_type	= company_waynecorp["BUSINESS_TYPE"]
)

First we populate the “my_wayne_company” object from our Company dict.

Adding a Company item to the database:

Now we can add the object into the database.

db.session.add(my_wayne_company)
db.session.commit()

Adding the Finance object:

Now that we have saved a Company object – we need to create some Finance objects and attach the finance data to their respective companies. The Finance table will represent the “many” part of our one-to-many relationships.

Creating an instance of the Finance object:

app/models.py

class Finance(db.Model):
    __tablename__    = 'finance'
    id 	             = db.Column(db.Integer, primary_key=True)
    year 	     = db.Column(db.Integer, default=1999)
    q1_earnings      = db.Column(db.Float)
    q2_earnings      = db.Column(db.Float)
    q3_earnings      = db.Column(db.Float)
    q4_earnings      = db.Column(db.Float)
   company_id        = db.Column(db.Integer, db.ForeignKey('company.id'))
 
    def __repr__(self):
        return '<Finance {}>'.format(self.id)

What is this code doing?:

  • We are creating a Finance class object:
    • The Finance class inherits the properties of the db.Model parent class.
  • We are giving the class a table name of “finance”.
    • We have previously defined this reference in the Company tables’ “finances” column.
  • We are defining a “company_id” column, which is an integer type:
    • “company_id” is a also a foreign key referencing the “id” column of the “company” table.

Adding a list of Finance items to the database:

Each Company object will have many Finance objects attached to it.

We can can create 2 instances of the Finance object, in a similar way to how we created an instance of the Company objects.

app\api_1_0\load_junk_data.py

wayne_finance_y1 = Finance(
	year		= wayne_finance_y1["YEAR"],
	q1_earnings	= wayne_finance_y1["Q1_EARNINGS"],
	q2_earnings	= wayne_finance_y1["Q2_EARNINGS"],
	q3_earnings	= wayne_finance_y1["Q3_EARNINGS"],
	q4_earnings	= wayne_finance_y1["Q4_EARNINGS"]
)

wayne_finance_y2 = Finance(
	year		= wayne_finance_y2["YEAR"],
	q1_earnings	= wayne_finance_y2["Q1_EARNINGS"],
	q2_earnings	= wayne_finance_y2["Q2_EARNINGS"],
	q3_earnings	= wayne_finance_y2["Q3_EARNINGS"],
	q4_earnings	= wayne_finance_y2["Q4_EARNINGS"]
)

These Finance objects can be attached to the Company object – in a similar way to appending items to a list.

my_wayne_company.finances.append(wayne_finance_y1)
my_wayne_company.finances.append(wayne_finance_y2)

Bonus points: Attach a list of Finance objects directly to the Company object.

In the previous section we had a Company object and then attached some Finance objects to it.

What if we already had several Finance objects – before we realised we needed to create a Company table? (I came across this problem recently – and it took me a bit of time to figure a clean way to do it).

Let’s look at adding a list of Finance objects directly to a Company object.

First we can create a series of Finance objects, in the same way as before:

app\api_1_0\load_junk_data.py

stark_finance_y1 = Finance(
    year        = stark_finance_y1["YEAR"],
    q1_earnings = stark_finance_y1["Q1_EARNINGS"],
    q2_earnings = stark_finance_y1["Q2_EARNINGS"],
    q3_earnings = stark_finance_y1["Q3_EARNINGS"],
    q4_earnings = stark_finance_y1["Q4_EARNINGS"]
)
:
stark_finance_y4 = Finance(
    year        = stark_finance_y4["YEAR"],
    q1_earnings = stark_finance_y4["Q1_EARNINGS"],
    q2_earnings = stark_finance_y4["Q2_EARNINGS"],
    q3_earnings = stark_finance_y4["Q3_EARNINGS"],
    q4_earnings = stark_finance_y4["Q4_EARNINGS"]
)

With these 4 Finance objects created – we can create a list of Finance objects:

finance_list = [stark_finance_y1, stark_finance_y2, stark_finance_y3, stark_finance_y4]

Now that we have the finance_list created – we can create the Company object:

my_stark_company = Company(
    name            = stark_company["COMPANY"],
    company_ceo     = stark_company["COMPANY_CEO"],
    business_type   = stark_company["BUSINESS_TYPE"],
    finances        = finance_list
)

We can add the list of Finance objects directly into the object instantiation.

db.session.add(my_stark_company)
db.session.commit()

Finally, add them to the database.

Viewing our SQL data:

When you view your data in an SQL database browser you will see something like this – first let’s look at the “company” table:

Viewing the “company” table in the SQLite browser.

Above we can see there are 2 Company objects in our “company” table.

Next, let’s look at the “finance” table:

Viewing the “finance” table in the SQLite browser.

We can see there are now, 6 Finance objects stored in the “finance” table, the “company_id” column is the foreign ID , which references the respective Company ID of each Finance object.

SQL data browsers:

There are lots of programs you can use to view your SQL database:

(This is not an advertisement, let me know if you have any better suggestions)

(Also let me know if you want to advertise 😛 )

Blueprints.

Flask Blueprints provide a means to section off your application. They are used to organise your application into distinct components.

A common application pattern is to section your application into 3 distinct parts:

  1. Authorized endpoints:
    1. Returns a HTML page: Login required.
  2. Unauthorized endpoints:
    1. Returns a HTML page: Login not required.
  3. API endpoints:
    1. Returns a (usually) JSON response: Login can be required.

Adding Blueprints to your Flask project:

To use Blueprints in your app you need to first create the Blueprint and then attach it to your app.

Create Blueprint:

app/api_1_0/__init__.py

from flask import Blueprint
 
bp = Blueprint('api', __name__)
 
from app.api_1_0 import routes

What is this code doing?:

  • Importing Blueprint from the flask package.
  • Creating an instance of the Blueprint object.
  • Importing the API endpoints from the routes.py file in the api_1_0 folder.

Attach the Blueprint to your app:

app/__init__.py

def create_app(config_class=Config):
    app = Flask(__name__)
    # Rest of your config goes here:
 
    from app.api_1_0 import bp as api_bp
    app.register_blueprint(api_bp, url_prefix='/api_1_0')

What is this code doing?:

  • In the create_app function, (used to instantiate our application).
  • We register the api_bp Blueprint with the app context.
    • We’re adding a URL prefix of “/api_1_0” to this Blueprint.

Adding an API endpoint to a Flask app:

Create an API endpoint:

We’ve created the Blueprint – now lets create the api_1_0 routes file and our first API endpoint.

app/api_1_0/routes.py

First, import the Blueprint object:

from app.api_1_0 import bp

Now we can create the API endpoint:

@bp.route('/get_company/<int:id>')
@login_required
def get_company(id):
    c = Company.query.filter_by(id=id).first_or_404()
    message = "Welcome to the API :)"
    content = {
        "name"          : c.name,
        "ceo_name"      : c.company_ceo,
        "business type" : c.business_type
    }
    status_dict = {
        "status": 200,
        "success": True,
        "message": message,
        "contentType":'application/json',
        "content": content
    }
 
    return jsonify(status_dict), status_dict["status"]

What is this code doing?:

  • @bp.route(‘/get_company/<int:id>’)
    • This is the Blueprint decorator.
    • binds the route to our API blueprint.
    • The route takes a parameter, an integer called “id”
  • Login is required to access this route.
  • c = Company.query.filter_by(id=id).first_or_404()
    • We query the database, for the first item matching the id value.
    • If no items match – we return a 404 response.
    • The response from the SQLAlchemy query is stored in “c”
  • content = {}
    • We populate a dictionary object with the result of the query.
  • status_dict = {}
    • We populate a return response.
    • HTTP status code 200.
    • Success = True.
    • A meaningful success message in the response.
    • A contentType, to notify other applications we are returning a JSON resonse.
    • We populate the “content” key with the dictionary object from the database response.
  • return jsonify(status_dict), status_dict[“status”]
    • We convert the Python dict “status_dict” into a JSON object.
    • We return the status_dict JSON object and the the HTTP code.

Note: We’ve defined the route as “/get_company/id” but we’ve also added the prefix “/api_1_0” to the Blueprint – so the actual endpoint will be: /api_1_0/get_company/1 (for company ID 1).

Viewing the API respone:

With the server running, we can view the API JSON response in a web browser.

Note:

  • The API Blueprints URL’s are prepended with “/api_1_0”.
  • The Company ID “1” relates to WayneCorp.

Conclusion:

We looked at some Python data structures and turned these into a SQL relational data structure.

We have successfully created a Flask API, which will pull data from our database and return it as a JSON response.

We can now use this API to serve external applications or a Javascript frontend to our applications.

Resources:

Part 2 >

We’ll build on our Flask project by adding a React frontend.

Reusing Flask SQL Alchemy code between multiple applications

Introduction:

Flask and Flask SQL Alchemy have lots of cool functionality built into them, that a lot of developers probably weren’t even aware of. If you’ve followed any of the main Flask tutorials (such as Miguel Grinbergs amazing tutorial), you probably already have all of the necessary setup completed.

I’ll also be building this code off the Flask large application structure. So this will take care of creating my application configuration and database connections, in both development and production modes.

Let’s look at a common Flask use-case for creating a dashboard application:

  • You have a list of files (test results, for example).
  • You have some Python code that scrapes these files.
  • You want to create a Flask application to display these test results.
This is the basic structure of a Dashboard application.

Dashboard application structure:

This all seems pretty straight forward when you start to design your application. You design a working development environment. It’s looking pretty good, you spend some time adding custom CSS and JavaScript features.

Soon you realise, you’ve hit a roadblock:

  • My application is hosted in the cloud.
  • My database is hosted in (a different) the cloud.
  • My test results are split across several computers / servers.

Either way, it was easy to build your application in the development environment because the test results, web application and database were all on the same computer. You didn’t need to worry about getting access to the files, file permission, file sizes, long run times, etc…

Using the Flask app context:

You can invoke your Flask application with different contexts. Flask applications are normally used with the Request context – a web server waits for a GET request and sends a response.

The application context keeps track of the application-level data during a request, CLI command, or other activity. Rather than passing the application around to each function, the current_app and g proxies are accessed instead.

Read about the Flask application context here

Set your database free!:

Flask and SQL Alchemy allow you to separate your database from your Flask application.
If you’ve read any Flask / SQL Alchemy tutorials, you’ve probably heard the advice “don’t bind your SQLAlchemy object to the Flask application”. Binding your application to the Flask application, means you can only access the database through the Request context.
So in this case, we want to avoid binding our SQL Alchemy to the Request context – so we can use it in a custom context.

Don’t bind your SQL Alchemy object to the Flask application

def create_app(config_name):
    app = Flask(__name__)
    app.config.from_object(config[config_name])
    db = SQLAlchemy(app)

For example, you may have seen the above code in the SQL Alchemy quickstart guide. Let’s make some small changes.

Attach your SQL Alchemy object to your Flask application:

Instead of binding we can use the init_app function to attach the SQL Alchemy “db” object to our application

db = SQLAlchemy() 

def create_app(config_name):
    app = Flask(__name__)
    app.config.from_object(config[config_name])
    db.init_app(app)

Note:

  • Line 1: We are defining the SQL Alchemy object globally and attaching it to the application via the init_app function.
  • Line 6: The init_app function prepares the application to work with SQL Alchemy.
  • But it does not bind the SQL Alchemy object to your application!

What does init_app() do?

Flask SQL Alchemy is a “Flask extension“, a 3rd party library that has been designed to work with Flask.

init_app() is a common function, every Flask extension must provide, to initialise the extension to work with Flask.

Connecting to your database:

The development SQLite database is normally setup as below, usually defaulting to output to the “data-dev.sqlite” file (or you can even set up another external database).

class DevelopmentConfig(Config):
	DEBUG = True
	SQLALCHEMY_DATABASE_URI = os.environ.get('DEV_DATABASE_URL') or \
		'sqlite:///' + os.path.join(basedir, 'data-dev.sqlite')

Let’s set up our external production database, first set the environment variables:

set POSTGRES_USER=USERNAME
set POSTGRES_PASS=PASSWORD
set POSTGRES_HOST=123xxx.cloud.provider.com
set POSTGRES_PORT=1234
set POSTGRES_DB_NAME=DB_NAME

Note: I’m developing on Windows, so I set environment variables with the “set” command. You will need to use the correct command for your OS, for example: set, setenv or export.

In the config.py file, create a dict with the database details:

POSTGRES = {
	'user': os.environ.get('POSTGRES_USER'),
	'password': os.environ.get('POSTGRES_PASS'),
	'database': os.environ.get('POSTGRES_DB_NAME'),
	'host': os.environ.get('POSTGRES_HOST'),
	'port': os.environ.get('POSTGRES_PORT'),
}

Update the ProductionConfig class to use your parameters:

class ProductionConfig(Config):
	postgres_url = 'postgres://%(user)s:%(password)s@%(host)s:%(port)s/%(database)s' % POSTGRES
	SQLALCHEMY_DATABASE_URI = postgres_url or \
		'sqlite:///' + os.path.join(basedir, 'data.sqlite')

Accessing your database outside of the request context:

Now that we have correctly initialised out SQLAlchemy object:

  • We can access our database outside of the web servers Request context.
  • We don’t need to tie our code to a Request action.
  • Easily swap between production and development databases.

Let’s look at an example of how I would query my database for a list of all items stored in the Files table.

Creating the “Files” table:

Here is an example SQL Alchemy model I use for storing details of tracked Files.

models.py:

class Files(db.Model):
	__tablename__ = 'files'
	id	= db.Column(db.Integer, primary_key=True)
	created = db.Column(db.DateTime, nullable=False, index=True, default=datetime.utcnow)
	run_dir	= db.Column(db.String(256), nullable=False)
	file_path = db.Column(db.String(256), nullable=False)
	file_name = db.Column(db.String(128), nullable=False)
	full_name = db.Column(db.String(512), nullable=False)
	file_type = db.Column(db.String(10), nullable=False)
	file_size = db.Column(db.String(20), nullable=False)

Now that we have the Files table created, let’s query it using the Manager shell (You could also use Flask CLI).

Development database:

In our local development environment, using the Flask shell context, we can simply query the Files table like so.

(venv) [AllynH_dev] C:\example_app\>python manage.py shell
>>> files = Files.query.all()
>>> print("Found", len(files), "files")
Found 4 files
>>> job_queue = Queue.query.all()
>>> print("There are", len(job_queue), "queue items.")
There are 4 queue items.
Above: My development environment is tracking 4 files.

Note: I’m using Flask-Script manager but this also works with the Flask-CLI tool.

Production database:

To switch to production, we can simply change the FLASK_CONFIG environment variable and query the Files object, like so.

(venv) [AllynH_dev] C:\example_app\>set FLASK_CONFIG=production
(venv) [AllynH_dev] C:\example_app\>python manage.py shell
>>> files = Files.query.all()
>>> print("Found", len(files), "files")
Found 46716 files
>>> job_queue = Queue.query.all()
>>> print("There are", len(job_queue), "queue items.")
There are 15 queue items.
Above:  My production environment is tracking 46K files.

We can now see, we are pulling data directly from our production database.

We are also pulling data outside of the Request context – the Flask web server is not used, and we don’t need to wait for a GET request in order to execute the code.

Modifying the database contents:

Note: Obviously it’s not usually a great idea to modify production database contents from the Python interpreter, however, some times it can prevent you from having to drop the table and rebuilding the contents all over again.

Let’s look at an example of where I needed to remove old jobs from my schedulers Queue table, from the Flask shell interpreter.

Here is an example of a Queue object from my scheduler:

Let’s say for this example, that I pushed a fix to my code recently but I have a lot of jobs running in the queue that I want to run with the fixed code. In order to do this I need to delete these waiting jobs from the schedulers Queue.

First, I need to find a list of jobs in the Queue.

(venv) [AllynH_dev] C:\example_app\>python manage.py shell

>>> job_queue = Queue.query.all()
>>> print("There are", len(job_queue), "queue items.")
There are 15 queue items.

Now let’s delete the problem items:

>>> from datetime import datetime, timedelta
>>> for q in job_queue:
...     later = datetime.now() + timedelta(hours=10)
...     if q.time_to_live > later:
...             db.session.delete(q)
...
>>> db.session.commit()
>>> job_queue = Queue.query.all()
>>> print("There are", len(job_queue), "queue items.")
There are 7 queue items.

In this case – any Queue item with a time_to_live value of > 10 hours from now will be deleted.

Now that we can successively access, read and modify the production database through the Python interpreter – the next step is to actually create a standalone script to handle the file parsing and database connections.

Creating the database engine:

In the diagram below, each of the servers are connected to the web application via a file called “DB engine”, let’s have a look at how to create this file.

Dashboard application structure:

Using what we know about app context and adding the database to the application, we can now create a new file, called “db_engine.py”:

/yourapplication
    config.py
    db_engine.py
    /app
        __init__.py
        views.py
        models.py
        /static
            style.css
        /templates
            layout.html
            index.html
            login.html

To access our SQL Alchemy database:

  • We can import the create_app function.
  • We can also import the Flask database models.
  • When executing create_app, we push the app context to our db_engine app.

db_engine.py:

from app import create_app, db
from app.models import Users, Files, Queue # etc...:

create_app('production').app_context().push()

Note: The ‘production’ parameter can also be set to ‘development’ or ‘testing’ or any other configuration in your app. I normally set this via a command line argument.

We can now Query items from the database:

db_engine.py:

# code to open and parse files, etc.:
my_queue = Queue.query.all()
For queue in my_queue:
    output = parse_log_file(queue.run_dir, queue.owner, queue.run_tag, queue.user_tag)

Note: the parse_log_file function parses the file and returns some test results, implementation will depend on what you want to do.

We can also add items to the database:

db_engine.py:

# Add runs to the Queue database.:
add_run = Queue(
    time_to_live    = datetime.utcnow() + timedelta(hours=24))
    run_dir         = my_file[‘RUN_DIR'],
    owner           = my_file[‘OWNER'],
    site            = my_file['SITE'],
    host            = my_file['HOST_MACHINE'],
    run_tag         = my_file.get('run_tag', 'Development'),
    user_tag        = my_file.get('user_tag', ''),
    time_to_live    = datetime.utcnow() + timedelta(hours=24)
)

db.session.add(add_run)
db.session.commit()

Here I add an item to the task queue, these items are processed by a cron job that runs every 15 minutes.

Setting parameters with argparse :

In the code above, the create_app() function was hardcoded to ‘production’, in my case I use argparse to set this value with a command line argument.

db_engine.py:

parser.add_argument("-p", "--production", action="store_true",
					help="Select production server.")
args = parser.parse_args()

# Set user defined input options:
def parse_arguments():
	if args.production:
		# Create app:
		create_app('production').app_context().push()
	else:
		# Create app:
		create_app(os.getenv('FLASK_CONFIG') or 'default').app_context().push()

For more information on argparse, see here. See here for an example of how I use it in my automation code.

Executing the code:

As mentioned above, you can use the same code base for running the web server or the database engine. The app context controls how the application is run.

Running the web server:

When running the Flask webserver you’d use:

python manage.py runserver

Or, if you were using Flask CLI:

flask run

Or, if you were using gunicorn, something like this:

web: gunicorn --workers 4 manage:app

Running the database engine:

When running the database engine – you can do something like this:

# Run Engine in production mode - add schedule file:
python db_engine.py --schedule_file ..\Engine\queue_file.json --production

In my case, the schedule file is a list of files containing test results, that I want added to the database. These parameters are defined with argparse and can be whatever you need.

Conclusion:

To summarise, Flask and SQL Alchemy can do a lot of powerful stuff, with very little changes to your core code base.

  • We can now push data from multiple servers to our database.
  • We can reuse the Flask models and database structure, outside of the web application.
  • Don’t need to write custom database code, so our applications will never be out of sync.
  • The same code base can be used to run our web server or the db_engine – the code runs with different context.

If you’ve built your app structure following some of the main Flask tutorials – you may not even have to make changes to your code base.

PyCon IE 2019

PyCon Ireland 2019 – 10th Anniversary!

I was lucky enough to be selected at this years PyCon – this was a very special year, as it was the 10 annual PyCon Ireland!

The title of my talk was ” Adding data visualization
to your Flask app with React Victory charts
” this talk covered some topics I had previously touched on, as well as adding in some elements of new projects I had been working on.

Laura took some great pictures:

Getting started.

The talk consisted of 4 parts:

  1. Creating a Flask application.
    1. Project setup, storing data, creating app Blueprints.
    2. Adding a data API to the application
  2. Adding a React JS frontend to your application.
    1. Installing Webpack, Babel, React, make some API calls from React.
  3. Adding React Victory Charts to your application.
    1. Make a basic chart, look at how to create some really cool charts.
    2. See here for some cool examples from the Victory Charts official documentation.
  4. Some tips to secure your API.
    1. Top tips.
    2. Avoiding SQL injections.
Creating the SQLAlchemy models.

Code:

View the code on GitHub.

Slides:

You can download the PowerPoint of my slides here:

My slides are also available on Speaker Deck:

Flask asynchronous background tasks with Celery and Redis

Introduction:

This blog post will look at a practical example of how to implement asynchronous background tasks in a Flask environment, with an example taken from my ongoing project of building a Destiny the game inventory management web application.

During the design of DestinyVaultRaider.com one of the main pain points was manually updating my production environment every time the Destiny Manifest was changed. The development crew in Bungie were very active and were updating the Manifest right up to the launch of Destiny 2.

Before adding the background tasks, I had a small Python script running from my Raspberry Pi, which would send a request to Bungie, every 10 minutes, for the current Manifest version – if the stored Manifest version was different, the script would send me a message on a private Slack channel to notify me that the Manifest had changed and I’d need to update my Heroku environment.

If the Manifest version stored on my production environment didn’t match the current revision of the Manifest Bungie were using, this would cause an error in my Flask application, sending the user a HTTP 500 internal error response and be diverting them to a generic error page. This leads to a negative user experience, and with the Manifest being updated randomly – sometimes twice a week, I was left scrambling to update it as quickly as possible.

I store the Manifest in a Redis database, so  using Redis as a Message Broker (see below) made sense for my application.

Introduction to Celery:

From the Celery docs: “Celery is an asynchronous task queue/job queue based on distributed message passing. It is focused on real-time operation, but supports scheduling as well”.

From the perspective of my app, I will be using Celery to create a scheduled task, which checks the Destiny Manifest every few minutes, and updates my Redis database as needed. I will also be creating an asynchronous task that will check the Manifest every time an authorised user sends a request to a specific endpoint on my server, such as https://www.destinyvaultraider.com/updateManifest.

For another look at implementing Celery with Flask, have a read of Miguel Grinberg’s blog on Celery with Flask.

How Celery works:

The asynchronous tasks will be set up as follows.

  1. Celery client:
    • This will be connect your Flask application to the Celery task. The client will issue the commands for the task.
  2. Celery worker:
    • A process that runs a background task, I will have 2 workers, a scheduled task and an asynchronous task called every time I visit a particular endpoint (/updateManifest).
  3. Message broker:
    • The Celery client communicates to the Celery worker through a message broker, I will be using Redis but you can also use RabbitMQ or RQ.

Installing Celery and Redis:

An important note: One of the main reasons I went with Celery and Redis; is because I do all of my development work on a Windows laptop – most of the libraries and tutorials I found were geared on developing in a Linux environment (which makes sense as your web application is most likely deployed on a Linux system). Celery has dropped Windows support but you can still install an earlier version to allow development on a Windows system.

Shout out to /u/WTRipper on Reddit for this information.

Installing Celery:

Celery can be installed from pip, version 3.1.25 supports Windows and worked well for me:

pip uninstall celery 
pip install celery==3.1.25

Installing Redis:

Redis is not officially supported on windows – but the Microsoft open tech group maintain a Windows port, which you can download here. (I downloaded the installer Redis-x64-3.0.504.msi).

The Flask application factory:

The Flask application factory concept is a methodology of structuring your app as a series of Blueprints, which can run individually, or together (even with different configurations). More than just this, it sets out a more standardised approach to designing an application.

This can also add a bit of complexity to designing an application, as most Celery tutorials focus on standalone applications and ignore the detail of integrating Celery into a large Flask application.

In my case, I will have a Blueprint for my API and a Main Blueprint for everything else.

Destiny Vault Raider app structure:

As Destiny Vault Raider uses the Flask application factory structure, each Blueprint is contained in it’s own folder. For DVR, I only need a “main” and “api” Blueprint, as I don’t require separate views for unauthenticated visitors (although it’s probably something I’ll add in future).

The main items to look out for are highlighted in red.

DestinyVaultRaider
│   celery_worker.py
│   config.py
│   manage.py
│
├───app
│   │   email.py
│   │   getManifest.py
│   │   models.py
│   │   __init__.py
│   │  
│   ├───api_1_0
│   │       views.py
│   │       __init__.py
│   │      
│   ├───main
│   │       errors.py
│   │       forms.py
│   │       Inventory_Management.py
│   │       OAuth_functions.py
│   │       views.py
│   │       __init__.py
│   │      
│   ├───static
│   │   │   style.css
│   │          
│   └───templates
│       │   index.html
│

Destiny Vault Raider updating manifest flow chart:

Flask application with Redis and Celery.

Flask application with Redis and Celery.

From the diagram, we can see:

  • How the Flask application connects to the Redis message broker.
  • The Message broker talks to the Celery worker.
  • The Celery worker calls (either the asynchronous or periodic) Python function to update the Redis Manifest database.
  • The Flask application can access the Manifest database directly, when a user makes a request to view their items.

Now, lets tun these ideas into code!

Creating the Celery worker:

Create an instance of the Celery worker, add the Celery configuration. The Celery configuration will be defined a little later in config.py.

app/__init__.py:

from celery import Celery

celery = Celery(__name__, broker=Config.CELERY_BROKER_URL)

def create_app(config_name):
    app = Flask(__name__)
    :
    :
    celery.conf.update(app.config)
    :

Adding the Celery worker to the app instance:

Take the instance of the celery object we created and and add it to the app context (read about the app_context here).

celery_worker.py:

import os
from app import celery, create_app

app = create_app(os.getenv('FLASK_CONFIG') or 'default')
app.app_context().push()

Configuring Celery and Redis:

During development, your Celery client and Redis broker will be running on your local machine, however during deployment – these connections will be to a remote server. As you’ll need 2 setups, you’ll need to create the Config setup for both development and deployment. On DVR, I set an environment variable “is_prod” to True, which allows me to test if I’m in the deployed environment.

All of this configuration will be added to the Celery object in app/__init__.py, when we create the celery object and pass in the config with the command: celery.conf.update(app.config).

config.py:

First, I create the setup for the Celery beat schedule, I set the schedule for 5 minutes, which is 300 seconds.

# Create Celery beat schedule:
celery_get_manifest_schedule = {
    'schedule-name': {
        'task': 'app.getManifest.periodic_run_get_manifest',
        'schedule': timedelta(seconds=300),
    },
}

Note: The task  is named app.getManifest.periodic_run_get_manifest, the task is located in the “app” folder, in the “getManifest” file, and the function is called periodic_run_get_manifest.

Next, I create the Config object, with the Celery and Redis settings, for both production and development.

class Config:
    CELERYBEAT_SCHEDULE = celery_get_manifest_schedule
    # Development setup:
    if not is_prod:
        CELERY_BROKER_URL = 'redis://localhost:6379/0'
        CELERY_RESULT_BACKEND = 'redis://localhost:6379/0'
        REDIS_HOST = 'localhost'
        REDIS_PASSWORD = ''
        REDIS_PORT = 6379
        REDIS_URL = 'redis://localhost:6379/0'

    # Production setup:
    else:
        # Celery:
        CELERY_BROKER_URL = os.environ.get('REDIS_URL')
        CELERY_RESULT_BACKEND = os.environ.get('REDIS_URL')
        # Redis:
        REDIS_URL = os.environ.get('REDIS_URL')

Note: Both the Celery Broker URL is the same as the Redis URL (I’m using Redis as my messge Broker) the environment variable “REDIS_URL” is used for this.

Connecting to the Celery and Redis server:

Now that we’ve created the setup for the Celery and Redis we need to instantiate the Redis object and create the connection to the Redis server.

I also ping the Redis server to check the connection.

getManifest.py:

from . import celery
from celery.task.base import periodic_task
from config import config, Config

# Set Redis connection:
redis_url = urlparse.urlparse(Config.REDIS_URL)
r = redis.StrictRedis(host=redis_url.hostname, port=redis_url.port, db=1, password=redis_url.password)

# Test the Redis connection:
try: 
    r.ping()
    print "Redis is connected!"
except redis.ConnectionError:
    print "Redis connection error!"

Note: I tried to manually add the hostname, port and password as strings and populate the redis.StrictRedis command, however, this wouldn’t work for me and I could only connect to the Redis server if I used urlparse to format the URL for me (I presume it’s looking for a URL object and not a String object but couldn’t I figure out why).

The db=1 sets the database table number to 1, it defaults to 0 if not added.

REDIS_URL:

redis://h:p0dc...449@ec2-...-123.compute-1.amazonaws.com:48079

which is on the format of:

redis://<username>:<PASSWORD>@<HOST>:<PORT>

You can set this as an environment variable on Heroku by using the following command:

heroku config:set REDIS_URL redis://h:p0dc...449@ec2-...-123.compute-1.amazonaws.com:48079

Creating the asynchronous task:

Here is the definition of the run_get_manifest() function, it’s pretty huge so I won’t include all of the code.

However, the important thing to note is the @celery.task decorator.

@celery.task(name='tasks.async_run_get_manifest')
def run_get_manifest():
    """ Run the entire get_manifest flow as a single function """
    build_path()
    manifest_version = request_manifest_version()
    if check_manifest(manifest_version) is True:
        getManifest()
        buildTable()
        manifest_type = "full"
        all_data = buildDict(DB_HASH)
        writeManifest(all_data, manifest_type)
        cleanUp()
    else:
        print "No change detected!"

    return

To create the asynchronous function, I create a new  function async_run_get_manifest().

Inside this function, I call the original run_get_manifest function but add the delay() method, we can access the delay() method as we have wrapped the run_get_manifest() function in the @celery_task decorator.

def async_run_get_manifest():
    """ Asynchronous task, called from API endpoint. """
    run_get_manifest.delay()
    return

Creating the periodic task:

To create the periodic function, I create a new  function periodic_run_get_manifest().

This function is decorated with the @periodic_task decorator. The “run_every” parameter is required and sets the time interval.

@periodic_task(run_every=timedelta(seconds=300))
def periodic_run_get_manifest():
    """ Perodic task, run by Celery Beat process """
    run_get_manifest()
    return

So now I have 2 functions, that do the same thing, but with some important differences:

  1. periodic_run_get_manifest(): This is the periodic task that is run every 5 minutes.
  2. async_run_get_manifest(): This is the asynchronous task that will run in the background when a request is sent to the /updateManifest endpoint.

Starting the Celery workers:

To start the Celery workers, you need both a Celery worker and a Beat instance running in parallel. Here are the commands for running them:

worker -A celery_worker.celery --loglevel=info
celery beat -A celery_worker.celery --loglevel=info

Now that they are running, we can execute the tasks.

Calling the asynchronous task:

The asynchronous task will be called anytime an authorised account visits a designated endpoint, I’m using the endpoint “/updateManifest”. This will call the asynchronous task “async_run_get_manifest()” which will be executed in the background.

api_1_0/views.py:

You’ll need to implement a feature to detect if the user is authorised to access this endpoint, I’ve left that out for clarity’s sake.

In this case I return back to the index.html page, depending on how your API is setup, you may return a text or JSON response. I had a system in place where I would receive update messages on a private Slack channel – depending on how the update went.

@api.route('/updateManifest')
@login_required
def updateManifest():
    async_run_get_manifest()
    return render_template('index.html',
                            site_details    = site_details,
                            ) 

Executing the periodic task:

The Periodic task will be executed every 5 minutes when the Celery Beat scheduler is running. Here I can check the progress from the Celery output:

[2017-11-22 13:38:08,000: INFO/MainProcess] Received task: app.getManifest.periodic_run_get_manifest[97a82703-af22-4a43-b189-8dc192f55b84]
[2017-11-22 13:38:08,059: INFO/Worker-1] Starting new HTTPS connection (1): www.bungie.net
[2017-11-22 13:38:10,039: WARNING/Worker-1] Detected a change in version number: 60480.17.10.23.1314-2
[2017-11-22 13:38:10,042: INFO/Worker-1] Starting new HTTPS connection (1): slack.com
[2017-11-22 13:38:10,803: WARNING/Worker-1] Detected a change in mobileWorldContentPaths: [u'en']

We can see from here:

  • Recieved the task: app.getManifest.periodic_run_get_manifest()
  • Created a new HTTPS connection to www.bungie.net – this is the request to check the Manifest version.
  • Next I check the version number of the Manifest, and print the line “Detected a change in version number: 60480.17.10.23.1314-2”
  • Created a new HTTPS connection to www.slack.com and I send this line to Slack as a message.
  • Next I check the mobileWorldContentPaths version for the English Manifest, and print the line “Detected a change in mobileWorldContentPaths: [u’en’]”

In my case I didn’t need my app to keep track of the task status or check if it’s completed correctly, but Celery has that option. I get updates from the Slack messages.

Creating a development Start up script:

Here’s the script I use to start up the development server, Redis server, Celery worker and Celery Beat worker. Save the following into a file called “Startup.bat” and you can just double click on the file icon to start each process, in it’s own window, in your development environment.

This can save a lot of time as opening 4 command windows and starting each process separately.

C:\
cd /d "C:\Users\AllynH\Documents\Python\Flask\DestinyVaultRaider_Redis_Celery_API"
start /K redis-cli shutdown
start timeout 5
start CMD /K redis-server
start CMD /K celery worker -A celery_worker.celery --loglevel=info
start CMD /K celery beat -A celery_worker.celery --loglevel=info
start CMD /K python manage.py runserver

Here’s a breakdown of what the script is doing:

  • The first line changes to our working directory.
  • Next I shutdown any existing Redis server (sometimes Redis wouldn’t start correctly unless I had done a shutdown first).
  • Then I wait for 5 seconds to allow the Redis server to shutdown.
  • The next 4 commands are used to start the Redis server, Celery worker, Celery Beat worker, and Flask server – each started in their own command shell.

Redis server, Celery workers and Flask server started.

Redis server, Celery workers and Flask server started via the Startup.bat script.

Running on Heroku:

Here are some Heroku specific changes, you can skip these if you’re not running on Heroku.

Creating a Redis broker and adding it to the app:

You’ll need to create a Redis broker and attach it to your app, this will give you the REDIS_URL mentioned above.

heroku addons:create heroku-redis -a destinyvaultraider

Editing the procfile:

To start the Celery worker and Beat processes, add the following to your procfile:

worker: celery worker -A celery_worker.celery --beat --loglevel=info

Note: we can kick off both the Celery worker and Beat scheduler in one command here, whereas we couldn’t on Windows.

Scaling the Worker dyno:

To start the process, you need to enable the Celery worker Dyno:

heroku ps:scale worker=1

Now your background tasks should be up and running!

Note on running Celery and Redis on Heroku:

The pricing on Heroku is really expensive to the point of being prohibitive, from my perspective I have had to disable the Redis database and Celery worker as Heroku require you to pay separately for each of these.

For example the pricing for the package I wanted worked out like this (as of November 2017), all figures are per month:

  • Hobby Dyno: $7 (Required for HTTPS certification).
  • Celery worker: $7.
  • Redis database 100MB: $30 (80MB required).

This is obviously not feasible for a hobby project that isn’t making any money.

In comparison, a Digital Ocean, Vultr or OVH also provide Virtual Private Server services from ~$5 per month, which would allow you to run Redis and Celery inclusive of that price.

So before you invest your time in Heroku, research some of the alternatives 🙂

PyCon UK 2017 presentation

PyCon UK 2017:

I was lucky enough to be selected to give a talk at PyCon UK, about my work on Destiny Vault Raider and all of the work I’ve been doing on the Destiny API.

The conference was held in Wales in between Thursday 26th to Monday the 30th of October, my talk took place on Saturday the 28th of October.

Presentation documents:

Destiny_Vault_Raider presentation in PDF format.

Destiny Vault Raider presentation in PDF format, hosted on Speaker Deck.

Demo video is located here.

Video of the presentation:


More PyCon UK Talks:

See the full schedule of talks here.

Here is the official PyCon UK Youtube channel, you can watch the talks.

© 2024 Allyn H

Theme by Anders NorenUp ↑