Making things, writing code, wasting time...

Category: Arduino

Creating a Python app for Destiny – Part 3: Logging in to Bungie.net and authenticating with PSN

Introduction:

In the previous sections I showed how to:

  1. Send a request to read Xurs inventory.
  2. Send a HTML formatted email with Xurs inventory.

I want to build on the previously created code to create an app that can transfer an item to and from the vault, and equip items.

In order to do that, our code will need to log in to Bungie.net and authenticate the account with PSN.

Logging in to Bungie.net and authenticating with PSN:

We are going to use the Python “Requests” package to login to Bungie.net by using our PSN account details and OAuth 2.0 to authenticate our connection with PlayStation Network.,

The good people at BungieNetPlatform have put together some guides on how to connect with Bungie.net, get authenticated with PSN (or Xbox Live – but I’m on PS4) and grab the required cookies. For this example, I used the code provided by Quantum Ascend here.

You can also see his step by step instructions here.

Here are the steps to this section:

  1. Sign in on Bungie.net via PSN – this will redirect you to the PSN sign in page.
  2. Grab our PSN session ID.
  3. Login to PSN (via OAuth) using our PSN username, password and adding our session ID as a cookie.
  4. Receive PSN a unique sign in URL and updated JSESSIONID.
  5. Request PSN  X-NP-GRANT-CODE, using updated JSESSIONID.
  6. Sign in to Bungie.net by adding the grant code to our original URL.
  7. Grab our Bungie.net authentication cookies.

Here is a flow chart detailing these steps:

Future War Cult colours - representing!

Bungie.net Sign-in flow chart

Request 1 is done in this way, to accommodate both Playstation and Xbox accounts to log in – however as I only have a Playstation 4, I’m not working on the Xbox live sign in, you can find code for that in the BungieNetPlatform guide here.

request1 = requests.get(BUNGIE_SIGNIN_URI, allow_redirects=True)
jsessionid0 = request1.history[1].cookies["JSESSIONID"]
params = urlparse(request1.url).query
params64 = b64encode(params)

Request 2 sends a POST request to the PSN sign in page. Our log in credentials are passed in a dictionary format, these are then form-encoded (by the Requests package as a HTML form) when the request is made. We also create a cookie with the JESSIONID we received from Request 1.

The response from Request 2, returns an updated JSESSIONID, also stored in a cookie – we save this updated value. The if statement checks for an authentication error being returned – this confirms our log in credentials were correct and no errors were returned.

request2 = requests.post(PSN_OAUTH_URI, data={"j_username": username, "j_password": password, "params": params64}, cookies={"JSESSIONID": jsessionid0}, allow_redirects=False)
if "authentication_error" in request2.headers["location"]:
    logger.warning("Invalid credentials")
jsessionid1 = request2.cookies["JSESSIONID"]

Request 3 sends a GET request to the returned PSN OAtuh sign in URL, adding the updated JSESSION ID, to the header. This will give us our x-np-grant-code.

request3 = requests.get(request2.headers["location"], allow_redirects=False, cookies={"JSESSIONID": jsessionid1})
grant_code = request3.headers["x-np-grant-code"]

The PSN OAtuh sign in URL will look something like this:

https://auth.api.sonyentertainmentnetwork.com/2.0/oauth/authorize?response_type=code&client_id=78xxx&redirect_uri=https%3a%2f%2fwww.bungie.net%2fen%2fUser%2fSignIn%2fPsnid&scope=psn:s2s&request_locale=en

Request 4 makes the final request to the Bungie.net sign in page, attaching the x-np-grant-code to the URL. The “params” function in the requests library attaches this code to the URL.

request4 = requests.get(BUNGIE_SIGNIN_URI, params={"code": grant_code})

The Bungie.net sign in URL with the x-np-grant-code attached should look something like this:

https://www.bungie.net/en/User/SignIn/Psnid?code=Nxxxh

Now that we have authorised our Bungie.net account with PSN, we can create a persistent session and send multiple requests.

Creating a persistent HTTP Session:

A persistent HTTP session is used to keep our HTTP connection alive allowing us to make multiple requests without the need to sign in and authenticate each time. This means we will only need to authorise our account once and can make multiple requests – so long as we attach the relevant authorisation data. This authorisation data is stored in the cookies and header data we send in our requests. The python requests package has a “Session” object, used for just this thing!

To create a HTTP session, we need to do 2 things:

  1. Send the required HTTP header data:
    • X-API-Key – the Application Programming Interface key we got from registering at Bungie.net.
    • x-csrf – our Cross Site Request Forgery protection token, received from Bungie.net after we have authenticated out app with PSN.
  2. Attach the required cookies with the correct, authenticated data:
    • bungled – received from Bungie.net after we have authenticated out app with PSN (This is also our x-csrf token).
    • bungleatk – received from Bungie.net after we have authenticated out app with PSN.
    • bungledid – received from Bungie.net after we have authenticated out app with PSN.

Here’s what that looks like when translated into Python code – first we create a requests Session object:

session = requests.Session()

Next, we add our X-API-KEY and x-csrf token to the session header:

session.headers["X-API-Key"] = API_KEY
session.headers["x-csrf"] = request4.cookies["bungled"]

Then we create our Cookies and attach them to the requests session object:

session.cookies.update(
 {
    "bungleatk": request4.cookies["bungleatk"], 
    "bungled": request4.cookies["bungled"], 
    "bungledid": request4.cookies["bungledid"]
 })

That’s it! We’re done – our app can now log into Destiny via PSN. This will allow us to use all of the private endpoints provided by the API and do lots of cool stuff, such as transferring items, equipping items, locking items, etc.
I’ll build on this code again in my next blog post.

Running the code:

Here is the full set of Python code, this can be copied into a file called “PSN_login.py”, in the same directory as your own code, and implemented like so:

from PSN_login import login

username = emailaddr
password = mypassword
api_key = API_KEY

# Log in via PSN and create our persistant HTTP session: 
session = requests.Session()
session = login(username, password, api_key)

Here’s the link to the code on my GitHub account:

https://github.com/AllynH/Destiny_Equip_Item/blob/master/PSN_login.py

Here’s the GitHub Gist:

Making a Twitter-Bot on your Galileo or Raspberry Pi

Twitter have developed an API (Application Programming Interface) for their website, which makes it really easy to send and receive Tweets from your Raspberry Pi or Galileo! The Twitter API takes all of the hard work out of writing a program to interface with Twitter, There are several ways to access the Twitter API, the easiest of which (in my opinion anyway 🙂 is to use the Twython package of the Python language.

Differences between Raspberry Pi and the Galileo:

It’s really easy to install Twython on the Raspberry Pi, a little harder to install on the Galileo – so for that reason, I’ll show the step-by-step instructions from the Galileo install. The only difference is the Galileo doesn’t require you to use the sudo command as you already have root permissions set. For example, when editing a file with the Galileo you would use:

# nano my_file.txt

When editing the file on a Raspberry Pi you would use:

# sudo nano my_file.txt

Changing the date on the Galileo:

In order to install some of these packages, you’ll need to update the date and time of your Galileo – this isn’t automatically done when you connect to the internet as you may expect. If you don’t update your date and time, you’ll get SSL certification errors when you try to download the Twython package.

To change the date and time – use the following command in the format year-month-day hour:minute:second:

# date --set="2015-01-20 10:00:00"

Installing Twython (and other Python packages):

In order to connect our computer to Twitter, we’ll need to download some Python packages:

  1. setuptools – this will allow you to “Easily download, build, install, upgrade, and uninstall Python packages.”
  2. pip – this is a  Python package installer.
  3. twython – this is the package which will actually interface with Twitter.

Here are the commands to install these packages – remember if you’re on a Raspberry Pi you’ll need to put “sudo” in front of each command.

# apt-get install python-setuptools

Here’s what that looks like on your computer, when asked “do you want to continue” as per the picture below – enter “y”. to continue.

Package 1 of 3.

Installing the setuptools Python package.

Next, install the “pip” package:

# easy_install pip

Finally, using pip – install the Twython package:

# pip install twython


Creating a Twitter App:

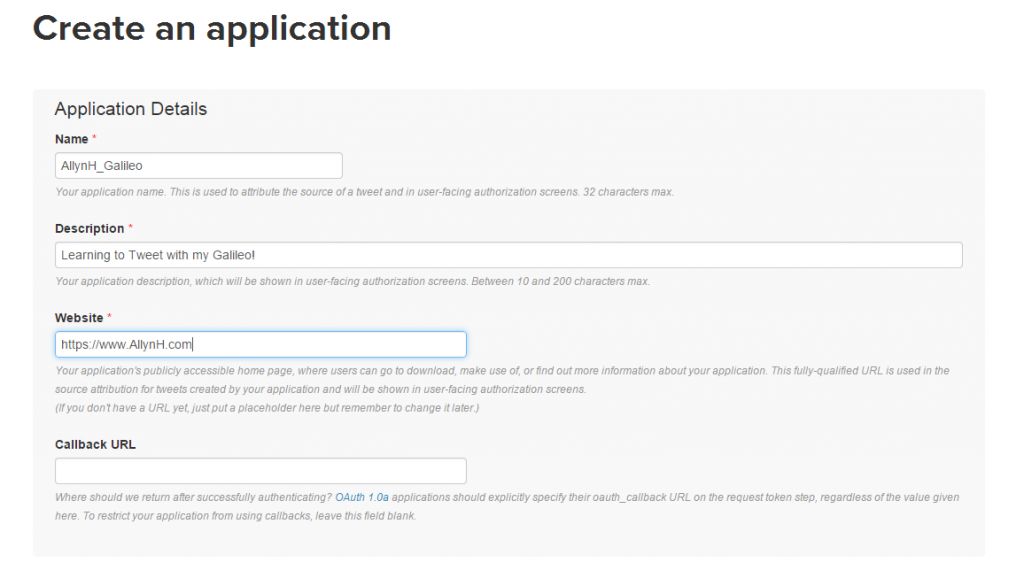
To create a Twitter App, you’ll need to sign up to Twitter and register the account as an application. This is important as you’ll need to verify this App with Twitter every time you use it. The verification method Twitter uses is called OAuth 2.0 to verify your App, this means you’ll never have to supply your password to 3rd party App developers but it does make it a little harder to verify your App – the good news is, Twython and other API’s handle all the OAuth pain, all you need to do is register your App and save the information. Register your app here: https://apps.twitter.com/ Click on “Create New App” and enter your information.

Let the fun begin!

Creating an App.


Changing App permissions:

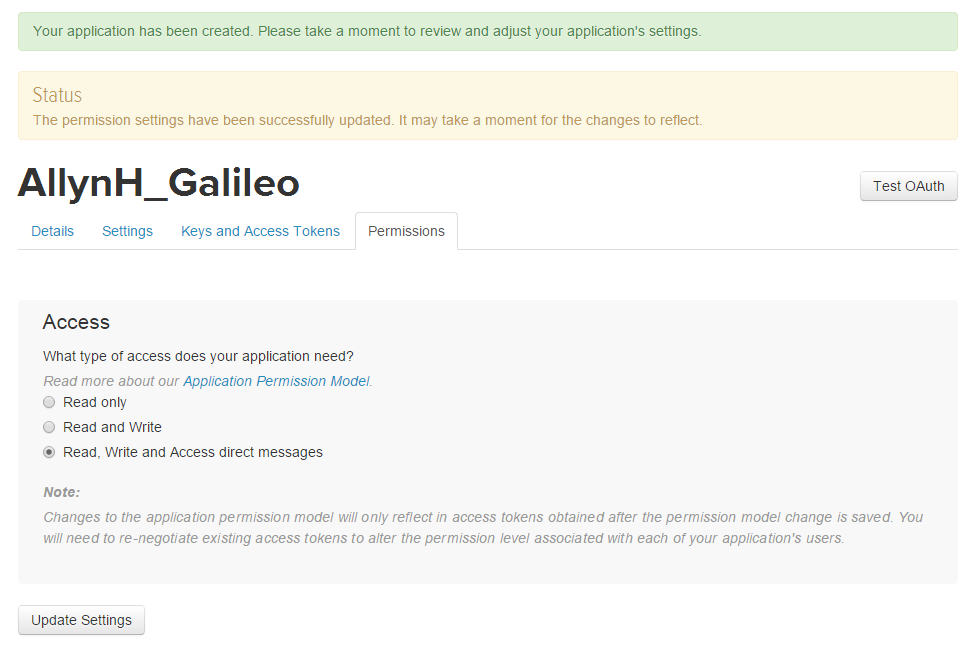
As this is your App and you’ll want to be able to play around with it – you can chance the App permissions to allow you to read, write and access your direct messages. You can change these permissions at a later stage.

Change permissions.

Change permissions.

Authorize your account:

You need to create your access token and access token secret before you use your App. Click on the “Keys and access tokens” tab. Click on the “Create my access token” button.

Generate your secret token.

Generate your secret token.

You should now have all 4 pieces of required information:

  1. Consumer Key (API key).
  2. Consumer Secret (API Secret).
  3. Access Token
  4. Access Token Secret.

Now it’s time to write some Python!

Writing the Python:

Creating a Python file:

On your Raspberry Pi or Galileo, create a file called “Tweet.py” using the following command:

# nano Tweet.py

Now paste in the Python code:

Twitter Authorization:

In order to send  a Tweet, you’ll need to send Twitter your OAuth information. This process is handled by the Twython package. Here we are creating 4 string objects and a Twython object called “twitter”. When we create the Twython object we are passing the 4 strings to it an arguments. These are the access keys you generated in the previous section.

CONSUMER_KEY = '<YOUR CONSUMER_KEY>'
CONSUMER_SECRET = '<YOUR CONSUMER_SECRET>'
ACCESS_KEY = '<YOUR ACCESS_KEY>'
ACCESS_SECRET = '<YOUR ACCESS_SECRET>'
twitter = Twython(CONSUMER_KEY,CONSUMER_SECRET,ACCESS_KEY,ACCESS_SECRET)

Reading in a command line argument:

To make the code a bit more flexible, we can pass the text we want to Tweet into the Python script as a command line argument. This is done by using the system “argv” parameter. In our case – we only want to take the first 140 characters of this text, as this is the character limit set by Twitter for each Tweet. We do that by using the command:

sys.argv[1][:140]

Executing the code:

You can execute the code from the command line like so:

# python Tweet.py "Hello world."

Here’s what that looks like on the Galileo:

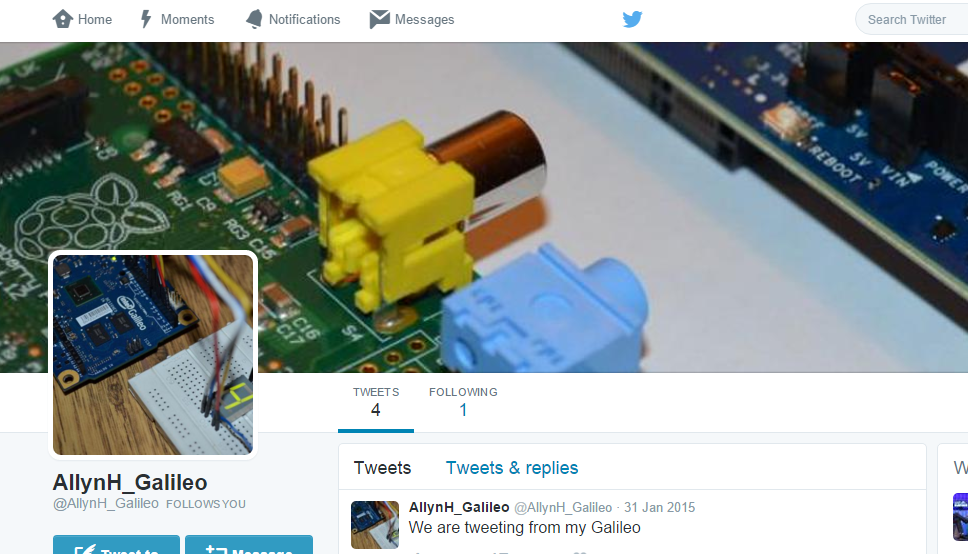
First Tweet!

Hello World!

Then check your Twitter Bot!

Creating a Web Server on the Galileo: Using the Arduino IDE.

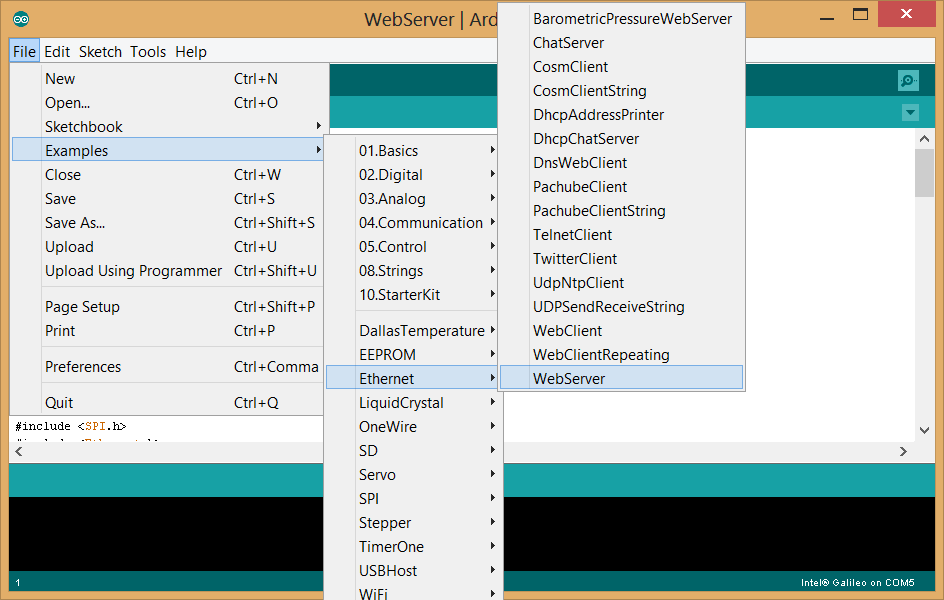
Creating a Web Server using the Arduino IDE example:

The Arduino IDE comes with a prebuilt Web Server example. If you’re not sure what a Web Server is, or what it’s used for – check out my blog post here -> Creating a Web Server on the Galileo

It's pretty sweet actually.

Arduino Example for creating a Web Server.

The above example comes with enough code to:

  • Create a Web Server on the given IP address.
  • Create a blank HTML page.
  • Read the analogue inputs and display their values on the HTML page.

How the Arduino Web Server works:

The Web Server uses the Arduino Ethernet library to answer any HTTP requests made to the Galileo. The Galileo already has an Ethernet connection on board and fully supports the Ethernet library.

Here’s how the library is explained on the Arduino website:

The library allows the Arduino device to connect to the internet. It can serve as either a server accepting incoming connections or a client making outgoing ones. The library supports up to four concurrent connection (incoming or outgoing or a combination).

The Arduino example does not conform to the full HTML page structure, and instead relies on printing text between the opening and closing HTML tags.
This is not the ideal solution for creating a fully functioning HTML page but it is a very quick and easy way to control your Galileo via a web browser. The example is pretty bare-bones, a HTML only website with no CSS styling or server side scripting functionality. Without any JavaScript or PHP, your page needs to be refreshed anytime the data changes.

Creating the Web Server in the Arduino IDE:

We start the Web Server by initialising the Ethernet class, to do this we need to call the Ethernet.begin() function and pass the required MAC and IP addresses to the function.

byte mac[] = { 0xDE, 0xAD, 0xBE, 0xEF, 0xFE, 0xED };
IPAddress ip(192,168,1,177);

void setup() {
//  Ethernet.begin(0xDE, 0xAD, 0xBE, 0xEF, 0xFE, 0xED, 192,168,1,177); 
    Ethernet.begin(mac, ip);
}

Once the Ethernet class has been initialised, we need to tell the server to listen for incoming connections on port 80, this is the default port for HTML requests, you can change this port number, which I will be doing in the Node.js example.

EthernetServer server(80);

void setup() {
  server.begin();
}

When the server is running and a client is available (connected via a web browser), the client.println() function is used to send data to all the connected devices. HTML can be printed directly using the client.println() function.

void loop() {
  client.println("<title> Allyns webserver: </title>");
}

The above code can be used to build a fully functioning Web Server.

Note:

At the time of writing there is a bug in the Arduino Ethernet library, which is discussed and a fix is suggested here.

© 2024 Allyn H

Theme by Anders NorenUp ↑