Introduction:
Big news: I’ve managed to launch my own Destiny based website!!! I’ve been working on an inventory management system for a while now, and following on from my previous blog posts I’ve managed to deploy my work to date as a live website.
You can test it out for yourself here https://www.destinyvaultraider.com once you’ve authorised your account, you can click on Vault, Character or Xur (if he’s around).
The aim of this website is to use it as a live learning tool, where I can continue to develop and add new features. For example, I can display the vault and character inventory but I can’t transfer items yet, so this is a feature I hope to add in the future.
If you’d like to review the previous Destiny API posts, check them out here:
- Send a request to read Xurs inventory.
- Send a HTML formatted email with Xurs inventory.
- Log into Destiny and Bungie.net via your PSN account.
- Transfer items from your vault to your character and equip them.
- Reading a characters inventory and vault contents.
- Creating a Python web server with Flask.
- Authenticating our app with Bungie.net OAuth.
You can also find me on Twitter here @Allyn_H_
Flow chart:
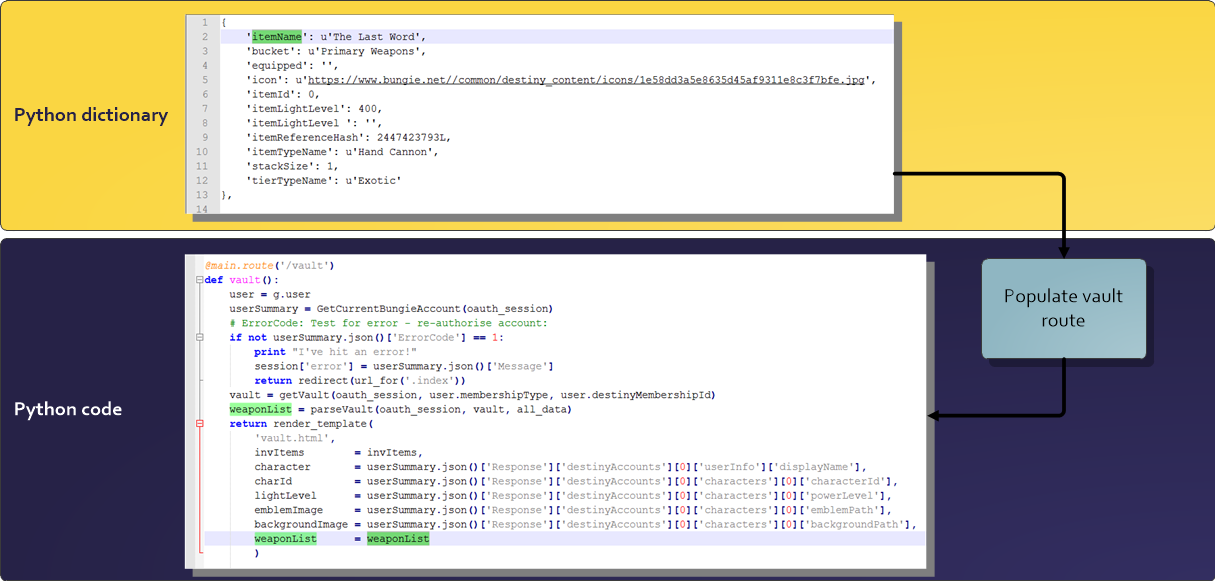
This section is quite confusing as I’ll be making a request to Bungie, then decoding that request and changing the format of the response a few times before plugging it into my Flask app, so here’s a quick guide as to how I’m creating the Vault route. Excuse the colours, I’m a representing Future War Cult. You can click on the image to make it bigger.
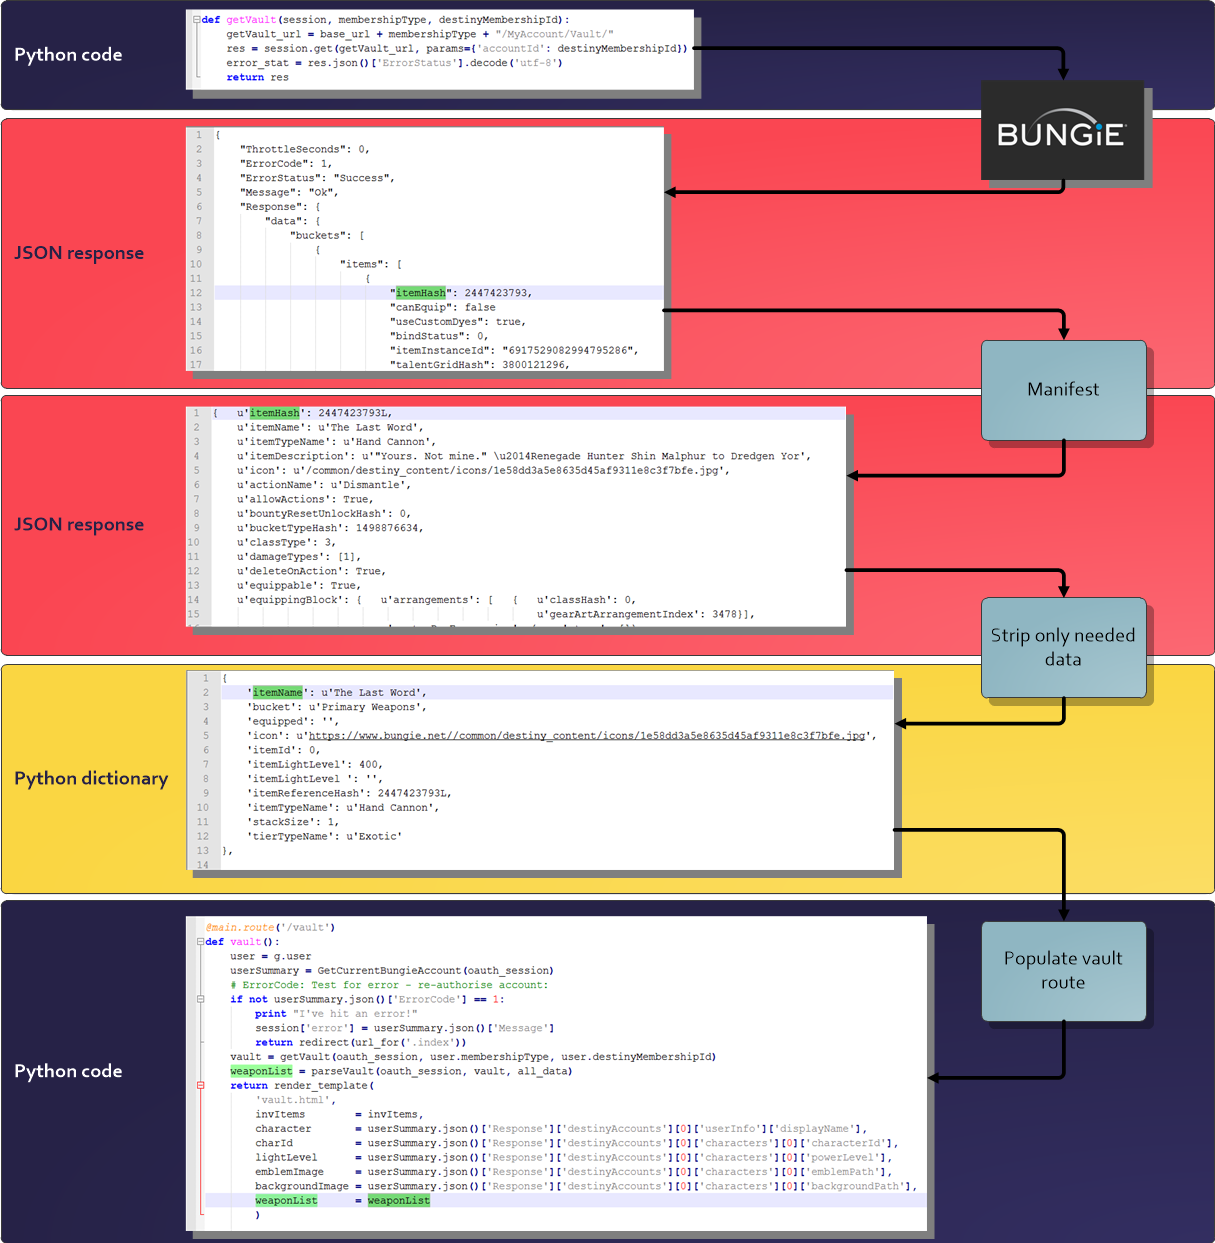
Flow chart detailing the steps for creating the vault page.reate vault route:
Create vault route:
In the previous section we created an index route, which was used to display the index.html page. Now that we have authorised the user, we can build on this and add a new route to display the users Vault contents.
To create the Vault route, the code looks like this:
@main.route('/vault')
def vault():
    :
    # Do something...
    :
    return render_template('vault.html')
Right now, ‘vault.html’ is an empty file that extends from our ‘base.html’ – it will only display our navbar. For a quick refresh on the Flask setup, check out this post: Creating a Python app for Destiny – Part 7: Authenticating our app with Bungie.net OAuth.
Right now the “vault.hmtl” template looks like this:
{% extends "base.html" %}
{% block content %}

{% endblock %}
We are extending from the “base.hmtl” template and our content block is empty. Now we can build on this and add some content.
in order to build our Vault page we will need to do a few things:
- Send a request to Bungie.net to get the users account details:
- We need the users membershipType, destinyMembershipId and characterId.
- Send a request to Bungie.net to get the users Vault contents.
- We’ve already done this here: Creating a Python app for Destiny – Part 5: Reading a characters inventory and vault contents.
- Parse through the users vault contents and take out the data we wish to display.
- Again, we’ve done this above, we just need to tweak the code a bit.
- Categorise and display each item.
- The JSON response from Bungie doesn’t return the items in any order, so we need to categorise them in order to display them properly.
In order to better categorise the vault items, I created a dictionary of each item category. These categories are stored in the item details returned from the manifest, as item[‘bucket’]. I’ve split these out as below:
invItems = {
    1 : 'Primary Weapons',
    2 : 'Special Weapons',
    3 : 'Heavy Weapons',
    4 : 'Ghost',
    5 : 'Helmet',
    6 : 'Gauntlets',
    7 : 'Chest Armor',
    8 : 'Leg Armor',
    9 : 'Class Armor',
    10 : 'Artifacts',
    11 : 'Vehicle',
    12 : 'Sparrow Horn',
    13 : 'Ships',
    14 : 'Shaders',
    15 : 'Emblems',
    16 : 'Emotes',
    17 : 'Weapon Bundles',
    18 : 'Materials',
    19 : 'Consumables',
    20 : 'Ornaments',
    }
Each of these categories will be used to create a section in our vault page. We will loop through these categories and create the HTML needed to display each item. First though, we need to get the users vault details…
1: Send a request to Bungie.net to get the users account details:

Send a request to Bungie.net to get the users account details
Once the user has been authenticated by Bungie, we can send a request to Bungie to get the account details of the current user. This will return some important information like the users PSX / Xbox Live username, membershipType, destinyMembershipId, and all of the users character IDs.
Here’s the code to send the “GetCurrentBungieAccount” request:
def GetCurrentBungieAccount(session):
    req_string = 'https://www.bungie.net/Platform/User/GetCurrentBungieAccount/'
    res = session.get(req_string)
    error_state = res.json()['ErrorStatus'].decode('utf-8')
    return res
There’s nothing there we haven’t seen before. The function takes the authenticated session data as a parameter and returns the JSON response. As we can see, there’s a lot of important account data returned that will enable us to view and interact with the users account:

The response from getcurrentbungieaccount returns a lot of important account data.
This Endpoint will also give character details, such as race, gender and class, details of the users clan affiliation, the users Grimore and more.
2: Send a request to Bungie.net to get the users Vault details:
Sending a request to Bungie.net to get the users Vault details
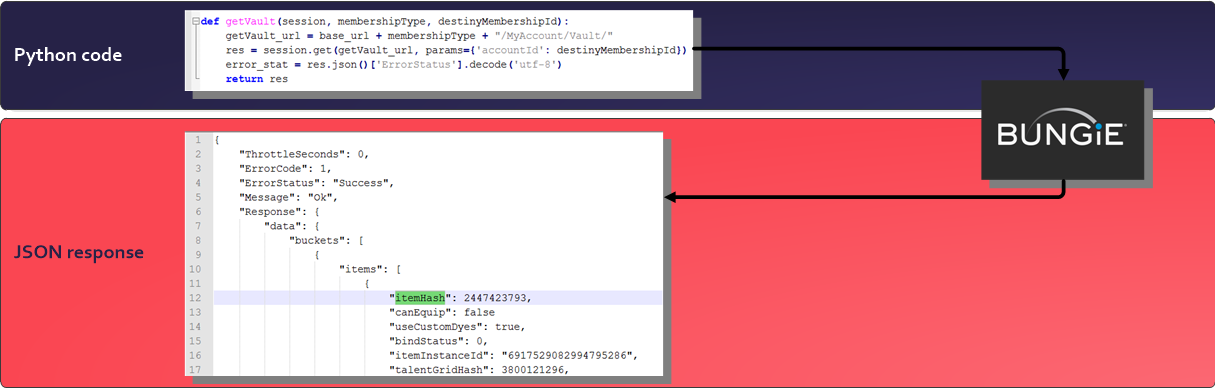
Now that we have the users membershipType and destinyMembershipId, we can send a request to Bungie for their vault contents.
def getVault(session, membershipType, destinyMembershipId):
    getVault_url = base_url + membershipType + "/MyAccount/Vault/"
    res = session.get(getVault_url, params={'accountId': destinyMembershipId})
    return res
Again we send a request, with the users membershipType and destinyMembershipId added to the URL as parameters, the the function then returns the JSON response from Bungie.
3: Parse the Vault response and return only the required data:
Now that we have a response from Bungie, we need to convert this into a human readable format. The JSON response from the getVault request (in my case) is 35,147 lines of text… That’s a lot of data, also there is no real human readable data in there, it doesn’t return the item names for example – just a itemHash value. So we now need to strip out each item hash and search the manifest for the human readable format of that data. Again, the response after decrypting these items from the Manifest is 54,150 lines of text, so we’ll need to extract only the lines of code we’re interested in. Each item will be condensed down to 10 pieces of useful information (we can build on this at a later stage if needed).
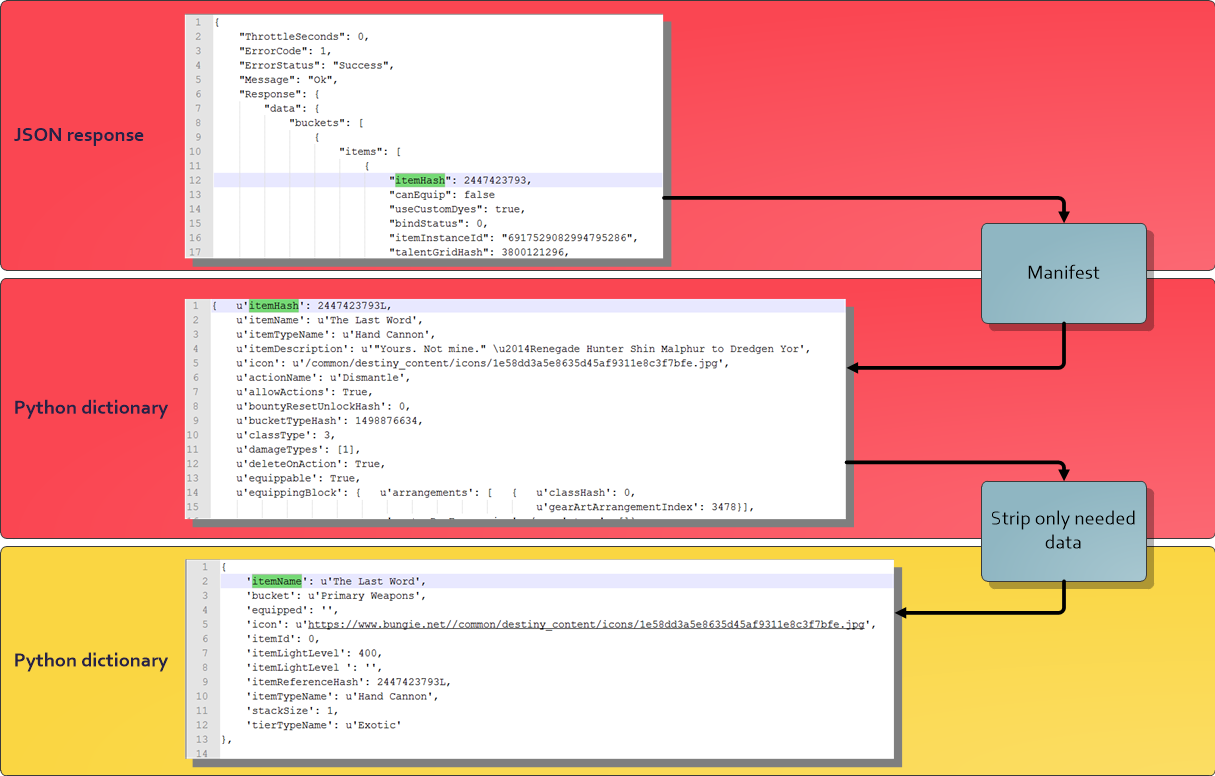
Decoding the itemHash from the manifest and stripping out the required data.
One of the things we can also do, to make life a little easier for us, is to categorise each item by its “bucketName” – this is a value stored in the manifest that is used to categorise each item, for example “Primary Weapon”, “Consumables” or “Ghost”. The response from getVault is split into 3 buckets, “Weapons,” “Armor” and “Inventory”. This can be seen when you visit your vault in the tower or on any app. In our case, we’re going to add them all to 1 page, with the ‘bucketName’ (i.e. “Primary Weapon”, “Chest Armor” or “Consumables”) used to categorise each item.
First, lets create a list of blank dictionary objects with the items we want to display for our vault:
array_size = 0
weapon_list = [{
    'itemReferenceHash': 0,
    'itemId': 0,
    'itemName': '',
    'tierTypeName': '',
    'itemTypeName': '',
    'itemLightLevel ': '',
    'stackSize': 1,
    'icon': '',
    'bucket': '',
    'equipped': '',
} for array_size in range(vaultSize)]
array_size = 0
Now that the list is created, lets loop through each inventory item, decode the values from the manifest and store the data we want to display.
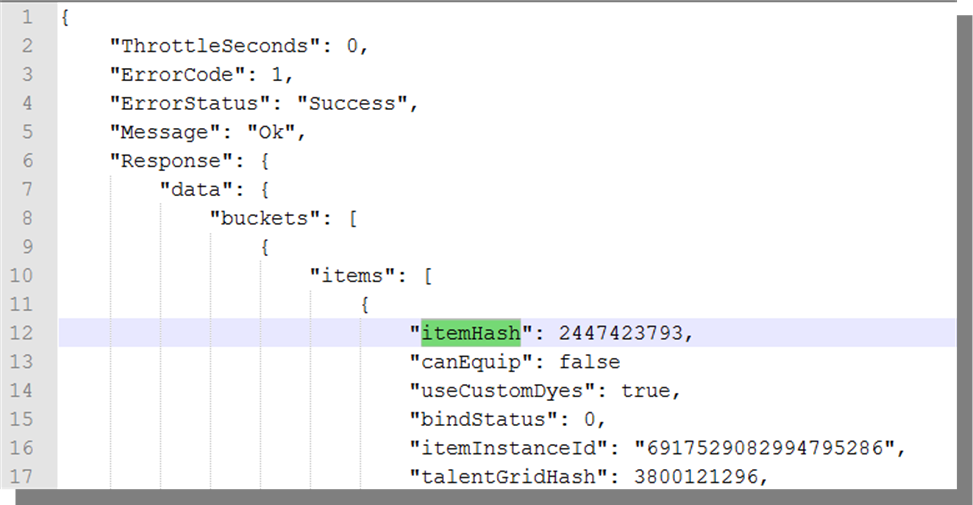
The JSON response from getVault shows the itemHash we need to decrypt.
We are also going to query each “itemHash” from the manifest to get the full item details, you can read back to part 5 for a refresh on what I’m doing here.
If we look at the JSON response from the getVault request, shown in the picture above, both “buckets” and “items” are lists of nested dictionary items , so we need to loop through “buckets” and then each of the “items”, to get to the items “itemHash”. (You can see they’re lists because of the square brackets “[“, denote the start of the list.)
The code for looping through the nested lists is below:
for bucket in vaultResult.json()['Response']['data']['buckets']:
    for item in bucket['items']:
        weapon_list[array_size]['itemReferenceHash'] = item['itemHash']
        inventoryItem = all_data['DestinyInventoryItemDefinition'][item['itemHash']]
        weapon_list[array_size]['itemName'] = inventoryItem['itemName']
Once we have the “itemHash” we can query the Manifest definition “DestinyInventoryItemDefinition” for the item details. We can then store the information we want to keep in our own list of dictionary items.
Stripping out the important data:
The function parseVault takes 3 parameters; the authorised “session”, the “vaultResult” JSON response and the Manifest data in the format of a Python dictionary as “all_data”. Here’s what the full code for stripping each item from the manifest looks like:
def parseVault(session, vaultResult, all_data):
    for bucket in vaultResult.json()['Response']['data']['buckets']:
        for item in bucket['items']:
            weapon_list[array_size]['itemReferenceHash'] = item['itemHash']
            inventoryItem = all_data['DestinyInventoryItemDefinition'][item['itemHash']]
            weapon_list[array_size]['itemName'] = inventoryItem['itemName']
            weapon_list[array_size]['itemLightLevel'] = item.get('primaryStat', {}).get('value', "")
            if ((inventoryItem['itemName'] != "Classified") and (inventoryItem['itemHash'] != 1826822442)):
                bucketHash = all_data['DestinyInventoryBucketDefinition'][inventoryItem['bucketTypeHash']]
                weapon_list[array_size]['itemName'] = inventoryItem['itemName']
                weapon_list[array_size]['tierTypeName'] = inventoryItem['tierTypeName']
                weapon_list[array_size]['itemTypeName'] = inventoryItem['itemTypeName']
                weapon_list[array_size]['icon'] = "https://www.bungie.net/" + inventoryItem['icon']
                weapon_list[array_size]['bucket'] = bucketHash['bucketName']
            # Classified items won't have this information, if not overwritten can cause fails:
            if ((inventoryItem['itemName'] == "Classified") or (inventoryItem['itemHash'] == 1826822442)):
                weapon_list[array_size]['itemName'] = inventoryItem['itemName']
                weapon_list[array_size]['tierTypeName'] = "Classified"
                weapon_list[array_size]['itemTypeName'] = "Classified"
                weapon_list[array_size]['bucket'] = "Classified"
            array_size += 1
    return weapon_list
Also note, as I’ve hit a few issues recently with Bungie releasing new items – but forgetting to change them from “Classified” in the Manifest, I’ve added a default value for any items with an “itemName” of “Classified” – this will prevent any errors occurring if Bungie add a Classified item at a later stage.
Populating the vault route with our data:
Now that we have stripped the important data out of the manifest, into a list of dictionary’s, we can pass this list to the ‘vault’ route in the ‘views.py’ file. As a side note, it would have been possible to populate the Vault route without stripping out this data – but it’s much harder to parse through lists of nested dictionary items in the Jinja2 template than in Python. Also, if we were creating a high traffic site, it’s not good practice to send large files of data every time the user refreshes a webpage.
In the case of our Vault route, this could get to about 5MB per page view… Users on mobile data wouldn’t be happy about that, so we need to cut this down.
Populating the Vault route in our Flask app with the data stripped from the manifest.
Now that we have our important data stripped out and stored in a list of dictionary objects, we need to pass this dictionary to the render_template function of the vault route as a parameter. The “invItems” dictionary, containing the item categories is also passed as a parameter.
@main.route('/vault')
def vault():
    userSummary = GetCurrentBungieAccount(oauth_session)
    vault = getVault(oauth_session, user.membershipType, user.destinyMembershipId)
    weaponList = parseVault(oauth_session, vault, all_data)
    return render_template('vault.html',
        weaponList = weaponList,
        invItems = invItems,
        character = userSummary.json()['Response']['destinyAccounts'][0]['userInfo']['displayName'],
        characterHash = characterHash,
        charId = userSummary.json()['Response']['destinyAccounts'][0]['characters'][0]['characterId'],
        lightLevel = userSummary.json()['Response']['destinyAccounts'][0]['characters'][0]['powerLevel'],
        emblemImage = userSummary.json()['Response']['destinyAccounts'][0]['characters'][0]['emblemPath'],
        backgroundImage = userSummary.json()['Response']['destinyAccounts'][0]['characters'][0]['backgroundPath'],
        )
The other parameters (character, characterHash, charId, lightLevel, emblemImage and backgroundImage) are all taken from the response from getcurrentbungieaccount() and were shown in the last blog post, Part 7: Authenticating our app with Bungie.net OAuth.
Displaying an item in HTML:
To display each item, I created a HTML template file called “itemBlock.html”
The code is quite basic, 2 <div>’s an <img> and 2 <p>’s. The first <div> sets out a Bootstrap column, col-md-3 will allow 4 images to be tiled, per row, before moving to a new row. For the image, I’m passing a lot of parameters but I’m not actually using them yet, as I haven’t found a tidy way to display all of the information. In the <p> paragraph sections, I’m displaying the itemName, itemLightLevel, tierTypeName and itemTypeName.
Here’s the code in the “itemBlock.html”:
<div class="col-md-3 col-sm-4 col-xs-6">
    <div class="thumbnail">
        <img class="img-responsive med-tile" src="{{ dict_item['icon'] }}" title="{{ dict_item['itemName'] }}" tierTypeName="{{ dict_item['tierTypeName'] }}" itemTypeName="{{ dict_item['itemTypeName'] }}" tier="{{ dict_item['tier'] }}" bucket="{{ dict_item['bucket'] }}" itemLightLevel="{{ dict_item['itemLightLevel'] }}" itemReferenceHash="{{ dict_item['itemReferenceHash'] }}">
        <p>{{ dict_item['itemName'] }}: {{ dict_item['itemLightLevel'] }}</p>
        <p>{{ dict_item['tierTypeName'] }} {{ dict_item['itemTypeName'] }}</p>
    </div>
</div>
Here’s what that will look like when displayed:
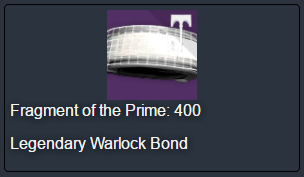
Here’s what the output from the ‘itemBlock.html’ template file looks like.
Edit vault.html template to display all items:
To display the vault contents in the correct order, we need to step through the invItems list and pick out each item of each category.
Here’s the code in the “itemBlock.html” file:
<div class="inventory-container">
{% for item in invItems -%}
    {% for dict_item in weaponList -%}

        {% if invItems[item] in dict_item['bucket'] -%}
            {% include 'itemBlock.html' -%}
        {% endif -%}

    {% endfor -%}
{% endfor -%}

</div>
In the code below, we test to see if the current item in our list is one of the category of items we want to display:
{% if invItems[item] in dict_item['bucket'] -%}
    {% include 'itemBlock.html' -%}
{% endif -%}
If so we include the “itemBlock.html” file to display the item.
Viewing our web site:
As usual, the full set of code can be found on my GitHub page:
https://github.com/AllynH/Destiny_Flask_Webserver
There are a few files / folders, so you’ll need to download it from there.
To run the code you can type:
python app.py
This will start the Flask Web Server, you’ll see some output like this:
* Restarting with stat
Opening Manifest...
Finished!
 * Debugger is active!
* Running on https://127.0.0.1:5000/ (Press CTRL+C to quit)
First, click on the “Authenticate with Bungie” link and follow the instructions to authenticate your account.

Here is the view of the index page.
You should see a screen like this, asking you to review and approve the permissions required by this app.
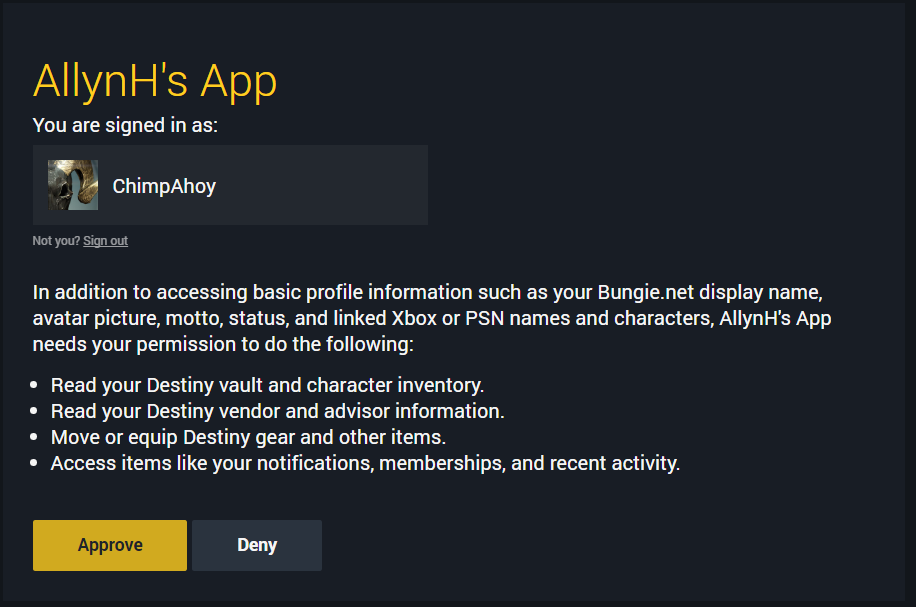
Don’t forget to review what permissions your giving the app.
You should then be redirected back to the index page.
Now that you’ve been authorised and logged into Bungie via our app, we can open the link “view your vault contents”, you’ll see something like this:
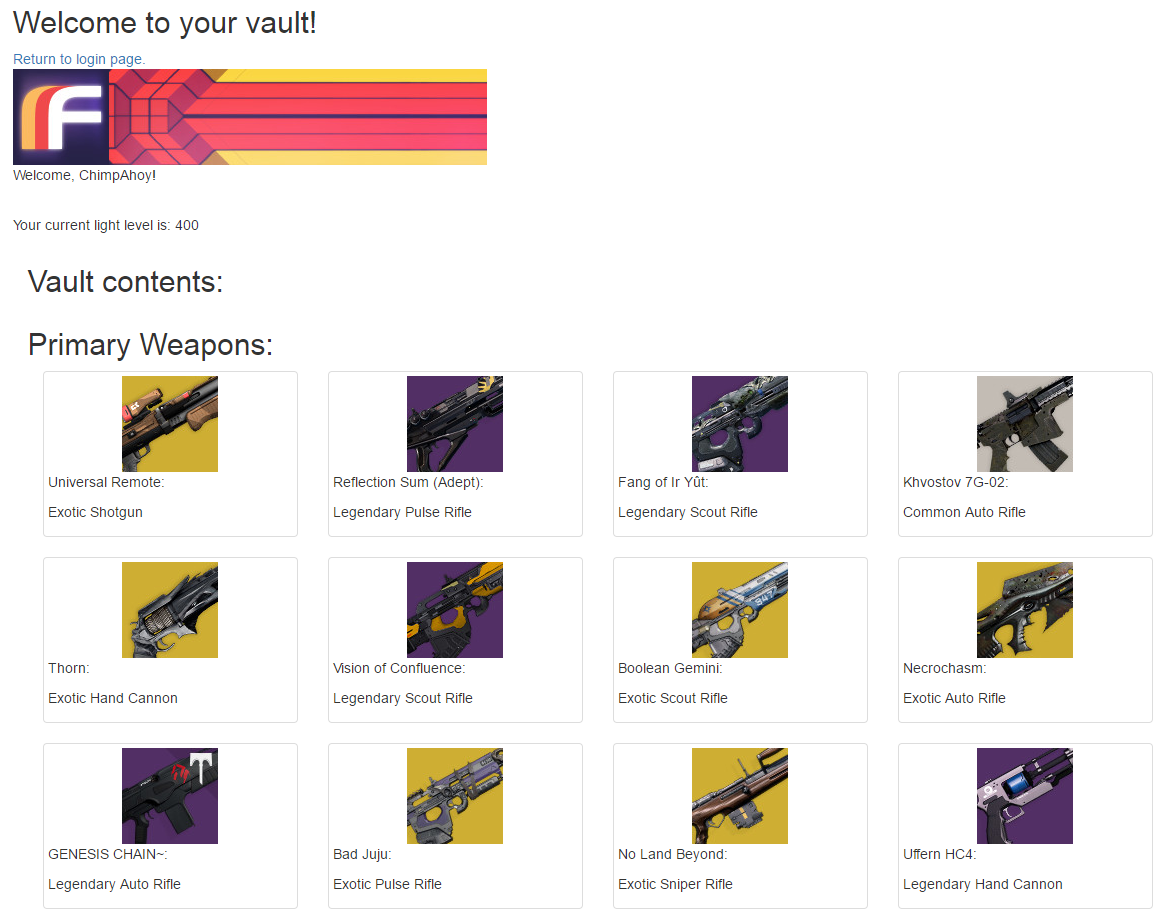
Here’s what the vault view currently looks like!
Next steps:
Right now, we’ve created the basic shell of the website / app. This is a good start and we can build onto this, add features, create new pages.
The next steps for me will be to add more functionality to the website:
- Character inventory view.
- Xur inventory view.
- Finish the refresh token flow, so users don’t need to authenticate every 30 mins.
- Add a user database to securely store the users refresh tokens.
- Add a transfer item feature.
All of the above is finished (except the transfer item feature), I just need to write up the blog post 🙂
Leave a Reply
You must be logged in to post a comment.