Making things, writing code, wasting time...

Tag: WebServer

Adding a React frontend to your Flask project

Introduction:

Flask is great for quickly building server side application.
React is great for quickly building responsive user interfaces.

This post is part 2 of a 3 part series. I’m going to walk through setting up a Flask API project, adding a React frontend to the project and then adding some data visualization to the React frontend.

Here are the other sections:

  1. Adding an API to your Flask project.
  2. Adding a React frontend to your Flask project
  3. Adding data visualization to your Flask app with React Victory charts.

We’ll look at this from the perspective of a project that’s already in flight. As most people who are familiar with Flask, are already familiar with Miguel Grinbergs microblog application, I’ve cloned his project repository we will add a React frontend into it.

Flask and React work really well together:

With Flask we can:

  • Run server side scripts and applications.
  • Deliver generic HTML sections such as headers / footers / nav bar.
  • Deliver raw JSON data via API endpoints.
    • Make database connections and requests.
    • Data processing / computation and packing data.

With React we can:

  • React can build responsive, stateful components.
    • Any component that needs memory, (remembering viewport height / width for example).
    • Show / hide / update a div, or HTML section.
  • Build a responsive user interface.
    • Anything that changes or updates with user input
    • Handle onClick functions.
    • Extensive compatible library selection, such as drag and drop tools.

Why do we need JS?

Our goal is to create a modular application, with a seamless (as possible), user interface and user experience.

Normally with a Flask only application; if a user clicks on a link or refreshes some data – the entire HTML page is dumped, then all of the required data structures are regenerated on the server side, a HTML template is populated and reloaded in the users browser – this can take a long time from the users perspective.

In an ideal application – if a section of your app needed to be updated, your server would, asynchronously, resend the required data, then your application frontend would handle rerendering only the updated section.
Only the required <div> or HTML section would be updated – the rest of your webpage would remain unchanged. The user doesn’t see all of this magic happening in the background.
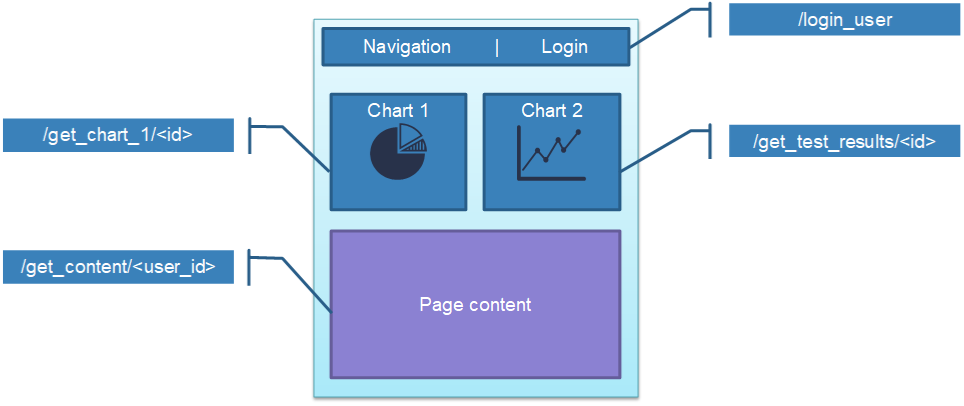
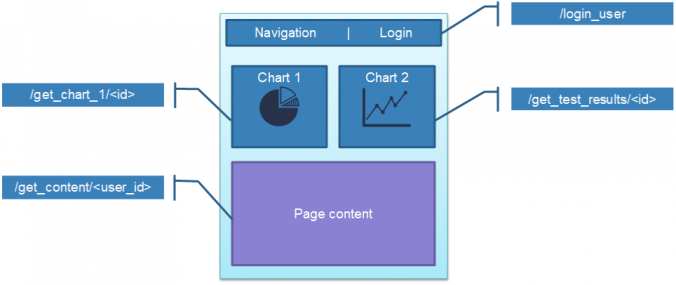
Create a modular application with JS and React

For example: if a user requested updated data for Chart 2 in the diagram above; we don’t want to regenerate the Navigation, Chart 1, and Page Content sections. We only want to update Chart 2, and have the data fetched in the background – so the user experience feels nice and smooth.

This is common practice in most client side applications but can become a bit tricky when you have a server side application.

Also if you’re like me and don’t have a background in Computer Science, you may not be aware that there is some additional optimization to be had in your applications.

Project structure:

Let’s build this from the Flask large application structure.

Here is the typical project structure for a Flask application.

Flask large application directory structure:

|   config.py
|   microblog.py
|
+---app
    |   cli.py
    |   models.py
    |   __init__.py
    |
    +---api_1_0
    |       routes.py
    |       __init__.py
    |
    +---main
    |       forms.py
    |       routes.py
    |       __init__.py
    |
    +---static
    |       loading.gif
    |
    +---templates
        |   base.html
        |   index.html
        |   user.html
        |
        \---errors
             404.html
             500.html

We’re going to add the React setup into the app/static folder.

Webpack and Babel:

While technically not required – these 2 tools make building a modern JavaScript frontend much easier.

We will, however, require Babel if we want to use React JSX (a syntax extension to JS, it looks like a mix of HTML and JavaScript). JSX simplifies much of the React development, so we want to use it.

Babel:

  • What is Babel?
    • Bable is a toolchain used to convert the latest versions of JavaScript code into backwards compatible code that all modern web browsers can understand.
  • Why do I need to use Babel?
    • Babel is required if you want to write React JSX (which we do).
An example of Babel transpiling new JS to browser compatible JS.
(Picture https://babeljs.io/ )

Webpack:

  • What is Webpack?
    • Webpack is an open source JavaScript module bundler.
    • It can also bundle HTML, CSS and images.
    • When used with the Babel loader Webpack and Babel will transpile your code.
  • Why do I need Webpack?
    • React components are usually split across multiple files – we want Webpack to bundle all of our JS files into 1, minimized, file.
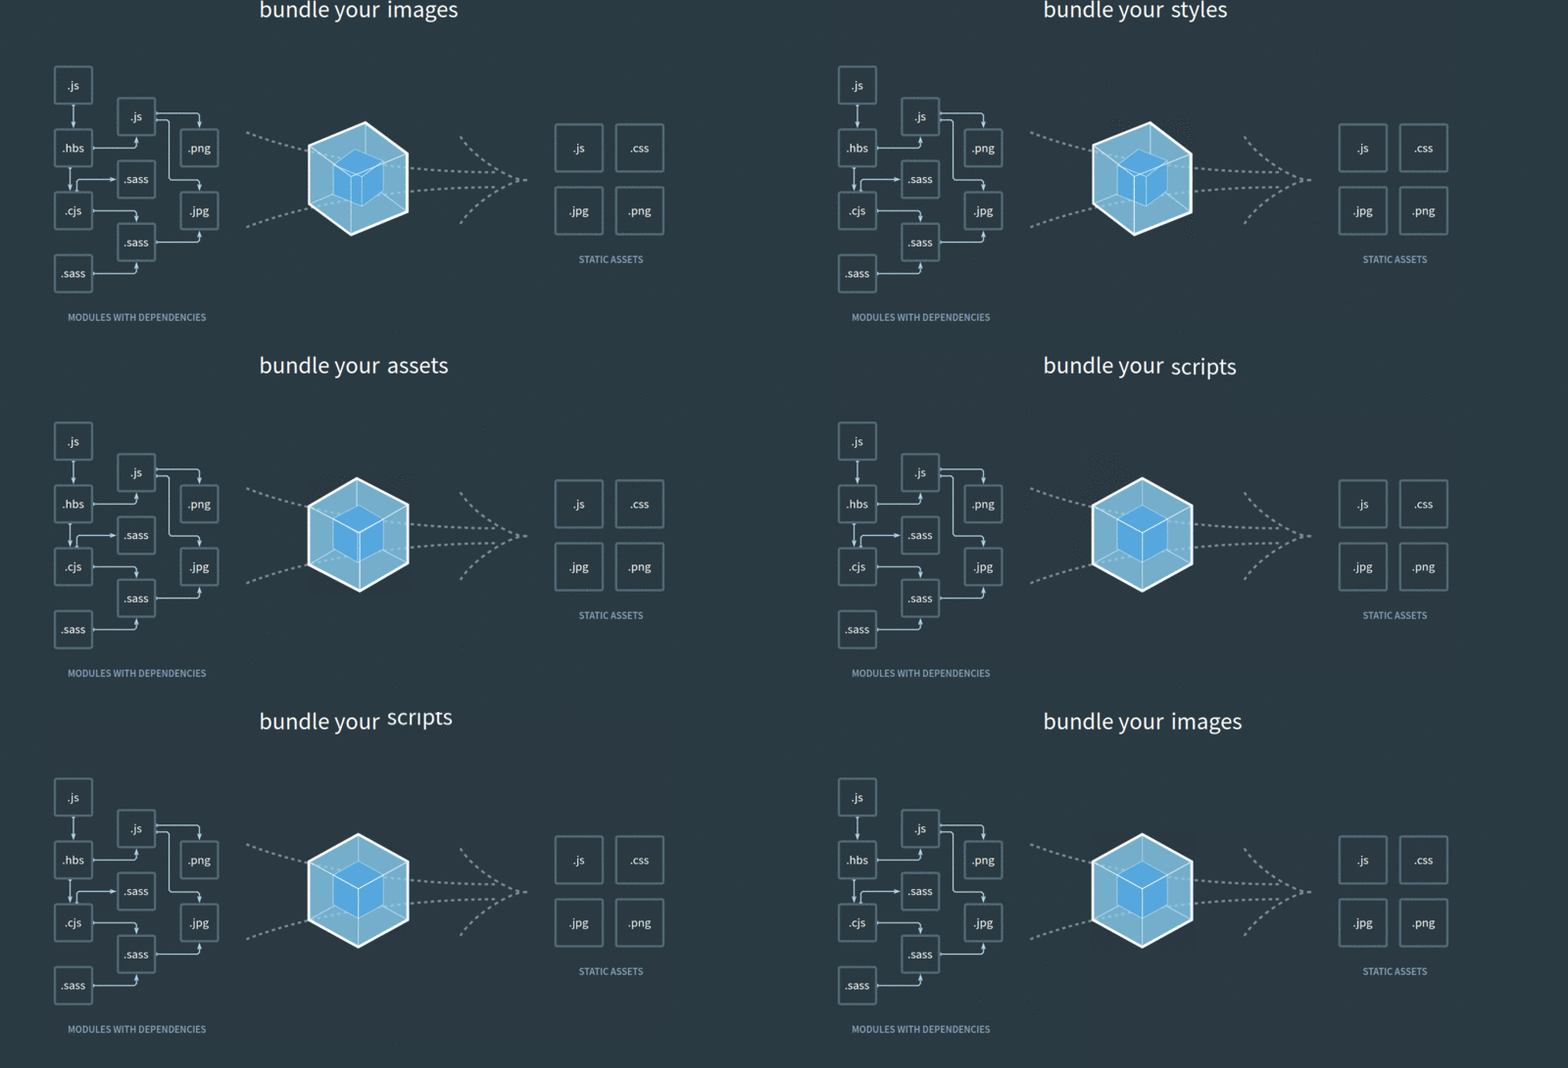
Webpack bundles your JS, HTML, CSS and images.
Picture (https://webpack.js.org/ )

Frontend directory structure:

app/static:

│   package-lock.json
│   package.json
│   webpack.config.js
│
├───css
│       style.css
│
├───dist
│       bundle.js
│
└───scripts
        index.js
        Finance.js
        HelloWorld.js

Installing Webpack and Babel:

We’ll use Node Package Manager to initialise our project and install Webpack and Babel.

Initialise your project:

npm init

This will create your package.json file. You’ll be asked to input basic information, such as author name, project name, description, project repository URL.

If you already have a package.json file – npm init will install any dependencies in that file – similar to how running python -m pip install -r requirements.txt would work in a Python application.

Install Webpack and Webpack CLI:

npm i webpack --save-dev
npm i webpack-cli --save-dev

Install Babel:

We will want to install 4 things here:

  1. babel core: The Babel core transpiler.
  2. babel-loader: The Webpack loader for Babel.
  3. @babel presets-env: This transpiles newer JS code into browser compatible JS (ECMA Script 5).
  4. @bable presets-react: This transpiles our React code into browser compatible JS.
npm i @babel/core --save-dev
npm i babel-loader --save-dev
npm i @babel/preset-env--save-dev
npm i @babel/preset-react --save-dev

Creating the config files:

To use Webpack and Babel, we need to create 2 config files:

  1. package.json
  2. webpack.config.js

Create package.json:

When running npm init, we created a package.json file. In this file we are going to tell Webpack how to run our frontend server.

We will do that by adding the following scripts section, which tells NPM how to run the app:

"scripts": {
  "build": "webpack -p --progress --config webpack.config.js",
  "dev-build": "webpack --progress -d --config webpack.config.js",
  "watch": "webpack --progress -d --config webpack.config.js --watch"
},
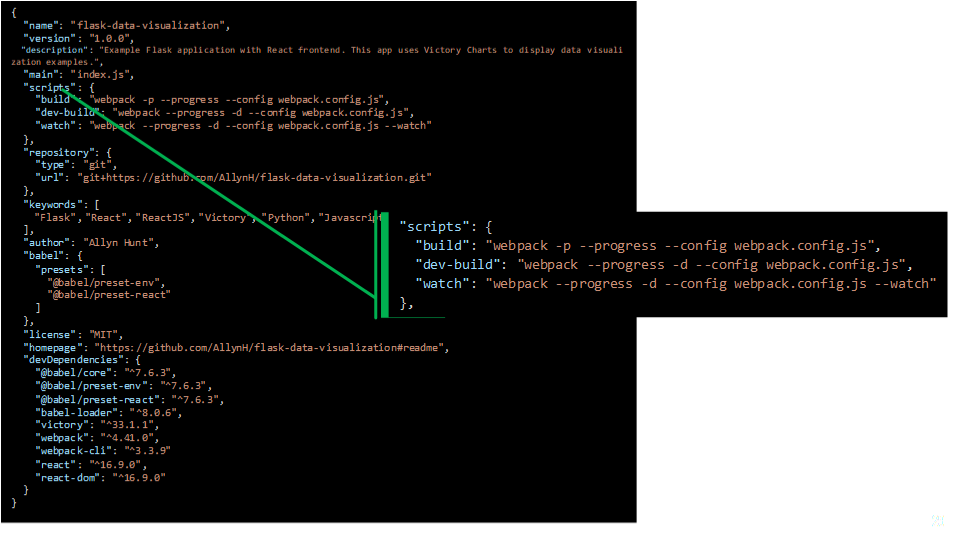
Example scripts section from my package.json

Top tip:

webpack --help

Will print the Webpack help information, where you can read in detail about the above commands.

Create webpack.config.js:

Our webpack.config.js file is going to provide Webpack with information on how our project is structured. Let’s look at the main sections:

  1. entry“: This is the index.js file, that links all of our React code to the HTML frontent. We instantiate our React components here and attach them to the DOM.
  2. output“: This is the bundle.js file, Webpack and Babel will output. This is our transpiled code that we actually include in our HTML file.
  3. resolve“: We want Webpack and Babel to resolve all .js, .jsx files. (.jsx files are sometimes used when a developer wants to specifically show that these files are React specific – .js workes just fine for us).
  4. module“: We want to use the babel-loader, and exclude any packages in ./node_modules (where all of our installed packages are located).

app/static/webpack.config.js

See highlighted sections below:

const webpack = require('webpack');
const config = {
    entry:  __dirname + '/scripts/index.js',
    output: {
        path: __dirname + '/dist',
        filename: 'bundle.js',
    },
    resolve: {
        extensions: ['.js', '.jsx', '.css']
    },
 
    module: {
        rules: [
            {
            test: /\.(js|jsx)?/,
                exclude: /node_modules/,
                use: 'babel-loader'     
            }        
        ]
    }
};
module.exports = config;

More information:

Here are links to the files I used in my application:

Here is some useful documentation:

Note: In the extensions section of the webpack.config.js – we can add other file extensions, such as CSS or images – as long as we have the relevant Webpack loaders installed.

React:

Installing React:

Now that we have a project setup with Weback and Babel – we need to install React. We can use NPM to install React and React DOM.

npm i react react-dom [--save-dev]
  • react: This is the actual React library package – used to define and create your React components.
  • react-dom: This mounts your React component into a HTML DOM object (usually a blank <div>).
    • DOM refers to the Document Object Model.
    • Used to identify and access DOM elements.
    • Updates HTML elements with with React.DOM.render()

Note: We’ve installed both packages with 1 command. You don’t necessarily need to add –save-dev as these are required package and you’ll probable use React for other projects.

Creating our React Components:

Let’s start with the usual “Hello, World!” Example.

React “Hello, World!”:

For every React component we create, we need to do 2 things:

  1. Write the React JS code for that component.
  2. Create an instance of that component, in the index.js entry file (from our webpack.config.js).

Creating the HelloWorld.js component:

app/static/scripts/HelloWorld.js

import React from 'react';
 
class HelloWorld extends React.Component {
    render() {
        return (
            <h1>Hello, World!</h1>
        );
    }}
export default HelloWorld;

What is this code doing?:

  • importing the React module.
  • Creating (extending) a HelloWorld Class, from the React.Component class type.
  • Rendering a <h1> element with the text “Hello, World!”
    • When creating a React component – the render() function is the only function we are required to use.
  • Exporting the HelloWorld function, so it can be imported by our index.js file.

When creating the component, we populated the render() function, React components have several built in methods and these are defined in the React component lifecycle.

Attaching the HelloWorld component to the DOM:

Now that our component is created – we need some way of creating an instance of that component and attaching it to a DOM element of our application.

app/static/scripts/index.js

import React from "react";
import ReactDOM from "react-dom";
import HelloWorld from "./HelloWorld";
 
ReactDOM.render(<HelloWorld />, document.getElementById("react-root"));

Running our code:

Now, when we run “npm run build” or “npm run watch”, NPM will run Webpack and Babel, transpile our index.js and HelloWorld.js file and output a ./dist/bundle.js file.
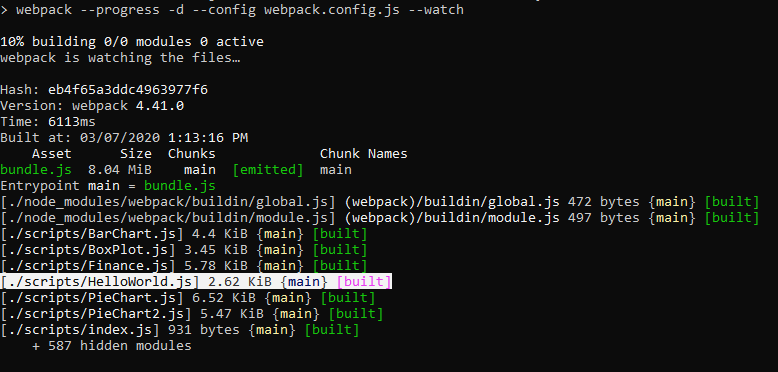
Output from npm run watch

Adding React to our Flask application:

Now that we have the HelloWorld example completed, we want to hook that into our Flask application. In order to call our JS code, we need to update our Flask HTML templates with a <script> tag, pointing to our bundled JS code. There are 2 places we can do this:

  1. base.html: If we want every Flask HTML endpoint to use this code (recommended).
  2. Add to the footer of a specific template: If you don’t want every endpoint to call your React code.
    1. You may want to do this if you already have Flask templates (that extend base.html) populating nav bars, footers and other generic HTML code.

app/templates/base.html:

{% block app_content %}
 
<div id="react-root"></div>
 
<script src="{{ url_for('static', filename='dist/bundle.js') }}"></script>
{% endblock %}

What is this code doing?:

  1. {% block app_content %} creates a Jinja2 template, which is used by Flask to populate the HTML templates.
  2. Creating an empty <div> element with and ID attribute of “react-root”.
    • This matches the ID element our React.DOM.render() function is looking for.
  3. Adding the script tag with a link to our bundle.js file.

Viewing our React app in the browser:

Our Hello World app in progress:

Note: All the other Flask rendered elements, from the microblog application, are there, for example the nav bar and search bar. However, now we also have rendered our first React component.

There’s not much here yet – but it’s a start!

React API:

Now that we can render React components – we want to be able to populate these components, with data from our Flask API.

First, let’s look at the React documentation for the recommended methodology for adding API requests into React components.

Our API component:

class Finance extends React.Component {
  constructor(props) {
    super(props);
    this.state = {
    error: null,
    isLoaded: false,
    items: []
    };
  }
  componentDidMount() {
    fetch("/api_1_0/finance/1/2018")
    .then(res => res.json())
    .then(
      (result) => {
      this.setState({
        isLoaded: true,
        items: result.items
      });
      },
      (error) => {
      this.setState({
        isLoaded: true,
        error
      });
      }
    )
  }
  render() {
    const { error, isLoaded, items } = this.state
    if (error) {
    return <div>Error: {error.message}</div>;
    } else if (!isLoaded) {
    return <div>Loading...</div>;
    } else {
    return (     );
    }
  }
}

What is this code doing?:

  1. We’ve added a constructor():
    1. This stores the component state.
    2. Stores error and isLoaded status – used in the render() function.
  2. Added the componentDidMount() built-in function:
    1. This is a React component built in function – using this function allows us to populate the component state with the output of from the API.
    2. Update the fetch() URL with the required API endpoint.
    3. Update component state with this.setState.
    4. Update isLoaded and error status – depending on the response from the API.
  3. Updated the render() function.
    1. Now handles error status from the API.
    2. Also has a loading section – we could add a loading animation here for example.

Note: The below code is an example of JavaScript “destructuring“.

const { error, isLoaded, items } = this.state

The state variable is a JS Object type, with the keys “error”, “isLoaded” and “items”.

We are populating const variables from the values of each of these keys in the components state.

Storing our API data in the Components state:

Now that we can make an API call – we need some way of storing this in our React component.

Storing the API response:

After making the API request – we store the response in the components state:

  componentDidMount() {
    fetch("/api_1_0/finance/1/2018")
:
      (result) => {
      this.setState({
        isLoaded: true,
        items: result.items
      });
      },
:
:
  }

We can store the state here, immediately, as we are using the React componentDidMount() function to make the API call.

Note: componentDidMount() is a React built-in function, which is allows us to set the component state value.

Retrieving the data from state:

Now that we have the API data stored in the component state – we can retrieve it like so:

make_chart_data(items) {
        
    let my_data_list = [];

    my_data_list.push(items.q1_earnings)
    my_data_list.push(items.q2_earnings)
    my_data_list.push(items.q3_earnings)
    my_data_list.push(items.q4_earnings)

    return my_data_list;
}

We can create an array, my_data_list, and populate it with the quarterly earnings.

Calling the make_chart_data function:

Inside the render function, we can call the make_chart_data() function. Obviously – we only want to call this function if there are no errors and the application has finished loading – so we put the function call in the “else” condition, as below:

render() {
	const { error, isLoaded, items } = this.state;
if (error) {
	return <div>Error loading data.</div>;
} else if (!isLoaded) {
	return <div>Loading...</div>;
} else {
	// Populate chart data:
	const finance_data = this.make_chart_data(items);
	const finance_axis = ["Q1", "Q2", "Q3", "Q4"];
:
	return (
:
:
      )
}

Debugging your application:

Some (maybe) obvious tips for debugging your application.

Based on issues I’ve found and conversations I’ve had with other people.

Chrome developer tips:

Viewing your API data in the Chrome developer tools may seem obvious to some people but as a lot of us are self-learning – I thought I’d show some tips:
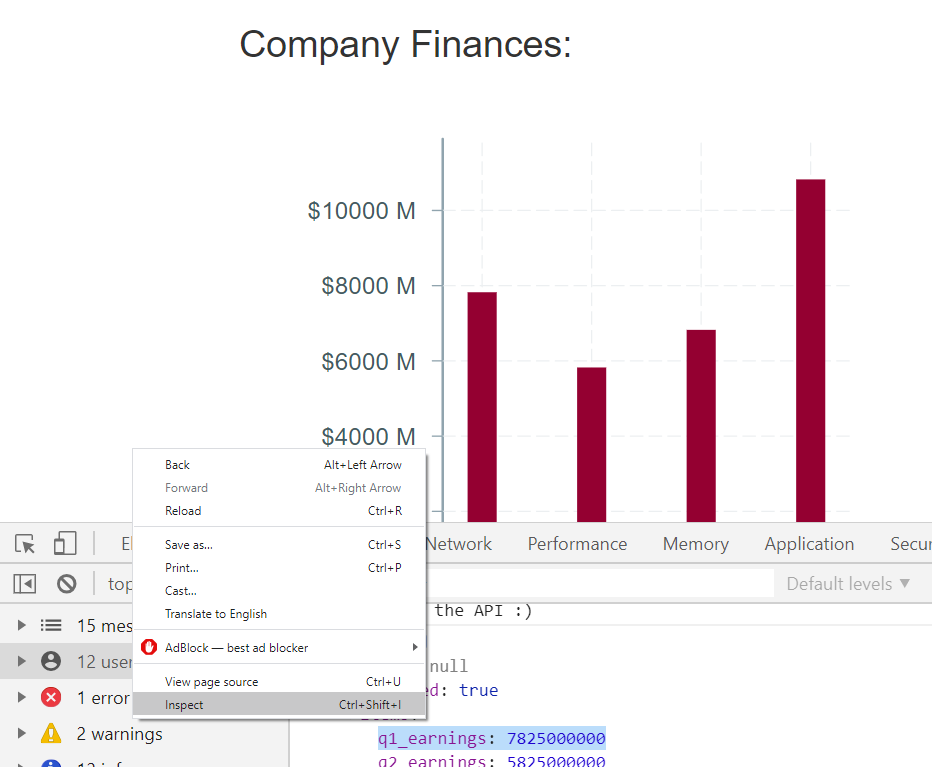
Open the Chrome or Firefox developer tools.

Right-click anywhere on the page, and select “inspect” to view the developer tools.

Printing the components State:

In the render() function – log the components state:

render() {
	console.log(this.state)
	const { error, isLoaded, items } = this.state;
:
}

You can view this in the developer tools Console section:
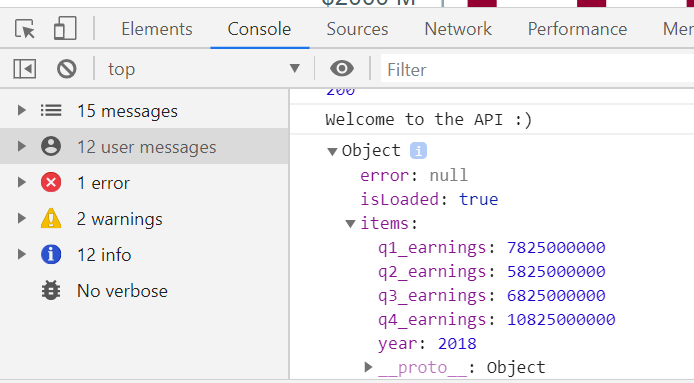
Viewing the console output
Viewing the console output.

Some things to look out for:

  • Has the component State been set correctly?
    • error should be: null
    • isLoaded should be: true
    • items should contain the API response.

Some other issues that caught me out:

  • Are the values and data types correct?
    • Are you expecting and integer or String value?
    • (in a previous iteration of code, I sent the earnings values – from the API – as Strings instead of integers).
    • JavaScript only throws an error if you specifically type check.
  • Are you comparing True == true?
    • Python syntax versus JavaScript syntax.
  • Uncaught TypeError: items.map is not a function
    • You are trying using map to loop through an object, instead of an array.
    • Did you mean to send an array from your API?

Conclusion:

We installed and configured Babel and Webpack for our project.

We successfully added a React frontend into a Flask application.

We can make API calls from our Flask data API to our React frontend.

Resources:

Part 3 – React Victory charts (coming soon) >

Next up, we’ll look at adding some data visualisation to our applications with the amazing React library – Victory charts
Flask asynchronous background tasks with Celery and Redis

Introduction:

This blog post will look at a practical example of how to implement asynchronous background tasks in a Flask environment, with an example taken from my ongoing project of building a Destiny the game inventory management web application.

During the design of DestinyVaultRaider.com one of the main pain points was manually updating my production environment every time the Destiny Manifest was changed. The development crew in Bungie were very active and were updating the Manifest right up to the launch of Destiny 2.

Before adding the background tasks, I had a small Python script running from my Raspberry Pi, which would send a request to Bungie, every 10 minutes, for the current Manifest version – if the stored Manifest version was different, the script would send me a message on a private Slack channel to notify me that the Manifest had changed and I’d need to update my Heroku environment.

If the Manifest version stored on my production environment didn’t match the current revision of the Manifest Bungie were using, this would cause an error in my Flask application, sending the user a HTTP 500 internal error response and be diverting them to a generic error page. This leads to a negative user experience, and with the Manifest being updated randomly – sometimes twice a week, I was left scrambling to update it as quickly as possible.

I store the Manifest in a Redis database, so  using Redis as a Message Broker (see below) made sense for my application.

Introduction to Celery:

From the Celery docs: “Celery is an asynchronous task queue/job queue based on distributed message passing. It is focused on real-time operation, but supports scheduling as well”.

From the perspective of my app, I will be using Celery to create a scheduled task, which checks the Destiny Manifest every few minutes, and updates my Redis database as needed. I will also be creating an asynchronous task that will check the Manifest every time an authorised user sends a request to a specific endpoint on my server, such as https://www.destinyvaultraider.com/updateManifest.

For another look at implementing Celery with Flask, have a read of Miguel Grinberg’s blog on Celery with Flask.

How Celery works:

The asynchronous tasks will be set up as follows.

  1. Celery client:
    • This will be connect your Flask application to the Celery task. The client will issue the commands for the task.
  2. Celery worker:
    • A process that runs a background task, I will have 2 workers, a scheduled task and an asynchronous task called every time I visit a particular endpoint (/updateManifest).
  3. Message broker:
    • The Celery client communicates to the Celery worker through a message broker, I will be using Redis but you can also use RabbitMQ or RQ.

Installing Celery and Redis:

An important note: One of the main reasons I went with Celery and Redis; is because I do all of my development work on a Windows laptop – most of the libraries and tutorials I found were geared on developing in a Linux environment (which makes sense as your web application is most likely deployed on a Linux system). Celery has dropped Windows support but you can still install an earlier version to allow development on a Windows system.

Shout out to /u/WTRipper on Reddit for this information.

Installing Celery:

Celery can be installed from pip, version 3.1.25 supports Windows and worked well for me:

pip uninstall celery 
pip install celery==3.1.25

Installing Redis:

Redis is not officially supported on windows – but the Microsoft open tech group maintain a Windows port, which you can download here. (I downloaded the installer Redis-x64-3.0.504.msi).

The Flask application factory:

The Flask application factory concept is a methodology of structuring your app as a series of Blueprints, which can run individually, or together (even with different configurations). More than just this, it sets out a more standardised approach to designing an application.

This can also add a bit of complexity to designing an application, as most Celery tutorials focus on standalone applications and ignore the detail of integrating Celery into a large Flask application.

In my case, I will have a Blueprint for my API and a Main Blueprint for everything else.

Destiny Vault Raider app structure:

As Destiny Vault Raider uses the Flask application factory structure, each Blueprint is contained in it’s own folder. For DVR, I only need a “main” and “api” Blueprint, as I don’t require separate views for unauthenticated visitors (although it’s probably something I’ll add in future).

The main items to look out for are highlighted in red.

DestinyVaultRaider
│   celery_worker.py
│   config.py
│   manage.py
│
├───app
│   │   email.py
│   │   getManifest.py
│   │   models.py
│   │   __init__.py
│   │  
│   ├───api_1_0
│   │       views.py
│   │       __init__.py
│   │      
│   ├───main
│   │       errors.py
│   │       forms.py
│   │       Inventory_Management.py
│   │       OAuth_functions.py
│   │       views.py
│   │       __init__.py
│   │      
│   ├───static
│   │   │   style.css
│   │          
│   └───templates
│       │   index.html
│

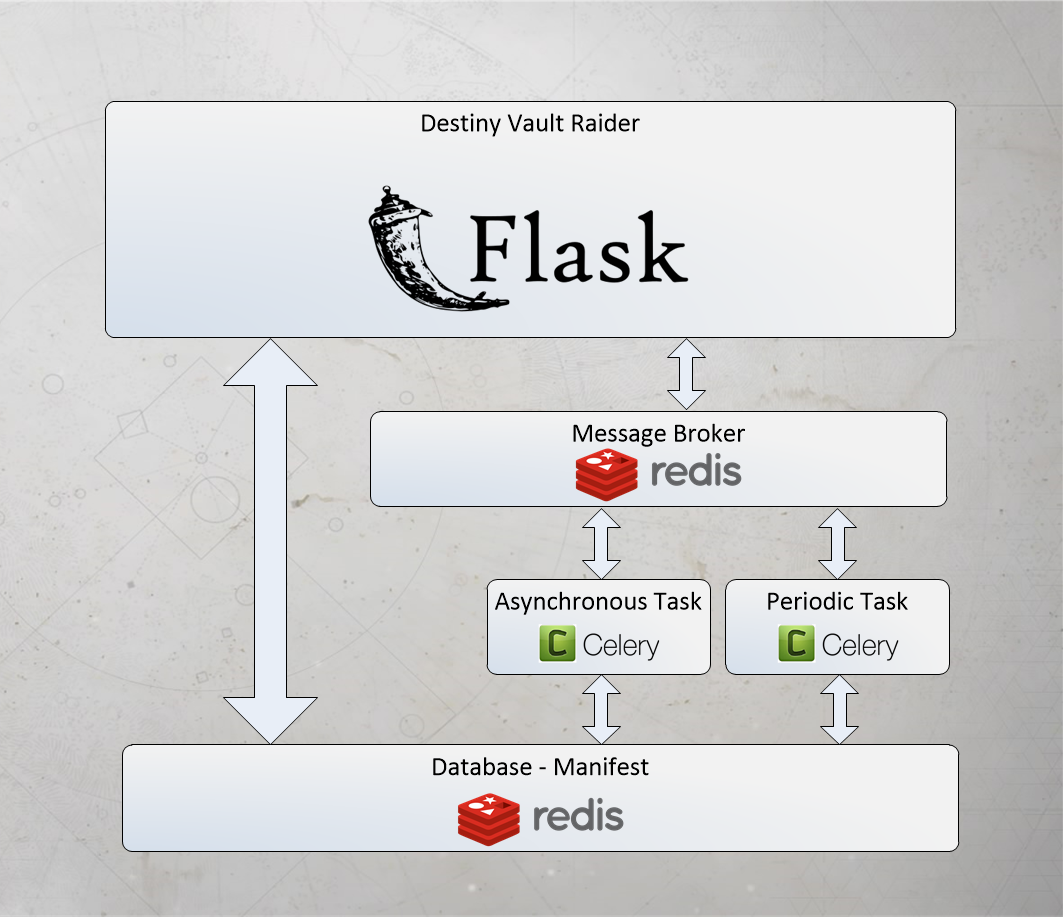
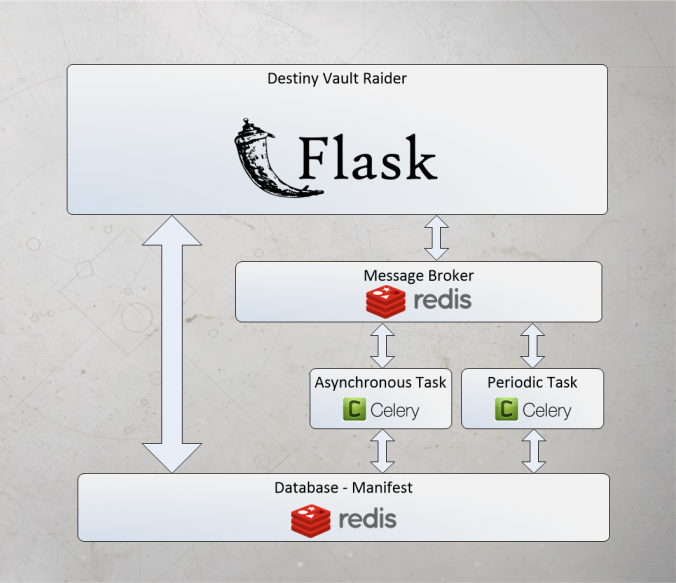
Destiny Vault Raider updating manifest flow chart:

Flask application with Redis and Celery.

Flask application with Redis and Celery.

From the diagram, we can see:

  • How the Flask application connects to the Redis message broker.
  • The Message broker talks to the Celery worker.
  • The Celery worker calls (either the asynchronous or periodic) Python function to update the Redis Manifest database.
  • The Flask application can access the Manifest database directly, when a user makes a request to view their items.

Now, lets tun these ideas into code!

Creating the Celery worker:

Create an instance of the Celery worker, add the Celery configuration. The Celery configuration will be defined a little later in config.py.

app/__init__.py:

from celery import Celery

celery = Celery(__name__, broker=Config.CELERY_BROKER_URL)

def create_app(config_name):
    app = Flask(__name__)
    :
    :
    celery.conf.update(app.config)
    :

Adding the Celery worker to the app instance:

Take the instance of the celery object we created and and add it to the app context (read about the app_context here).

celery_worker.py:

import os
from app import celery, create_app

app = create_app(os.getenv('FLASK_CONFIG') or 'default')
app.app_context().push()

Configuring Celery and Redis:

During development, your Celery client and Redis broker will be running on your local machine, however during deployment – these connections will be to a remote server. As you’ll need 2 setups, you’ll need to create the Config setup for both development and deployment. On DVR, I set an environment variable “is_prod” to True, which allows me to test if I’m in the deployed environment.

All of this configuration will be added to the Celery object in app/__init__.py, when we create the celery object and pass in the config with the command: celery.conf.update(app.config).

config.py:

First, I create the setup for the Celery beat schedule, I set the schedule for 5 minutes, which is 300 seconds.

# Create Celery beat schedule:
celery_get_manifest_schedule = {
    'schedule-name': {
        'task': 'app.getManifest.periodic_run_get_manifest',
        'schedule': timedelta(seconds=300),
    },
}

Note: The task  is named app.getManifest.periodic_run_get_manifest, the task is located in the “app” folder, in the “getManifest” file, and the function is called periodic_run_get_manifest.

Next, I create the Config object, with the Celery and Redis settings, for both production and development.

class Config:
    CELERYBEAT_SCHEDULE = celery_get_manifest_schedule
    # Development setup:
    if not is_prod:
        CELERY_BROKER_URL = 'redis://localhost:6379/0'
        CELERY_RESULT_BACKEND = 'redis://localhost:6379/0'
        REDIS_HOST = 'localhost'
        REDIS_PASSWORD = ''
        REDIS_PORT = 6379
        REDIS_URL = 'redis://localhost:6379/0'

    # Production setup:
    else:
        # Celery:
        CELERY_BROKER_URL = os.environ.get('REDIS_URL')
        CELERY_RESULT_BACKEND = os.environ.get('REDIS_URL')
        # Redis:
        REDIS_URL = os.environ.get('REDIS_URL')

Note: Both the Celery Broker URL is the same as the Redis URL (I’m using Redis as my messge Broker) the environment variable “REDIS_URL” is used for this.

Connecting to the Celery and Redis server:

Now that we’ve created the setup for the Celery and Redis we need to instantiate the Redis object and create the connection to the Redis server.

I also ping the Redis server to check the connection.

getManifest.py:

from . import celery
from celery.task.base import periodic_task
from config import config, Config

# Set Redis connection:
redis_url = urlparse.urlparse(Config.REDIS_URL)
r = redis.StrictRedis(host=redis_url.hostname, port=redis_url.port, db=1, password=redis_url.password)

# Test the Redis connection:
try: 
    r.ping()
    print "Redis is connected!"
except redis.ConnectionError:
    print "Redis connection error!"

Note: I tried to manually add the hostname, port and password as strings and populate the redis.StrictRedis command, however, this wouldn’t work for me and I could only connect to the Redis server if I used urlparse to format the URL for me (I presume it’s looking for a URL object and not a String object but couldn’t I figure out why).

The db=1 sets the database table number to 1, it defaults to 0 if not added.

REDIS_URL:

redis://h:p0dc...449@ec2-...-123.compute-1.amazonaws.com:48079

which is on the format of:

redis://<username>:<PASSWORD>@<HOST>:<PORT>

You can set this as an environment variable on Heroku by using the following command:

heroku config:set REDIS_URL redis://h:p0dc...449@ec2-...-123.compute-1.amazonaws.com:48079

Creating the asynchronous task:

Here is the definition of the run_get_manifest() function, it’s pretty huge so I won’t include all of the code.

However, the important thing to note is the @celery.task decorator.

@celery.task(name='tasks.async_run_get_manifest')
def run_get_manifest():
    """ Run the entire get_manifest flow as a single function """
    build_path()
    manifest_version = request_manifest_version()
    if check_manifest(manifest_version) is True:
        getManifest()
        buildTable()
        manifest_type = "full"
        all_data = buildDict(DB_HASH)
        writeManifest(all_data, manifest_type)
        cleanUp()
    else:
        print "No change detected!"

    return

To create the asynchronous function, I create a new  function async_run_get_manifest().

Inside this function, I call the original run_get_manifest function but add the delay() method, we can access the delay() method as we have wrapped the run_get_manifest() function in the @celery_task decorator.

def async_run_get_manifest():
    """ Asynchronous task, called from API endpoint. """
    run_get_manifest.delay()
    return

Creating the periodic task:

To create the periodic function, I create a new  function periodic_run_get_manifest().

This function is decorated with the @periodic_task decorator. The “run_every” parameter is required and sets the time interval.

@periodic_task(run_every=timedelta(seconds=300))
def periodic_run_get_manifest():
    """ Perodic task, run by Celery Beat process """
    run_get_manifest()
    return

So now I have 2 functions, that do the same thing, but with some important differences:

  1. periodic_run_get_manifest(): This is the periodic task that is run every 5 minutes.
  2. async_run_get_manifest(): This is the asynchronous task that will run in the background when a request is sent to the /updateManifest endpoint.

Starting the Celery workers:

To start the Celery workers, you need both a Celery worker and a Beat instance running in parallel. Here are the commands for running them:

worker -A celery_worker.celery --loglevel=info
celery beat -A celery_worker.celery --loglevel=info

Now that they are running, we can execute the tasks.

Calling the asynchronous task:

The asynchronous task will be called anytime an authorised account visits a designated endpoint, I’m using the endpoint “/updateManifest”. This will call the asynchronous task “async_run_get_manifest()” which will be executed in the background.

api_1_0/views.py:

You’ll need to implement a feature to detect if the user is authorised to access this endpoint, I’ve left that out for clarity’s sake.

In this case I return back to the index.html page, depending on how your API is setup, you may return a text or JSON response. I had a system in place where I would receive update messages on a private Slack channel – depending on how the update went.

@api.route('/updateManifest')
@login_required
def updateManifest():
    async_run_get_manifest()
    return render_template('index.html',
                            site_details    = site_details,
                            ) 

Executing the periodic task:

The Periodic task will be executed every 5 minutes when the Celery Beat scheduler is running. Here I can check the progress from the Celery output:

[2017-11-22 13:38:08,000: INFO/MainProcess] Received task: app.getManifest.periodic_run_get_manifest[97a82703-af22-4a43-b189-8dc192f55b84]
[2017-11-22 13:38:08,059: INFO/Worker-1] Starting new HTTPS connection (1): www.bungie.net
[2017-11-22 13:38:10,039: WARNING/Worker-1] Detected a change in version number: 60480.17.10.23.1314-2
[2017-11-22 13:38:10,042: INFO/Worker-1] Starting new HTTPS connection (1): slack.com
[2017-11-22 13:38:10,803: WARNING/Worker-1] Detected a change in mobileWorldContentPaths: [u'en']

We can see from here:

  • Recieved the task: app.getManifest.periodic_run_get_manifest()
  • Created a new HTTPS connection to www.bungie.net – this is the request to check the Manifest version.
  • Next I check the version number of the Manifest, and print the line “Detected a change in version number: 60480.17.10.23.1314-2”
  • Created a new HTTPS connection to www.slack.com and I send this line to Slack as a message.
  • Next I check the mobileWorldContentPaths version for the English Manifest, and print the line “Detected a change in mobileWorldContentPaths: [u’en’]”

In my case I didn’t need my app to keep track of the task status or check if it’s completed correctly, but Celery has that option. I get updates from the Slack messages.

Creating a development Start up script:

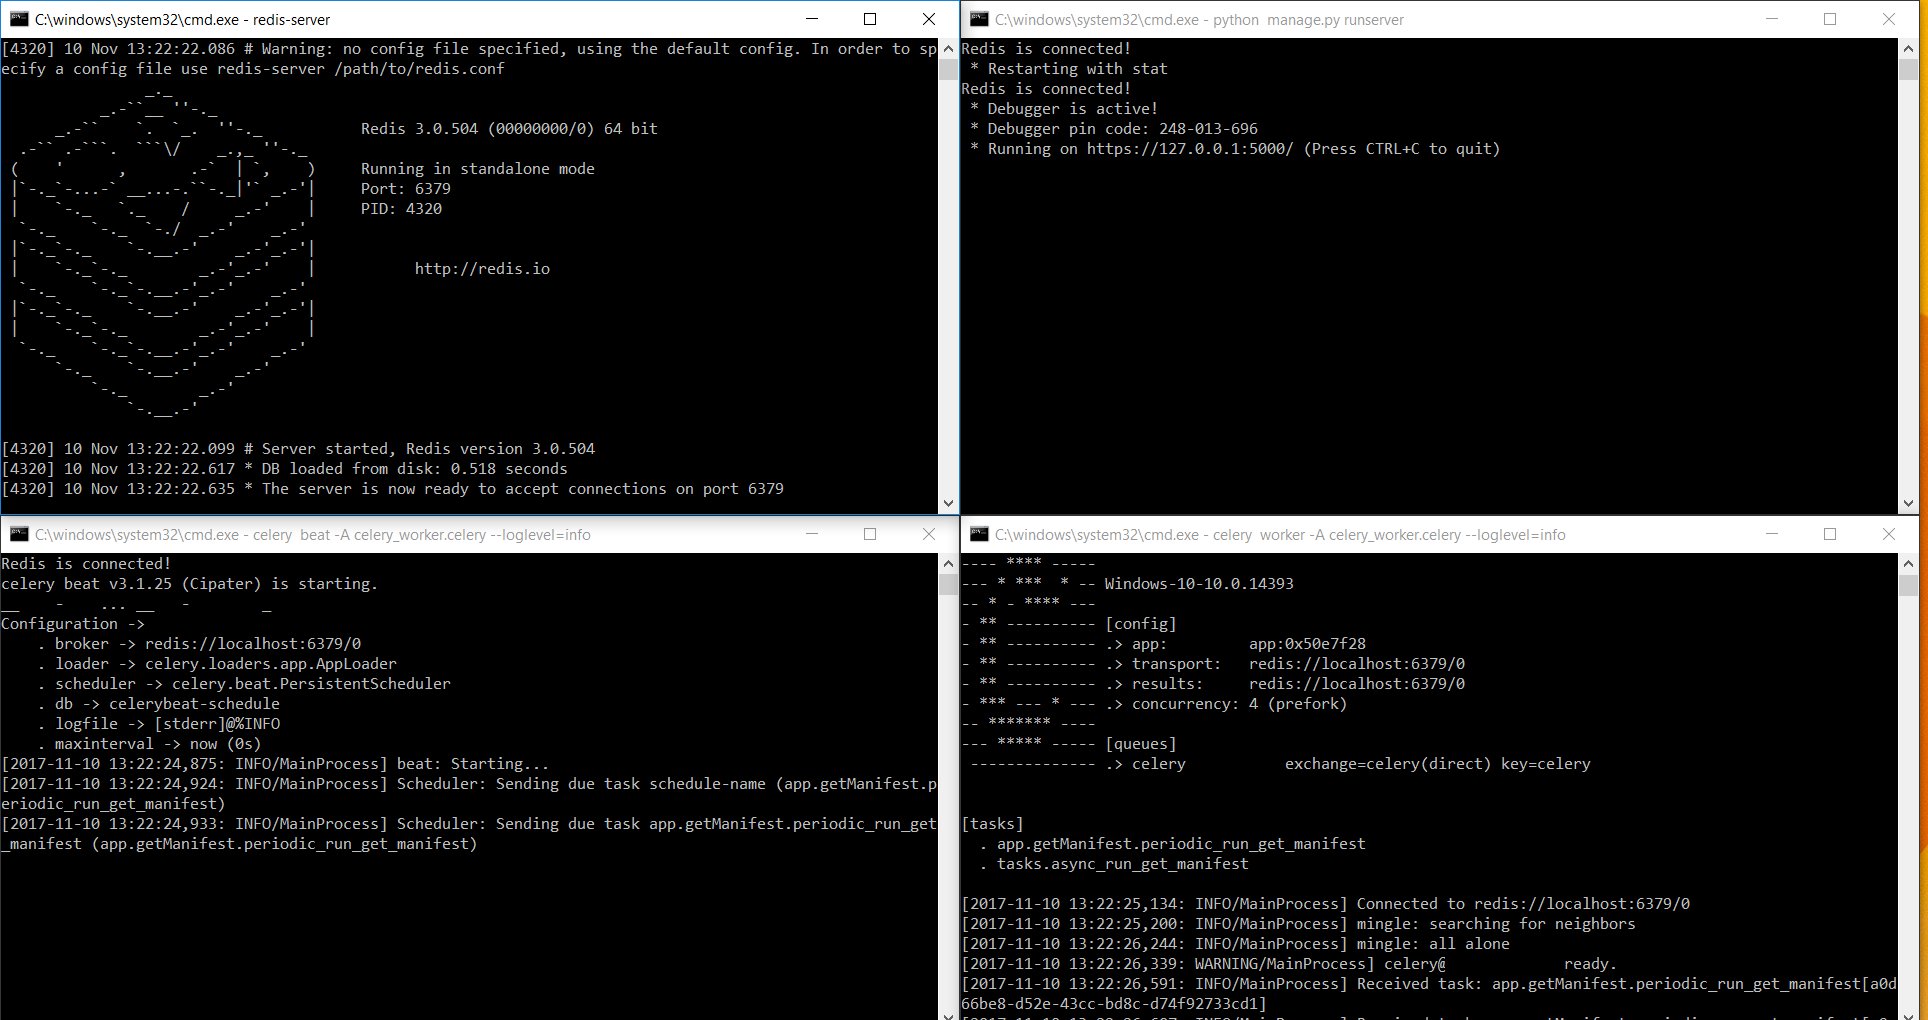
Here’s the script I use to start up the development server, Redis server, Celery worker and Celery Beat worker. Save the following into a file called “Startup.bat” and you can just double click on the file icon to start each process, in it’s own window, in your development environment.

This can save a lot of time as opening 4 command windows and starting each process separately.

C:\
cd /d "C:\Users\AllynH\Documents\Python\Flask\DestinyVaultRaider_Redis_Celery_API"
start /K redis-cli shutdown
start timeout 5
start CMD /K redis-server
start CMD /K celery worker -A celery_worker.celery --loglevel=info
start CMD /K celery beat -A celery_worker.celery --loglevel=info
start CMD /K python manage.py runserver

Here’s a breakdown of what the script is doing:

  • The first line changes to our working directory.
  • Next I shutdown any existing Redis server (sometimes Redis wouldn’t start correctly unless I had done a shutdown first).
  • Then I wait for 5 seconds to allow the Redis server to shutdown.
  • The next 4 commands are used to start the Redis server, Celery worker, Celery Beat worker, and Flask server – each started in their own command shell.

Redis server, Celery workers and Flask server started.

Redis server, Celery workers and Flask server started via the Startup.bat script.

Running on Heroku:

Here are some Heroku specific changes, you can skip these if you’re not running on Heroku.

Creating a Redis broker and adding it to the app:

You’ll need to create a Redis broker and attach it to your app, this will give you the REDIS_URL mentioned above.

heroku addons:create heroku-redis -a destinyvaultraider

Editing the procfile:

To start the Celery worker and Beat processes, add the following to your procfile:

worker: celery worker -A celery_worker.celery --beat --loglevel=info

Note: we can kick off both the Celery worker and Beat scheduler in one command here, whereas we couldn’t on Windows.

Scaling the Worker dyno:

To start the process, you need to enable the Celery worker Dyno:

heroku ps:scale worker=1

Now your background tasks should be up and running!

Note on running Celery and Redis on Heroku:

The pricing on Heroku is really expensive to the point of being prohibitive, from my perspective I have had to disable the Redis database and Celery worker as Heroku require you to pay separately for each of these.

For example the pricing for the package I wanted worked out like this (as of November 2017), all figures are per month:

  • Hobby Dyno: $7 (Required for HTTPS certification).
  • Celery worker: $7.
  • Redis database 100MB: $30 (80MB required).

This is obviously not feasible for a hobby project that isn’t making any money.

In comparison, a Digital Ocean, Vultr or OVH also provide Virtual Private Server services from ~$5 per month, which would allow you to run Redis and Celery inclusive of that price.

So before you invest your time in Heroku, research some of the alternatives 🙂

Creating a Python app for Destiny – Part 8: Displaying the Vault contents.

Introduction:

Big news: I’ve managed to launch my own Destiny based website!!! I’ve been working on an inventory management system for a while now, and following on from my previous blog posts I’ve managed to deploy my work to date as a live website.

You can test it out for yourself here https://www.destinyvaultraider.com once you’ve authorised your account, you can click on Vault, Character or Xur (if he’s around).

The aim of this website is to use it as a live learning tool, where I can continue to develop and add new features. For example, I can display the vault and character inventory but I can’t transfer items yet, so this is a feature I hope to add in the future.

If you’d like to review the previous Destiny API posts, check them out here:

  1. Send a request to read Xurs inventory.
  2. Send a HTML formatted email with Xurs inventory.
  3. Log into Destiny and Bungie.net via your PSN account.
  4. Transfer items from your vault to your character and equip them.
  5. Reading a characters inventory and vault contents.
  6. Creating a Python web server with Flask.
  7. Authenticating our app with Bungie.net OAuth.

You can also find me on Twitter here @Allyn_H_

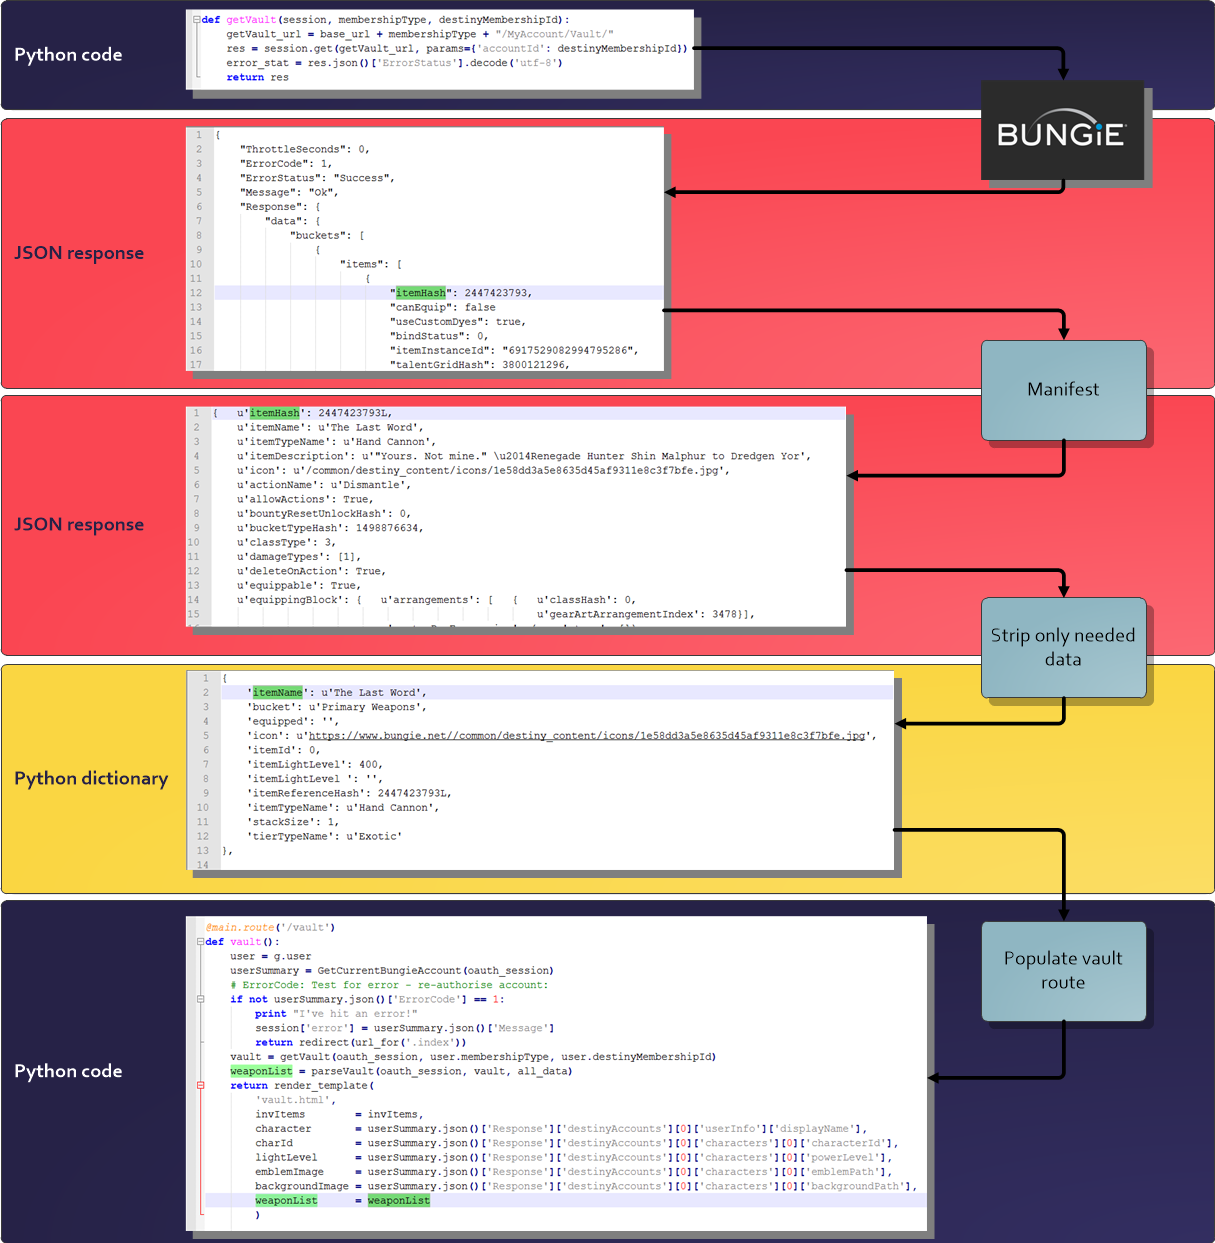
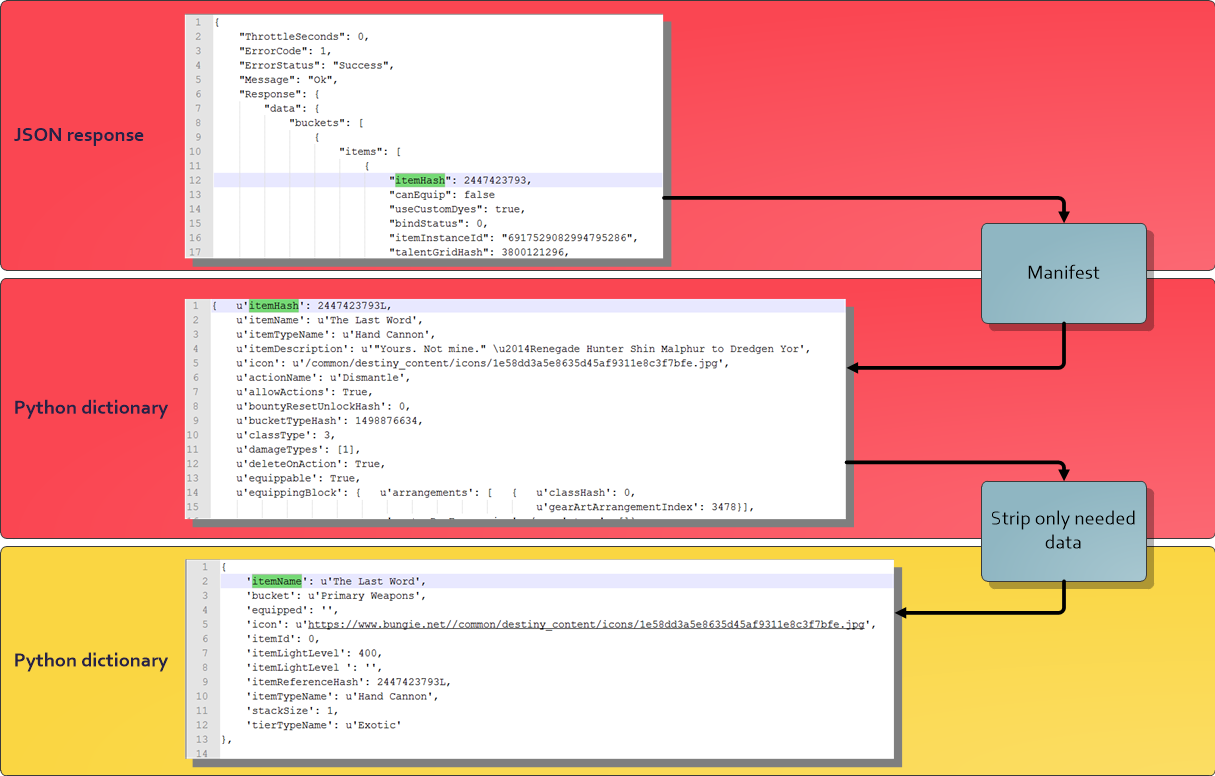
Flow chart:

This section is quite confusing as I’ll be making a request to Bungie, then decoding that request and changing the format of the response a few times before plugging it into my Flask app, so here’s a quick guide as to how I’m creating the Vault route. Excuse the colours, I’m a representing Future War Cult. You can click on the image to make it bigger.

Future War Cult representing!

Flow chart detailing the steps for creating the vault page.reate vault route:

Create vault route:

In the previous section we created an index route, which was used to display the index.html page. Now that we have authorised the user, we can build on this and add a new route to display the users Vault contents.

To create the Vault route, the code looks like this:

@main.route('/vault')
def vault():
    :
    # Do something...
    :
    return render_template('vault.html') 

Right now, ‘vault.html’ is an empty file that extends from our ‘base.html’ – it will only display our navbar. For a quick refresh on the Flask setup, check out this post: Creating a Python app for Destiny – Part 7: Authenticating our app with Bungie.net OAuth.

Right now the “vault.hmtl” template looks like this:

{% extends "base.html" %}
{% block content %}

{% endblock %}

We are extending from the “base.hmtl” template and our content block is empty. Now we can build on this and add some content.

in order to build our Vault page we will need to do a few things:

  1. Send a request to Bungie.net to get the users account details:
    1. We need the users membershipType, destinyMembershipId and characterId.
  2. Send a request to Bungie.net to get the users Vault contents.
  3. Parse through the users vault contents and take out the data we wish to display.
    • Again, we’ve done this above, we just need to tweak the code a bit.
  4. Categorise and display each item.
    • The JSON response from Bungie doesn’t return the items in any order, so we need to categorise them in order to display them properly.

In order to better categorise the vault items, I created a dictionary of each item category. These categories are stored in the item details returned from the manifest,  as item[‘bucket’]. I’ve split these out as below:

invItems = {
    1 : 'Primary Weapons', 
    2 : 'Special Weapons', 
    3 : 'Heavy Weapons', 
    4 : 'Ghost', 
    5 : 'Helmet', 
    6 : 'Gauntlets', 
    7 : 'Chest Armor', 
    8 : 'Leg Armor', 
    9 : 'Class Armor', 
    10 : 'Artifacts', 
    11 : 'Vehicle', 
    12 : 'Sparrow Horn', 
    13 : 'Ships',
    14 : 'Shaders',
    15 : 'Emblems',
    16 : 'Emotes',
    17 : 'Weapon Bundles',
    18 : 'Materials',
    19 : 'Consumables',
    20 : 'Ornaments',
    }

Each of these categories will be used to create a section in our vault page. We will loop through these categories and create the HTML needed to display each item. First though, we need to get the users vault details…

1: Send a request to Bungie.net to get the users account details:

Once the user has authenticated their account, we can request information about their account.

Send a request to Bungie.net to get the users account details

Once the user has been authenticated by Bungie, we can send a request to Bungie to get the account details of the current user. This will return  some important information like the users PSX / Xbox Live username, membershipType, destinyMembershipId, and all of the users character IDs.

Here’s the code to send the “GetCurrentBungieAccount” request:

def GetCurrentBungieAccount(session):
    req_string = 'https://www.bungie.net/Platform/User/GetCurrentBungieAccount/'
    res = session.get(req_string)
    error_state = res.json()['ErrorStatus'].decode('utf-8')
    return res

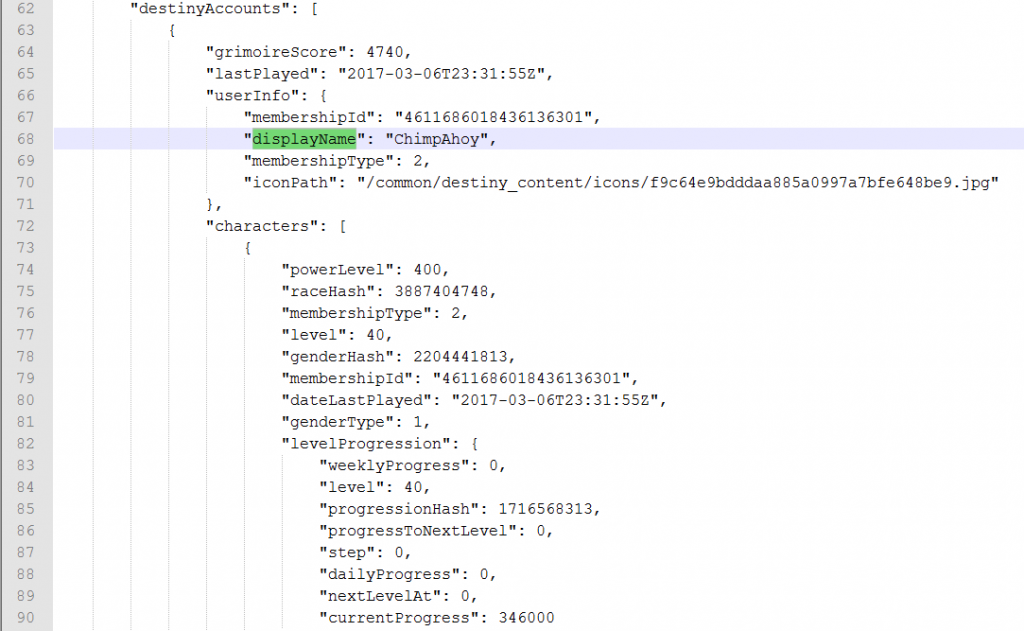
There’s nothing there we haven’t seen before. The function takes the authenticated session data as a parameter and returns the JSON response. As we can see, there’s a lot of important account data returned  that will enable us to view and interact with the users account:

Lots of important user data returned here.

The response from getcurrentbungieaccount returns a lot of important account data.

This Endpoint will also give character details, such as race, gender and class, details of the users clan affiliation, the users Grimore and more.

2: Send a request to Bungie.net to get the users Vault details:

Request and Response

Sending a request to Bungie.net to get the users Vault details

Now that we have the users membershipType and destinyMembershipId, we can send a request to Bungie for their vault contents.

def getVault(session, membershipType, destinyMembershipId):
    getVault_url = base_url + membershipType + "/MyAccount/Vault/"
    res = session.get(getVault_url, params={'accountId': destinyMembershipId})
    return res

Again we send a request, with the users membershipType and destinyMembershipId added to the URL as parameters, the the function then returns the JSON response from Bungie.

3: Parse the Vault response and return only the required data:

Now that we have a response from Bungie, we need to convert this into a human readable format. The JSON response from the getVault request (in my case) is 35,147 lines of text… That’s a lot of data, also there is no real human readable data in there, it doesn’t return the item names for example – just a itemHash value. So we now need to strip out each item hash and search the manifest for the human readable format of that data. Again, the response after decrypting these items from the Manifest is 54,150 lines of text, so we’ll need to extract only the lines of code we’re interested in. Each item will be condensed down to 10 pieces of useful information (we can build on this at a later stage if needed).

Parsing manifest and categorising the data.

Decoding the itemHash from the manifest and stripping out the required data.

One of the things we can also do, to make life a little easier for us, is to categorise each item by its “bucketName”  – this is a value stored in the manifest that is used to categorise each item, for example “Primary Weapon”, “Consumables” or “Ghost”. The response from getVault is split into 3 buckets, “Weapons,” “Armor” and “Inventory”. This can be seen when you visit your vault in the tower or on any app.  In our case, we’re going to add them all to 1 page, with the ‘bucketName’ (i.e. “Primary Weapon”, “Chest Armor” or “Consumables”) used to categorise each item.

First, lets create a list of blank dictionary objects with the items we want to display for our vault:

array_size = 0
weapon_list = [{
    'itemReferenceHash': 0,
    'itemId': 0,
    'itemName': '',
    'tierTypeName': '',
    'itemTypeName': '',
    'itemLightLevel ': '',
    'stackSize': 1,
    'icon': '',
    'bucket': '',
    'equipped': '',
} for array_size in range(vaultSize)]
array_size = 0

Now that the list is created, lets loop through each inventory item, decode the values from the manifest and store the data we want to display.

Nested JSON dicts and lists...

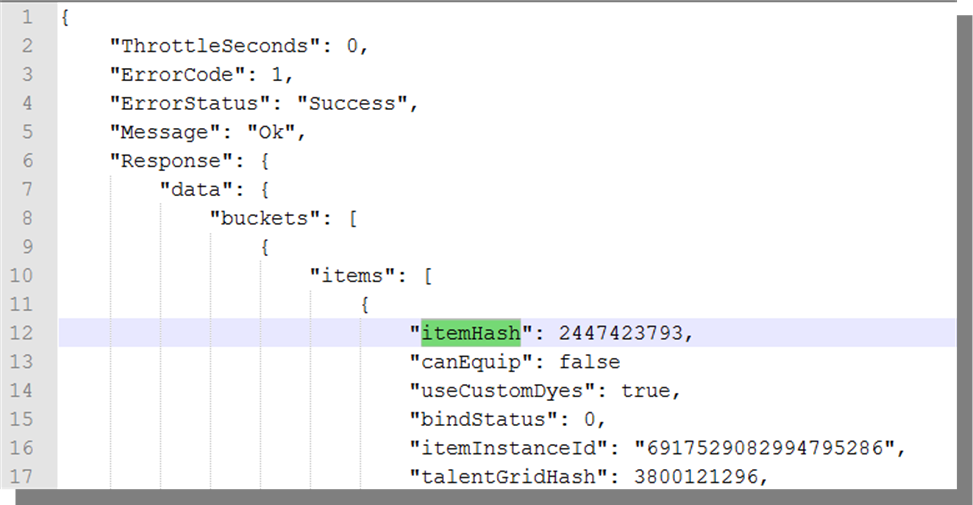
The JSON response from getVault shows the itemHash we need to decrypt.

We are also going to query each “itemHash”  from the manifest to get the full item details, you can read back  to part 5 for a refresh on what I’m doing here.

If we look at the JSON response from the getVault request, shown in the picture above, both “buckets” and “items” are lists of nested dictionary items , so we need to loop through “buckets” and then each of the “items”, to get to the items “itemHash”. (You can see they’re lists because of the square brackets “[“, denote the start of the list.)

The code for looping through the nested lists is below:

for bucket in vaultResult.json()['Response']['data']['buckets']:
    for item in bucket['items']:
        weapon_list[array_size]['itemReferenceHash'] = item['itemHash']
        inventoryItem = all_data['DestinyInventoryItemDefinition'][item['itemHash']]
        weapon_list[array_size]['itemName'] = inventoryItem['itemName']

Once we have the “itemHash” we can query the Manifest definition “DestinyInventoryItemDefinition” for the item details. We can then store the information we want to keep in our own list of dictionary items.

Stripping out the important data:

The function parseVault takes 3 parameters; the authorised “session”, the “vaultResult” JSON response and the Manifest data in the format of a Python dictionary as “all_data”. Here’s what the full code for stripping each item from the manifest looks like:

def parseVault(session, vaultResult, all_data):
    for bucket in vaultResult.json()['Response']['data']['buckets']:
        for item in bucket['items']:
            weapon_list[array_size]['itemReferenceHash'] = item['itemHash']
            inventoryItem = all_data['DestinyInventoryItemDefinition'][item['itemHash']]
            weapon_list[array_size]['itemName'] = inventoryItem['itemName']
            weapon_list[array_size]['itemLightLevel'] = item.get('primaryStat', {}).get('value', "")
            if ((inventoryItem['itemName'] != "Classified") and (inventoryItem['itemHash'] != 1826822442)):
                bucketHash = all_data['DestinyInventoryBucketDefinition'][inventoryItem['bucketTypeHash']]
                weapon_list[array_size]['itemName'] = inventoryItem['itemName']
                weapon_list[array_size]['tierTypeName'] = inventoryItem['tierTypeName']
                weapon_list[array_size]['itemTypeName'] = inventoryItem['itemTypeName']
                weapon_list[array_size]['icon'] = "https://www.bungie.net/" + inventoryItem['icon']
                weapon_list[array_size]['bucket'] = bucketHash['bucketName']
            # Classified items won't have this information, if not overwritten can cause fails:
            if ((inventoryItem['itemName'] == "Classified") or (inventoryItem['itemHash'] == 1826822442)):
                weapon_list[array_size]['itemName'] = inventoryItem['itemName']
                weapon_list[array_size]['tierTypeName'] = "Classified"
                weapon_list[array_size]['itemTypeName'] = "Classified"
                weapon_list[array_size]['bucket'] = "Classified"
            array_size += 1 
    return weapon_list

Also note, as I’ve hit a few issues recently with Bungie releasing new items – but forgetting to change them from “Classified” in the Manifest, I’ve added a default value for any items with an “itemName” of “Classified” – this will prevent any errors occurring if Bungie add a Classified item at a later stage.

Populating the vault route with our data:

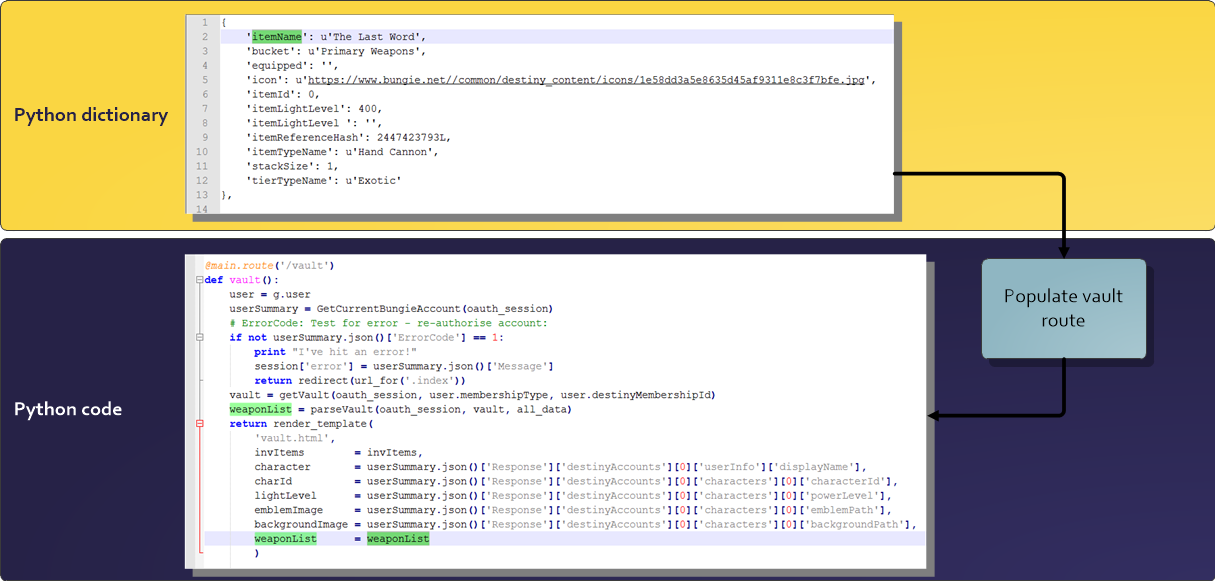
Now that we have stripped the important data out of the manifest, into a list of dictionary’s,  we can pass this list to the ‘vault’ route in the ‘views.py’ file. As a side note, it would have been possible to populate the Vault route without stripping out this data – but it’s much harder to parse through lists of nested dictionary items in the Jinja2 template than in Python. Also, if we were creating a high traffic site, it’s not good practice to send large files of data every time the user refreshes a webpage.

In the case of our Vault route, this could get to about 5MB per page view… Users on mobile data wouldn’t be happy about that, so we need to cut this down.

Creating the Flask Vault route with data taken from the manifest.

Populating the Vault route in our Flask app with the data stripped from the manifest.

Now that we have our important data stripped out and stored in a list of dictionary objects, we need to pass this dictionary to the render_template function of the vault route as a parameter.  The “invItems” dictionary, containing the item categories is also passed as a parameter.

@main.route('/vault')
def vault():
    userSummary = GetCurrentBungieAccount(oauth_session)
    vault = getVault(oauth_session, user.membershipType, user.destinyMembershipId)
    weaponList = parseVault(oauth_session, vault, all_data)
    return render_template('vault.html',
        weaponList = weaponList, 
        invItems = invItems,
        character = userSummary.json()['Response']['destinyAccounts'][0]['userInfo']['displayName'], 
        characterHash = characterHash, 
        charId = userSummary.json()['Response']['destinyAccounts'][0]['characters'][0]['characterId'],
        lightLevel = userSummary.json()['Response']['destinyAccounts'][0]['characters'][0]['powerLevel'],
        emblemImage = userSummary.json()['Response']['destinyAccounts'][0]['characters'][0]['emblemPath'],
        backgroundImage = userSummary.json()['Response']['destinyAccounts'][0]['characters'][0]['backgroundPath'],
        ) 

The other parameters (character, characterHash, charId, lightLevel, emblemImage and backgroundImage) are all taken from the response from getcurrentbungieaccount() and were shown in the last blog post, Part 7: Authenticating our app with Bungie.net OAuth.

Displaying an item in HTML:

To display each item, I created a HTML template file called “itemBlock.html”

The code is quite basic, 2 <div>’s an <img> and 2 <p>’s. The first <div> sets out a Bootstrap column, col-md-3 will allow 4 images to be tiled, per row, before moving to a new row. For the image, I’m passing a lot of parameters but I’m not actually using them yet, as I haven’t found a tidy way to display all of the information. In the <p> paragraph sections, I’m displaying the itemName, itemLightLevel, tierTypeName and itemTypeName.

Here’s the code in the “itemBlock.html”:

<div class="col-md-3 col-sm-4 col-xs-6">
    <div class="thumbnail">
        <img class="img-responsive med-tile" src="{{ dict_item['icon'] }}" title="{{ dict_item['itemName'] }}" tierTypeName="{{ dict_item['tierTypeName'] }}" itemTypeName="{{ dict_item['itemTypeName'] }}" tier="{{ dict_item['tier'] }}" bucket="{{ dict_item['bucket'] }}" itemLightLevel="{{ dict_item['itemLightLevel'] }}" itemReferenceHash="{{ dict_item['itemReferenceHash'] }}">
        <p>{{ dict_item['itemName'] }}: {{ dict_item['itemLightLevel'] }}</p>
        <p>{{ dict_item['tierTypeName'] }} {{ dict_item['itemTypeName'] }}</p>
    </div>
</div>

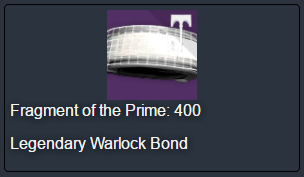
Here’s what that will look like when displayed:

WOOT Fragment of the Prime!

Here’s what the output from the ‘itemBlock.html’ template file looks like.

Edit vault.html template to display all items:

To display the vault contents in the correct order, we need to step through the invItems list and pick out each item of each category.

Here’s the code in the “itemBlock.html” file:

<div class="inventory-container">
{% for item in invItems -%}
    {% for dict_item in weaponList -%}
 
        {% if invItems[item] in dict_item['bucket'] -%}
            {% include 'itemBlock.html' -%}
        {% endif -%}

    {% endfor -%} 
{% endfor -%}
 
</div>

In the code below, we test to see if the current item in our list is one of the category of items we want to display:

{% if invItems[item] in dict_item['bucket'] -%}
    {% include 'itemBlock.html' -%}
{% endif -%}

If so we include the “itemBlock.html” file to display the item.

Viewing our web site:

As usual, the full set of code can be found on my GitHub page:

https://github.com/AllynH/Destiny_Flask_Webserver

There are a few files / folders, so you’ll need to download it from there.

To run the code you can type:

python app.py

This will start the Flask Web Server, you’ll see some output like this:

* Restarting with stat
Opening Manifest...
Finished!
 * Debugger is active!
* Running on https://127.0.0.1:5000/ (Press CTRL+C to quit)

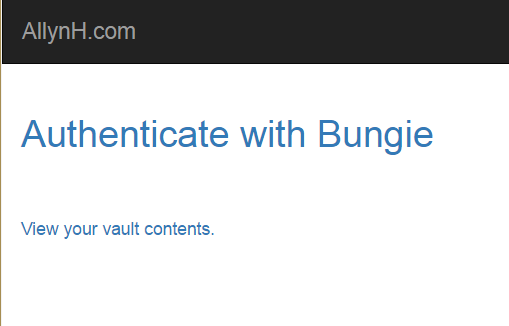
First, click on the “Authenticate with Bungie” link and follow the instructions to authenticate your account.

Index page view:

Here is the view of the index page.

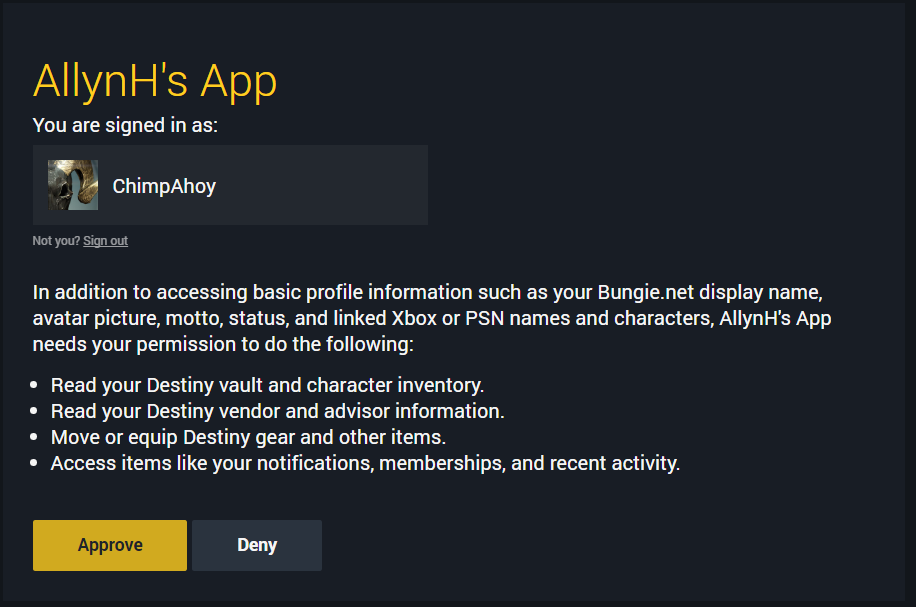
You should see a screen like this, asking you to review and approve the permissions required by this app.

Authorise your app.

Don’t forget to review what permissions your giving the app.

You should then be redirected back to the index page.

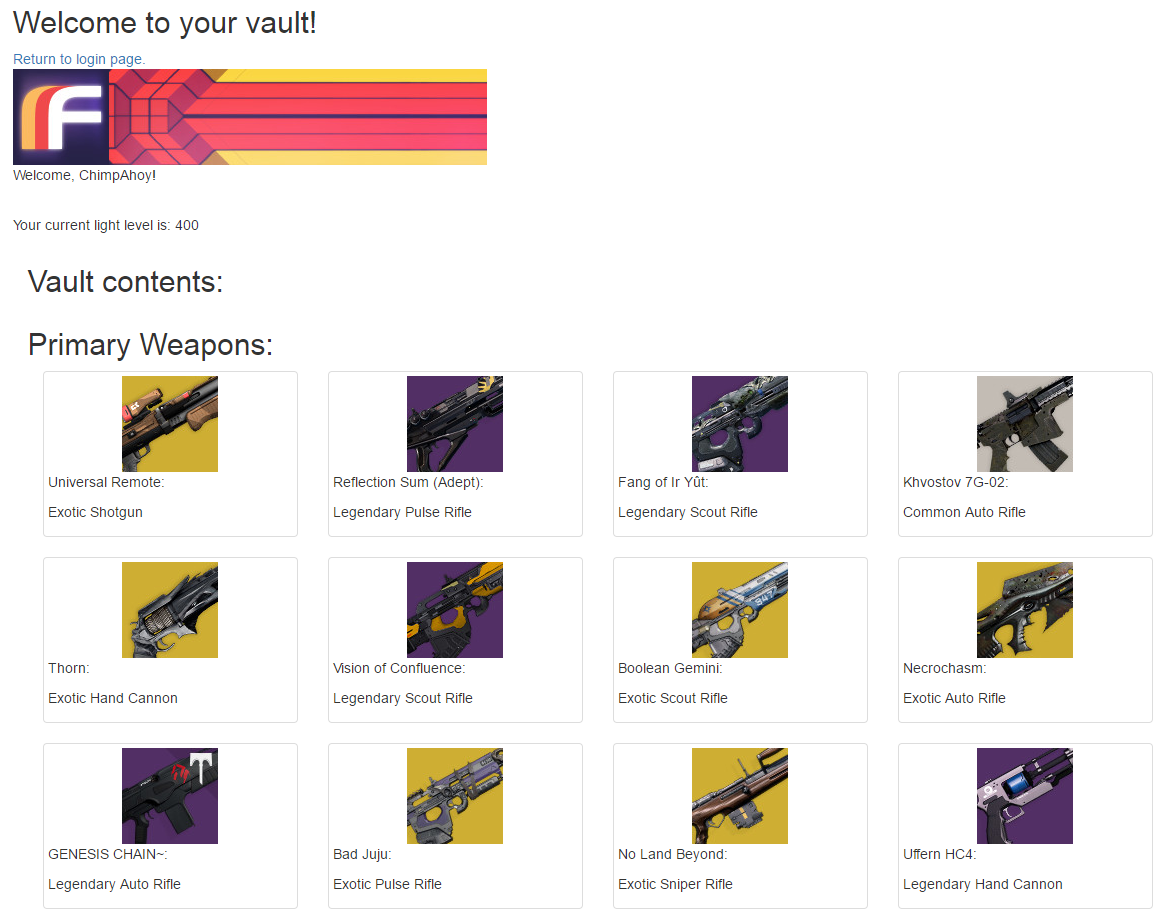
Now that you’ve been authorised and logged into Bungie via our app, we can open the link “view your vault contents”, you’ll see something like this:

Vault view.

Here’s what the vault view currently looks like!

Next steps:

Right now, we’ve created the basic shell of the website / app. This is a good start and we can build onto this, add features, create new pages.

The next steps for me will be to add more functionality to the website:

  • Character inventory view.
  • Xur inventory view.
  • Finish the refresh token flow, so users don’t need to authenticate every 30 mins.
  • Add a user database to securely store the users refresh tokens.
  • Add a transfer item feature.

All of the above is finished (except the transfer item feature), I just need to write up the blog post 🙂

Check out my website:

https://www.destinyvaultraider.com/

Creating a Python app for Destiny – Part 7: Authenticating our app with Bungie.net OAuth

Introduction:

Bungie are moving away from their Cookie based authentication flow and have created a new OAuth 2.0 style flow, this allows for a safer, more standardised approach to authenticating users with Bungie.net. Read the Bungie.net authentication release article here.

Bungie outline some of the benefits of using the new authentication flow:

  • It uses OAuth 2.0 style sign in flow, and does not depend on fragile cookies.
  • It gives the user a chance to review the scope of permissions granted to an application so they can understand what the application can do on their behalf.
  • Users can review all write operations performed by an application, and disable apps they no longer wish to have access.
  • It’s sanctioned by Bungie, and we will smile upon apps that use this mechanism instead of cookies. Also, this is the only mechanism permitted by our terms of service for application developers to make use of APIs that require authentication.

If you’d like to review the previous Destiny API posts, check them out here:

  1. Send a request to read Xurs inventory.
  2. Send a HTML formatted email with Xurs inventory.
  3. Log into Destiny and Bungie.net via your PSN account.
  4. Transfer items from your vault to your character and equip them.
  5. Reading a characters inventory and vault contents.
  6. Creating a Python web server with Flask.

You can also find me on Twitter here @Allyn_H_

Also, many thanks to all the people involved in the Destiny Item Manager development team (too many to name individually) and Vlad from Destiny Trials Report,  for their help debugging some of the issues with the OAuth flow!

Creating an app on Bungie.net:

To create an app on Bungie, you need to visit the developer page here. If you’ve previously created one, you’ll need to update it for the new authentication flow.

Fill in the required details:

  1. Application name: Give your app a recognisable name.
  2. Application status: Set it to private unless you plan to deploy this app.
  3. Website: A place where people can find details of your app.
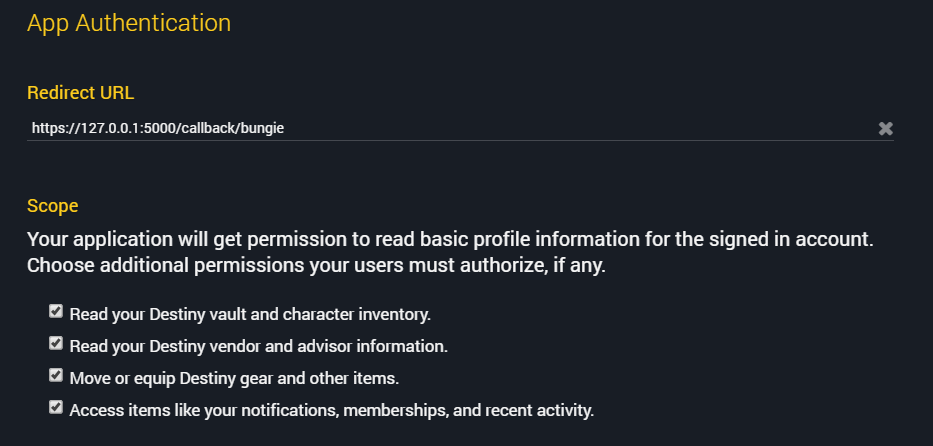
  4. Redirect URL: You’ll need to set a HTTPS redirect URL for your app in order to complete OAuth authorisation.

Setting Callback URL and permissions.

I’ve added all the permissions here, as I’m also using this to test other features – you may not need all these permissions.

Then click on the save changes button at the bottom.

Hooray, your app is created!

App is created, now let’s get coding!

Now, let’s get to coding up the flow…

Creating the authorisation URL:

When you registered your app on Bungie, you should have been given an authorisation URL with a unique number, like this: https://www.bungie.net/en/Application/Authorize/1234.

We are going to take that URL and add some parameters to it before we make our authorisation request. Here’s what the updated “index.html” route looks like:

AUTH_URL = 'https://www.bungie.net/en/Application/Authorize/1234?'

@app.route('/')
@app.route('/index')
def index():
    state = make_authorization_url()
    state_params = {'state': state}
    url = AUTH_URL + urllib.urlencode(state_params)
    return render_template('index.html', url=url)

Before we look at what the state parameter is doing, here’s how we pass the URL to our HTML “index.html” template, via the render_template method.

 Creating the index page:

I’m going to build on the templates made in the previous blog post, you can review them here. The index.html page is left deliberately bare, there’s a lot of cool stuff we could do here but let’s get our basic program up and running first. In our index.html template file, we can create a hyperlink to authorise our account like this:

{% block page_content %}

<div>
    <h2><a href="{{ url }} " >Authenticate with Bungie</a></h2></br></br>
</div>


{% endblock %}

The value for {{ url }} will be passed in from the render_template method, and the hyper link will be created.

Preventing Cross Site Request Forgery with the state parameter:

As an extra precaution, we are going to add some Cross Site Request Forgery (CSRF) protection, as an added security benefit to the visitors of our site, there is a great post about this, referenced on the Bungie authentication article, you can read the post here.

Here’s how we are going to handle the state parameter of our authorisation request and callback:

  1. Create a state value, a random string of numbers and letters.
  2. Save this state value in the users secure HTTPS session.
  3. Add this parameter to the authorisation URL when we direct the user to the Bungie authorisation URL.
  4. When the user is redirected to back to our site via the callback URL, Bungie will echo the state parameter back to us.
  5. Compare the state parameter from Bungie and the state parameter we stored in the users session.

If the state parameters are the same – we know the user is who they say they are, and nothing dodgy is happening.

Here’s what the state parameter looks like in action:

State parameter in action during app authorisation.

Here we can see the state parameter in the URL.

Here’s what it looks like when Bungie redirects the user to the callback URL:

State parameter in callback.

User is redirected to the callback URL, then redirected to the /index route.

Let’s code this up –  here’s what our index view looks like (deliberately basic):

@app.route('/')
@app.route('/index')
def index():
    state = make_authorization_url()
    state_params = {'state': state}
    url = AUTH_URL + urllib.urlencode(state_params)
    print url
    return render_template('index.html', url=url)

The first thing we do is call the function make_authorization_url() and store the result in the “state” variable.

Inside the make_authorization_url(), we create a unique UUID (Universally Unique Identifier)  32 bit string, using  the Python library “uuid4”.  We store this UUID string in a variable called “state”.

Now that we have generated the state string, we’ll need to store, so we then call a function, save_created_state(state) and pass it the “state” value we just generated. We also return the

Here’s what the code looks like:

 
def make_authorization_url():
    # Generate a random string for the state parameter
    from uuid import uuid4
    state = str(uuid4())
    save_created_state(state)
    return state 

Now that we have generated the “state” value, we need to store this in the session, here’s what the code for save_created_state() looks like:

# Save state parameter used in CSRF protection: 
def save_created_state(state):
    session['state_token'] = state
    pass

Now that we have generated the state parameter, we can generate our authorisation URL and send the user to Bungie to be authenticated.

Handling a callback:

Once we have sent our request for authorisation, our server will listen on the callback URL for a response. The response from Bungie will also echo our CSRF state parameter back to us, so we are sure the response is from Bungie.

The callback route should read the state parameter, test to see if it’s the same parameter we stored in the users session – if it’s not the same state parameter- we send a HTTP 403 “forbidden” response. If the state parameter is the same as the one we sent, we can then store the authorisation code (access_token).

@app.route('/callback/bungie')
def bungie_callback():
    state = session.get('state_token')
    if not is_valid_state(state):
        print "Uh-oh, this request wasn't started by us!"
        abort(403)
    session.pop('state_token', None)
    code = request.args.get('code')
    access_code = code
    token = get_token(code)
    return redirect(url_for('index'))

The method  is_valid_state(state) is used to check that the state echoed back from Bungie is the same as the state value we have stored in our session.

Below you can see we are passing in the returned state value and comparing it to the “saved_state” value taken from the session:

def is_valid_state(state):
    saved_state = session['state_token']
    if state == saved_state:
        print "States match, you are who you say you are!"
    return True
    else:
        return False

If the states match, we return “True” and send our request for the access_token, if the states do not match, we return “False” and throw our 403 error.

The code “session.pop(‘state_token’, None)” removes the state parameter from the session (set’s it to “None”) – we don’t need it anymore.

Getting the Access Token from the Authorisation Code:

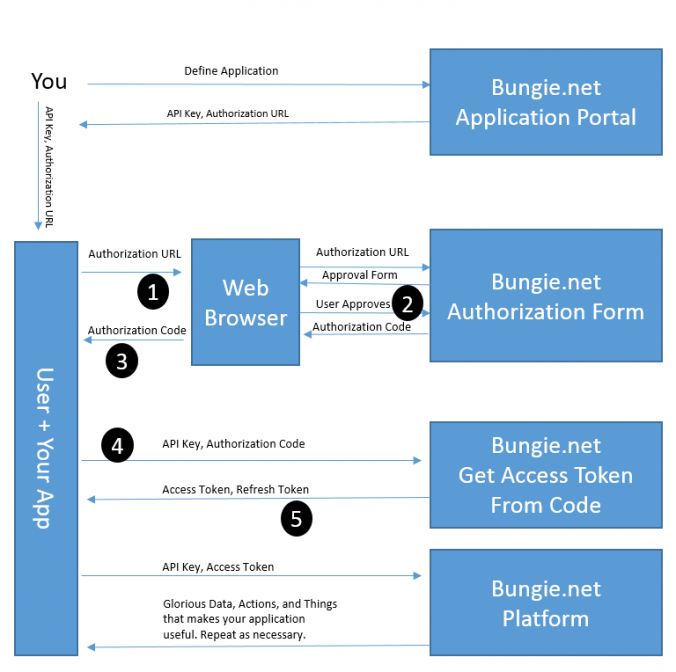
Now that the user has authorised their account and we have received the authorisation code from Bungie.net, we can swap this authoirsation code for the access token. This relates to step 4 & 5 of the Bungie.net authorisation flow.

First, we take the authorisation code and add it as the value of a Python dictionary object “post_data” – this dictionary object will be added to the body of the post request and transmitted as a JSON object.

def get_token(code):
    HEADERS = {"X-API-Key":'MY-API'}
    post_data = {'code': code}
    response = requests.post(access_token_url, json=post_data, headers=HEADERS)
    :

Now that we have made a request for the token – lets look at the response:

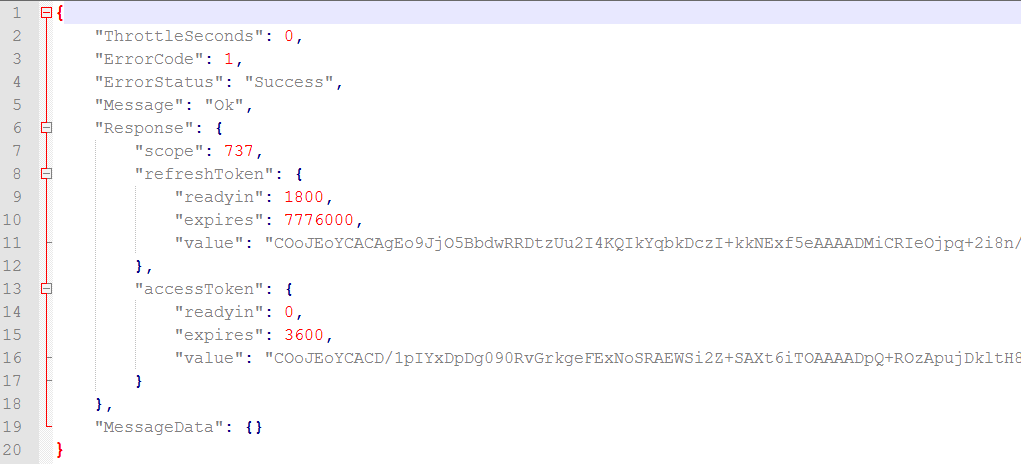
We've got the access_token!

JSON response containing access_token and refresh_token.

The section we are most interested in (right now) is:

    "accessToken": {
        "readyin": 0, 
        "expires": 3600, 
        "value": "COoJEo ... j8w=="
 }

We now have the access token needed to make any authorised API request! The response contains a bit more information too; the access token is ready in 0 seconds – which means we can use it immediately. The access token will expire in 3600 seconds – 1 hour from now. The access token value, is of course, the really long string.

Now that we have the JSON response, we can save the access token and the refresh token. I’m also saving the time values which tell me when my refresh token is ready and when it expires.

I’m not going to worry about refreshing the token in this blog post, as it takes a bit more work. I will be updating my code and writing a new blog post at a later date.

def get_token(code):
    :
    access_token = response.json()['Response']['accessToken']['value']
    refresh_token = response.json()['Response']['refreshToken']['value']
    refresh_ready = datetime.now() + timedelta(seconds=int(response.json()['Response']['refreshToken']['readyin']))
    refresh_expired = datetime.now() + timedelta(seconds=int(response.json()['Response']['refreshToken']['expires']))
    save_session(token_json)
    userSummary = GetCurrentBungieUser(oauth_session)
    return userSummary.json()['Response']['displayName']

We will use this to create an authorised HTTP session.

Creating our authorised session:

Now that we have our API key and our access token – we can create an authorised session. As before the API-Key is added to the session header “X-API-Key”. We also need to add an “Authorization” header with the value of our access token, here’s how the access token above would look: “Bearer  COoJEo … j8w==” (I’ve shortened it a little here).

Here’s the code to create the session:

def save_session(token_json):
    oauth_session = requests.Session()
    oauth_session.headers["X-API-Key"] = API_KEY
    oauth_session.headers["Authorization"] = 'Bearer ' + str(token_json)
    access_token = "Bearer " + str(token_json)

Making an authorised request:

Now that we are authorised – we can try a simple GET request to the GetCurrentBungieAccount endpoint (as recommended in the Bungie Auth article), this will give us some information on the logged in character, from their Bungie account.

For this – I’ve created a new view template called “vault.html”, for now this is just a straight copy of the “index.html” template. In the future, I’ll populate this with all of the vault contents.

def vault():
    userSummary = GetCurrentBungieAccount(oauth_session)
    return render_template('vault.html', 
        character=userSummary.json()['Response']['user']['displayName'], 
        lightLevel = charSummary.json()['Response']['data']['characterBase']['stats']['STAT_LIGHT']['value'],
        emblemImage = account.json()['Response']['data']['characters'][0]['emblemPath'],
        backgroundImage = account.json()['Response']['data']['characters'][0]['backgroundPath'],
    )

Here’s what the code for GetCurrentBungieAccount looks like, as we’ve seen before, it’s the same Python Requests GET format, we are passing the “oauth_session”, that we saved a moment ago, into the function as a parameter. We are returning the JSON response to the vault() route.

def GetCurrentBungieAccount(session):
    req_string = 'https://www.bungie.net/Platform/User/GetBungieNetUser/'
    res = session.get(req_string)
    return res

I’ve also created a new function to return some character specific data using the getCharacterSummary endpoint, this will give me some data like my characters light level and my characters emblem.

def GetCharacterSummary(session):
    req_string = base_url + membershipType + "/Account/" + destinyMembershipId + "/Character/" + characterId + "/"
    res = session.get(req_string)
    return res

Viewing our web site:

As usual, the full set of code can be found on my GitHub page:

https://github.com/AllynH/Destiny_Flask_Webserver

There are a few files / folders, so you’ll need to download it from there.

To run the code you can type:

python app.py

This will start the Flask Web Server, you’ll see some output like this:

* Restarting with stat
Opening Manifest...
Finished!
 * Debugger is active!
* Running on https://127.0.0.1:5000/ (Press CTRL+C to quit)

First, click on the “Authenticate with Bungie” link and follow the instructions to authenticate your account.

Index page view:

Here is the view of the index page.

You should see a screen like this, asking you to review and approve the permissions required by this app.

Authorise your app.

Don’t forget to review what permissions your giving the app.

You should then be redirected back to the index page.

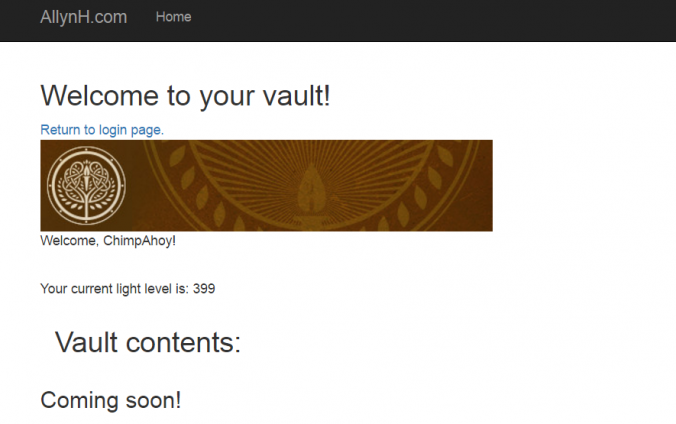
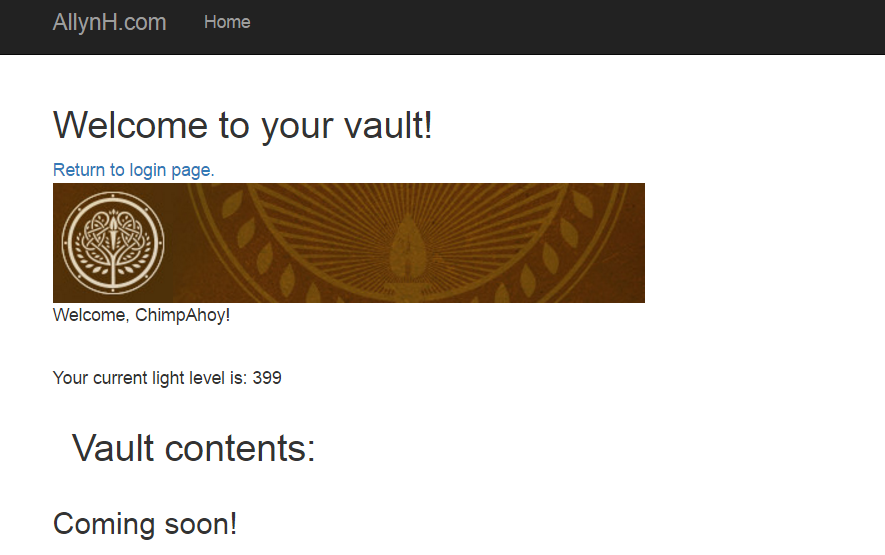
Now that you’ve been authorised and logged into Bungie via our app, we can open the link “view your vault contents”, you’ll see something like this:

Welcome to your vault - yet to be finished.

Gamertag, light level, Emblem and emblem background display.

Next steps:

Right now, we’ve created the basic shell of the website / app. This is a good start and we can build onto this, add features, create new pages.

The next steps for me will be to add more functionality to the website:

  • Character inventory view.
  • Xur inventory view.
  • Finish the refresh token flow, so users don’t need to authenticate every 30 mins.
  • Add a user database to securely store the users refresh tokens.
  • Add a transfer item feature.

All of the above is finished (except the transfer item feature), I just need to write up the blog post 🙂 I’m looking to deploy the code soon to a real live web site, so stay tuned.


Creating a Python app for Destiny – Part 6: Creating a Python web server with Flask

Introduction:

In my previous blog posts, I’ve been working to build a wep app based on Bungies API for Destiny the game. I’ve made great progress with the server side requests and processing the data responses from Bungie, the next steps are to integrate this code into a web server. This will also work out well as I move my code over to the new Bungie OAuth fow.

After a bit of research, I’ve decided to go with the Flask microframework. As their tag line suggests, Flask is a very light weight microframework and appears to be a little easier than Django to setup for smaller projects. In order to learn more about Flask, I’ve been working from Miguel Grinbergs book and his massive online tutorial, both of which I would highly recommend. This blog post is designed as a general overview of Flask, Jinja2, Python as there are many other better thought out learning material on these subjects I’d like to get stuck into the OAuth and adding Destiny features into the code.

If you’d like to review the previous Destiny API posts, check them out here:

  1. Send a request to read Xurs inventory.
  2. Send a HTML formatted email with Xurs inventory.
  3. Log into Destiny and Bungie.net via your PSN account.
  4. Transfer items from your vault to your character and equip them.
  5. Reading a characters inventory and vault contents.

Hello World:

To get started, lets start with the “Hello World!” example on the Flask homepage.

from flask import Flask
app = Flask(__name__)

@app.route("/")
def hello():
    return "Hello World!"

if __name__ == "__main__":
 app.run()

What the code is doing:

from flask import Flask
app = Flask(__name__)

We are importing the Flask Class from the flask package. We then create an instance of a Flask object and name it “app”. We pass “__name__” as the first parameter to our Flask object, this is the “import_name” parameter and you can read more about it here.

@app.route("/") 
def hello(): 
    return "Hello World!" 

The @app.route() decorator is used to tell Flask what URL will trigger our function. In this case, a visitor to our homepage will trigger the function hello(). Within the hello() function, we are returning the string “Hello World!”.

if __name__ == "__main__":
    app.run()

When you execute the Python code from the command line, “__name__” will be set to “__main__”, this will execute the code to run our instance of the Flask object, called “app”.

When we execute the code it will print something like this to the screen:

> python app.py
* Running on http://127.0.0.1:5000/ (Press CTRL+C to quit)
127.0.0.1 - - [25/Jan/2017 12:45:43] "GET / HTTP/1.1" 200 -
127.0.0.1 - - [25/Jan/2017 12:45:43] "GET /favicon.ico HTTP/1.1" 404 -

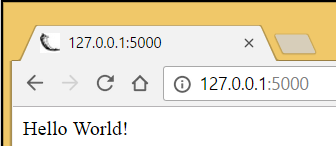
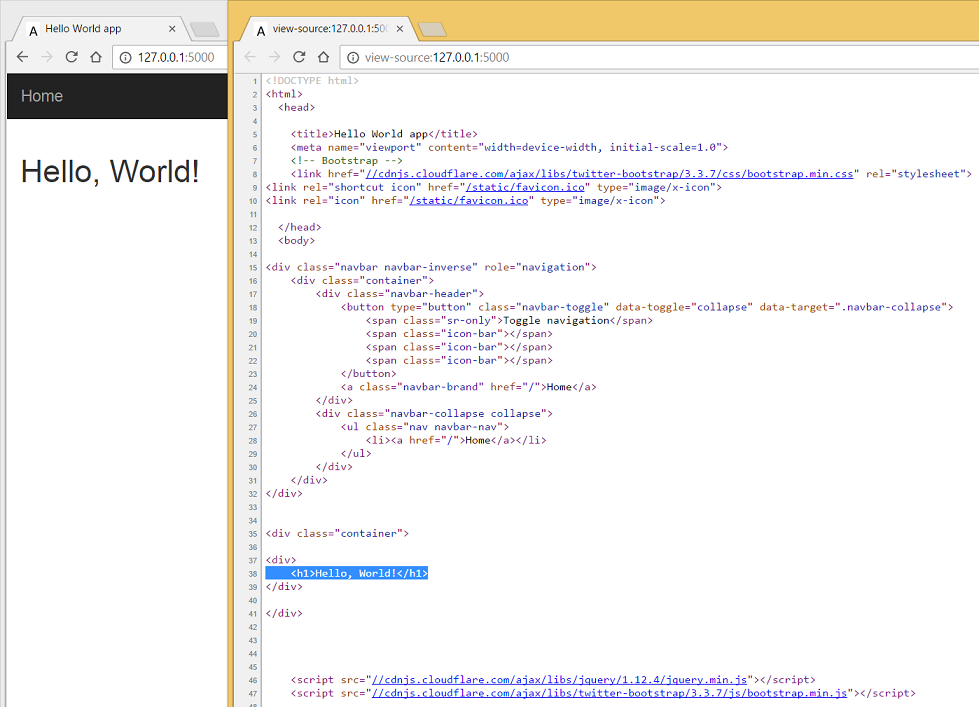
When we navigate to address in our browser we will see this:

Flask Hello World app

This is what our app looks like in our web browser.

If we view the source of the web page (Right mouse button -> View source), we can see. There is no HTML displayed, just the string “Hello World!”:

Flask Hello World app - page source

No HTML here – just a string.

This is a good start, we have created a web server with 7 lines of code.

Adding features to our server:

Now that we have a very basic web server up and running, lets add some features.

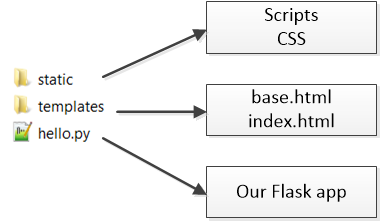
Flask_script Manager:

Flask Manager provides support for writing external scripts in Flask, in our case it will allow us to add parameters for the server directly from the command line. This will allow us to switch between debug mode and production mode, or to change the port and host IP numbers directly from the command line.

Here’s how we create a Manager instance and link it to our “app” object:

from flask_script import Manager
manager = Manager(app)

We can then restart our web server like so:

> python hello.py runserver

Or we could start on a different port like this:

> python hello.py  runserver -p 5001

Which would return:

 * Running on http://127.0.0.1:5001/ (Press CTRL+C to quit)

Flask-Bootstrap:

If you’re not familiar with HTML or web development, Bootstrap is a free web framework for designing websites. Bootstrap contains HTML and CSS templates used to design web pages. It really takes a lot of the pain out of designing websites 🙂

For more info on Python-Bootstrap, see here.

Here’s how we import Bootstrap into our app:

from flask_bootstrap import Bootstrap

bootstrap = Bootstrap(app)

This will allow us to create Bootstrap based designs by adding the following to our base.html template file (I’ll talk about this more in a minute):

{% extends "bootstrap/base.html" %}

HTML with the Jinja2 template engine:

In my previous posts, I’ve used a series of the file.write() commands to take the JSON response, format it as HTML , with a bit of hacking, and write it to a HTML file. This is OK for small scale programs, like the one where I send Xurs inventory as a HTML formatted email. It’s not really suitable for large scale projects, or any sort of project where you’ll be displaying multiple pages of content.

A template file is a text file that contains the response from our server, we can control the flow and contents of the template file by using Jinja2’s inbuilt Control Statements. First, let’s change the above code from returning a string – to returning a rendered Jinja2 template.

from flask import Flask, render_template

@app.route("/") def hello():
    message = "Hello, World!"
    return render_template('index.html', message=message) 

In the above code, instead of just returning the string “Hello, World!”, we are passing the Python string to the Jinja2 engine, which then renders the index.html template using the data our Python sends.

Before we build the index.html template, we can strip out all of the generic HTML code, that is reused for each page, and keep that in a base template file. This base.html template will contain our HTML <head></head> data, our CSS links, and our navigation bar.

Here’s what our base.html will look like:

When Flask-Bootstrap is initialised by our app, the template “bootstrap/base.html” becomes available to us. This “bootstrap/base.html” template contains the general HTML structure of our page and allows us to derive all of our new templates from this.

(For convenience, I’ve stripped out the navigation bar HTML, I’m using the Bootstrap example code for this).

{% extends "bootstrap/base.html" %}

{% block title %}Hello World app{% endblock %}

{% block head %}
{{ super() }}
    <link rel="shortcut icon" href="{{ url_for('static', filename='favicon.ico') }}" type="image/x-icon">
    <link rel="icon" href="{{ url_for('static', filename = 'favicon.ico') }}" type="image/x-icon">{% endblock %}
{% block navbar %}

<div class="navbar navbar-inverse" role="navigation">
    :
    :
    :
</div>

{% endblock %}

{% block content %}

<div class="container">
    {% block page_content %}{% endblock %}
</div>

{% endblock %}

Blocks like {% title%}, {% navbar %} or {% content %} are called “convenience” blocks, and are built directly into the Flask-Bootstrap, this means we can amend these blocks, without having to directly replace them. In the case of the {% head %} block, we call Flasks super() function, which allows to to amend data to the block, without overwriting the Bootstrap CSS links in the <head></head> tags.

The block we are most interested in is the {% block content %}, inside here we will find the {% block page_content %}, this will allow any template that calls our base.html to replace the contents of this block – through Template Inheritance.

{% block content %}

<div class="container">
    {% block page_content %}{% endblock %}
</div>

{% endblock %}

Here’s what our index.html will look like:

Now that all of our generic HTML has been defined in the base.html, we can create our index.html, as an extension of the base.html template.

{% extends "base.html" %}
{% block title %}Hello World app{% endblock %}

{% block page_content %}

<div>
<h1>{{ message }}</h1>
</div>

{% endblock %}

The index.html defines the contents of the page_content block, in our case we will print the string stored in the Python variable “message”, inside a set of <div> and <h1> tags:

<h1>{{ message }}</h1>
 

Folder structure:

In this example, we’ll have a base.html file for all of our generic HTML and an index.html, which will be populated by our Python code. This is a basic example, but later I’ll be building several more pages and HTML templates into this project.

Flask folder structure

Here is the folder structure Flask uses for defining template and static files.

Running the web server:

Now that the code is complete we can start our web server and see what our index page looks like.

We can start our web server like so:

> python hello.py runserver
* Running on http://127.0.0.1:5000/ (Press CTRL+C to quit)
127.0.0.1 - - [25/Jan/2017 12:45:43] "GET / HTTP/1.1" 200 -

Then navigating to http://127.0.0.1:5000/ we can view our active web server:

Web server with HTML output.

Web server shown on the left and HTML source code on the right.

As we can see, we are no longer outputting just a text string, we are outputting a full HTML web page, created from our base.html, index.html and the output of our Python code.

Download the code:

The full set of Python code can also be found on my GitHub page here: https://github.com/AllynH/Flask_webserver

As there are a few files in this project, it’s best to copy it from there.

Next steps:

Now that we have a web server built in Python using Flask we can:

  • Update the code with the new Bungie OAuth login flow.
  • Build in our previous Bungie code.

The new Bungie authentication flow!

Hi there,

As of the 14th of December, Bungie have changed their authentication flow for the Destiny API. Bungie are moving away from the cookie based authentication flow, to the OAuth 2.0 flow.

The code in the previous blog posts will still work, but Bungie will soon be switching over fully to the new authentication system.

This is good news for anyone using the apps based on the Destiny API, as it is much more secure, offers the users more control over how their data is used, and what can controlled from external applications.

You can read about the changes from the official Bungie release here:

The new Bungie OAuth flow.

I’m currently creating the Python code for the new authentication flow. The code is all working but I’m taking a week off to spend Christmas with my family, so stay tuned for the blog post with updated code 🙂

Creating a Web Server on the Galileo: Using the Arduino IDE.

Creating a Web Server using the Arduino IDE example:

The Arduino IDE comes with a prebuilt Web Server example. If you’re not sure what a Web Server is, or what it’s used for – check out my blog post here -> Creating a Web Server on the Galileo

It's pretty sweet actually.

Arduino Example for creating a Web Server.

The above example comes with enough code to:

  • Create a Web Server on the given IP address.
  • Create a blank HTML page.
  • Read the analogue inputs and display their values on the HTML page.

How the Arduino Web Server works:

The Web Server uses the Arduino Ethernet library to answer any HTTP requests made to the Galileo. The Galileo already has an Ethernet connection on board and fully supports the Ethernet library.

Here’s how the library is explained on the Arduino website:

The library allows the Arduino device to connect to the internet. It can serve as either a server accepting incoming connections or a client making outgoing ones. The library supports up to four concurrent connection (incoming or outgoing or a combination).

The Arduino example does not conform to the full HTML page structure, and instead relies on printing text between the opening and closing HTML tags.
This is not the ideal solution for creating a fully functioning HTML page but it is a very quick and easy way to control your Galileo via a web browser. The example is pretty bare-bones, a HTML only website with no CSS styling or server side scripting functionality. Without any JavaScript or PHP, your page needs to be refreshed anytime the data changes.

Creating the Web Server in the Arduino IDE:

We start the Web Server by initialising the Ethernet class, to do this we need to call the Ethernet.begin() function and pass the required MAC and IP addresses to the function.

byte mac[] = { 0xDE, 0xAD, 0xBE, 0xEF, 0xFE, 0xED };
IPAddress ip(192,168,1,177);

void setup() {
//  Ethernet.begin(0xDE, 0xAD, 0xBE, 0xEF, 0xFE, 0xED, 192,168,1,177); 
    Ethernet.begin(mac, ip);
}

Once the Ethernet class has been initialised, we need to tell the server to listen for incoming connections on port 80, this is the default port for HTML requests, you can change this port number, which I will be doing in the Node.js example.

EthernetServer server(80);

void setup() {
  server.begin();
}

When the server is running and a client is available (connected via a web browser), the client.println() function is used to send data to all the connected devices. HTML can be printed directly using the client.println() function.

void loop() {
  client.println("<title> Allyns webserver: </title>");
}

The above code can be used to build a fully functioning Web Server.

Note:

At the time of writing there is a bug in the Arduino Ethernet library, which is discussed and a fix is suggested here.

© 2025 Allyn H

Theme by Anders NorenUp ↑