
Introduction:
In the previous sections I showed how to:
- Send a request to read Xurs inventory.
- Send a HTML formatted email with Xurs inventory.
- Log into Destiny and Bungie.net via your PSN account.
I’m now going to build on the previously created code to create an app that can transfer an item to and from the vault, once the item has been transferred – we can then equip it.
If you’ve been reading along with me up to this point, you should understand all of this, if not – now is a good time to check out my previous posts.
Here’s the code working (sorry about the camera shaking, it was made using my phone ):
Destiny the game, Equipping an Item with the Destiny API. from Allyn H on Vimeo.
Also, I like to say a big thanks to all of the people on Reddit, Twitter and Bungie.net for their help and interest 🙂
You can find me on Twitter here @Allyn_H_
The transferItem endpoint:
The Destiny API uses web server endpoints to execute commands, the endpoint used to transfer items is: https://www.bungie.net/platform/Destiny/transferItem/
The BungieNetPlatform wiki for this endpoint can be found here. We can see this method is very different from the Xur advisors endpoint we used in the previous examples.
Here are the main differences:
- We still need to use the X-API key in our header.
- We also have to attach our x-csrf token in our header.
- This is a private endpoint – we need to be logged in to use this method.
- We need to attach the required cookies to our POST request.
- This is a POST method – we will need to send data with this request.
- We need to send the data as a JSON packet.
- The response will only tell us if we have been successful or not – the Xur advisors response was >1000 lines of text.
The code for storing the transferItem endpoint variable will look like this:
base_url = "https://www.bungie.net/platform/Destiny/"
req_string = base_url + "TransferItem/"
Important note: If the trailing “/” is missing from the “transferItem/” endpoint – the request will fail. I’ve spent way longer than I’m willing to admit debugging that issue :/
Creating the POST request payload:
The “transferItem” endpoint takes a JSON payload as an input. This JSON payload contains a lot of information. So lets take a look at how it’s put together.
The data gathered to populate this payload was found by looking at items I had equipped using the “GetCharacterInventory” endpoint, you can find more info here. This will list the relevant information for all of your equipped items, let me know if you want to see the code for this.
|
Name |
Description |
|
This will be 2 for PSN and 1 for Xbox live. |
|
|
itemReferenceHash |
This is the “itemHash” number from our previous examples. This refers to the generic item for example: 1000-Yard Stare. |
|
itemId |
This is a unique item number relating to a specific item, that you own. For example: Allyn’s 385 light level 1000-Yard Stare with the Ambush Scope, Quickdraw and Firefly. |
|
stackSize |
How many items to transfer. Should be “1” for equipable items. |
|
characterId |
The characterId the item is being moved to or from. You can find the characterId here. |
|
transferToVault |
Move the item to or from the vault; true or false |
Here’s how this method expects the JSON data to be formatted:
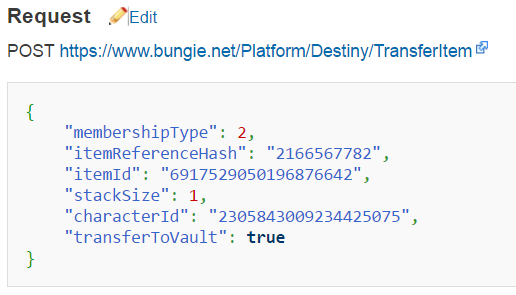
This is the BungieNetPlatform example for the transferItem POST payload
The good news here is it’s pretty easy to put this together in Python by creating a Dictionary object.
Making a POST request:
We’ve already looked at making HTTP GET requests with Python, but the Python Requests library also makes it really easy to make a POST request.
You can view the Requests documentation here. Here’s the quick example of how to send some data formatted as a Python dictionary:

Python Requests POST example
Or the Requests library will also automatically encode a Python dict into a JSON object for you, when you use the “json” parameter:
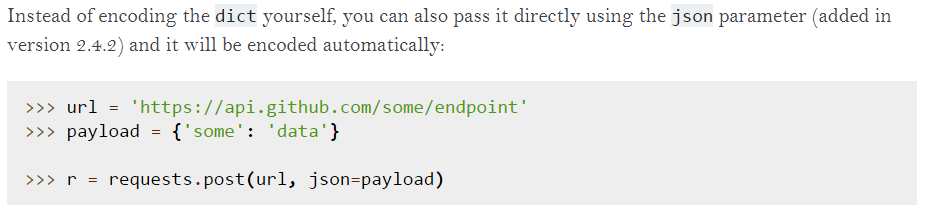
Python Requests POST JSON example
Now that we know how to create a Python POST request and what data the transferItem endpoint are looking for, lets turn that into some code!
Moving an item from your vault to your inventory:
As mentioned above – the data gathered to populate this payload was found by looking at items I had equipped by using the “GetCharacterInventory” endpoint, you can find more info here. I’m planning on putting together a blog post on this too but let me know if you’d like to see the code for this.
First we create our Python dictionary object:
text_payload = {
    "membershipType": 2,
    "itemReferenceHash": 1519376148, # The Ram
    "itemId": 6917529085991104887, # The Ram
    "characterId": characterId_Warlock,
    "stackSize": 1,
    "transferToVault": False
}
Next, we convert the dictionary object into a JSON object:
payload = json.dumps(text_payload)
Now we can make the actual POST request to the Destiny servers to transfer our item.
base_url = "https://www.bungie.net/platform/Destiny/"
req_string = base_url + "TransferItem/"
res = session.post(req_string, data=payload)
The JSON response should look like this:
{
    "ThrottleSeconds": 0,
    "ErrorCode": 1,
    "ErrorStatus": "Success",
    "Message": "Ok",
    "Response": 0,
    "MessageData": {}
}
If the item was not found in your vault, you’ll get a response like this:
{
    "ThrottleSeconds": 0,
    "ErrorCode": 1623,
    "ErrorStatus": "DestinyItemNotFound",
    "Message": "The item requested was not found.",
    "Response": 0,
    "MessageData": {}
}
For any other issues, for example if you were to omit the trailing “/” from “https://www.bungie.net/platform/Destiny/TransferItem/” URL, the request would fail but you wouldn’t receive a JSON response, instead your code would error and you’d receive a HTTP 405 status code. You can find the status code by using the following code:
print res.status_code
405
If you see something like that coming up, you’ll need to review and fix your code.
Equipping an item from your inventory:
Now that the item is in our characters inventory – we can equip the item on that character.
The endpoint used to equip an item from your inventory is: https://www.bungie.net/platform/Destiny/EquipItem/ you can find more information about this endpoint here.
Just a note: this can only be done when in a social space or in orbit (otherwise it’d be really easy to cheat in PvP – can you imagine if you could do this in Trials???). Otherwise the action will fail and return an error message.
Creating the POST request payload:
The POST request to equip an item is smaller and we already have the details of the item we want to equip.
text_equip_payload = {
    "membershipType": 2,
    "itemId": 6917529085991104887, # The Ram
    "characterId": characterId_Warlock
}
equip_payload = json.dumps(text_equip_payload)
equip_url = base_url + "EquipItem/"
res = session.post(equip_url, data=equip_payload)
Again, if the item was not found, you’ll get a response like this:
{
    "ThrottleSeconds": 0,
    "ErrorCode": 1623,
    "ErrorStatus": "DestinyItemNotFound",
    "Message": "The item requested was not found.",
    "Response": 0,
    "MessageData": {}
}
If you’re trying to equip an exotic and you already have one equipped, you’ll see an error message like this:
{
    "ThrottleSeconds": 0,
    "ErrorCode": 1641,
    "ErrorStatus": "DestinyItemUniqueEquipRestricted",
    "Message": "You can only have one item of this type equipped.",
    "Response": 0,
    "MessageData": {}
}
Running the code:
Here is the full set of Python code, this can be copied into a file called “equipItem.py” and executed from the command prompt like so:
> python equipItem.py
The code can also be found on my GitHub page here: https://github.com/AllynH/Destiny_Equip_Item
As always, I’ll try to keep the GitHub repo up to date with any changes I make.
0 Comments
4 Pingbacks