Introduction:
I’m a huge fan of Bungie’s Destiny game, and have been playing it since launch. In Destiny there is a vendor, called Xur, who visits the game each week and sells exotic weapons and armour. Xur is only available from Friday to Sunday mornings, and appears in a different location each week – because of this he can be quite hard to track down. As with most people – I’m at work every Friday and usually busy with family time over the weekend, so I’m often left in a situation where I miss Xur or don’t have the time to log in and see what he’s selling.
This just wasn’t good enough, I couldn’t risk missing out on the next Gjallarhorn! So let’s built an app to find Xurs inventory each week.
API registration:
In order to build an app using the Bungie API, you need to create a Bungie.net account, and register as a developer. This only takes a few minutes, to register as a developer, follow this link: https://www.bungie.net/en/User/API
This will give you your unique X-API-Key. For every request we make to the Bungie servers, we need to send this API key in the HTTP header of the request.
App flow chart:
Finding Xurs inventory isn’t as straight-forward as expected. Bungie have implemented a method for reading Xurs inventory – but it returns the data in an encrypted format, as an item hash.
The reason behind this is, even items of the same type can have different perks. For example, each gun can have a different scope type, different perks, and different barrel modifications. So even 2 of the same guns can be completely different.
Because of this, we’ll need to send multiple requests to the Bungie servers and read multiple replies.
Python HTTP requests:
Requests is a Python HTTP library, if you’re not familiar with it, start here. You may need to install it on your computer, If you have PIP installed on your computer requests can be installed by typing:
pip install requests
Sending our request to Xurs advisors page:
Our first HTTP request will be to Xurs Advisors page, here is the link https://www.bungie.net/Platform/Destiny/Advisors/Xur/
The X-API-Key is passed as a parameter with every HTTP request made to the Bungie servers:
HEADERS = {"X-API-Key":'MY-X-API-Key'}
Here is how we make the request:
xur_url = "https://www.bungie.net/Platform/Destiny/Advisors/Xur/"
print "\n\n\nConnecting to Bungie: " + xur_url + "\n"
print "Fetching data for: Xur's Inventory!"
res = requests.get(xur_url, headers=HEADERS)
It’s as simple as that.
So what are we doing? The line:
res = requests.get(xur_url, headers=HEADERS)
Makes a HTTP request to the URL stored in the “xur_url” string, the X-API-Key is also added to the request in the “headers” dictionary object.
Now the object “res” contains the JSON response received from the Bungie servers.
Parsing the JSON response:
The JSON response received from the request is pretty big, in my case it contained 1018 lines of text! So what do we do with this data? First things first, we need to know if our request was received and processed correctly. The JSON object contains a key called “ErrorStatus”, this key is used to store status of the request, so lets print the value of this key:
error_stat = res.json()['ErrorStatus']
print "Error status: " + error_stat + "\n"
Here is what the code outputs:
Here is an example of what the code would output if there was a successful request but Xur was not available (he’s only available from Friday to Sunday):
Parsing the multidimensional JSON response:
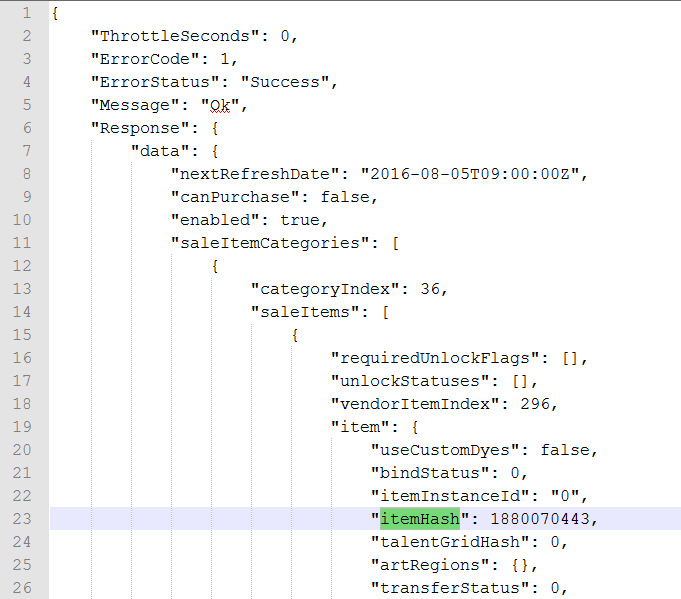
Looking through the “res” JSON object, we can see a key called “itemHash”, located in res[‘Response’][‘data’][‘saleItemCategories’][‘saleItem’][‘item’][‘itemHash’], shown on line 23. This is the location of the encoded item details we are looking for!
Here is where things get tricky… JSON data is used to represent key-value pairs, called dictionaries in Python. However the item “saleItemCategories”, shown on line 11 – itself contains a series of key-value pairs. Also the item “saleItems”, shown on line 14, is also a dictionary.
Our JSON object contains nested dictionaries, also known as a multidimensional array.
So in order to make a list of each of the “itemHash” values, we need a for loop to iterate through each of the “saleItemCategories” and another for loop to iterate through each of the “saleItems”.
for saleItem in res.json()['Response']['data']['saleItemCategories']:
	mysaleItems = saleItem['saleItems']
	for myItem in mysaleItems:
		hashID = str(myItem['item']['itemHash'])
Request 2 – decoding the item hash:
Now that we have a list of our itemHash’s – we need to make send a request to the Bungie Destiny Manifest page for each of the hashes.
This request takes the form of: http://www.bungie.net/Platform/Destiny/Manifest/{type}/{id}/
Where the {id} is the itemHash we just took from Xurs inventory.
A list of the hash {type}’s can be found here: http://bungienetplatform.wikia.com/wiki/DestinyDefinitionType but for this example, we know {type} will be “6”, as we are searching for an “InventoryItem”.
We can add on another request to our nested loops above:
base_url = "https://www.bungie.net/platform/Destiny/"
for saleItem in res.json()['Response']['data']['saleItemCategories']:
	mysaleItems = saleItem['saleItems']
	for myItem in mysaleItems:
		hashID = str(myItem['item']['itemHash'])
		hashReqString = base_url + "Manifest/" + hashType + "/" + hashID
		res = requests.get(hashReqString, headers=HEADERS)
		item_name = res.json()['Response']['data']['inventoryItem']['itemName']
		item_type = res.json()['Response']['data']['inventoryItem']['itemTypeName']
		item_tier = res.json()['Response']['data']['inventoryItem']['tierTypeName']
		print "Item is: " + item_name
		print "Item type is: " + item_tier + " " + item_type + "\n"
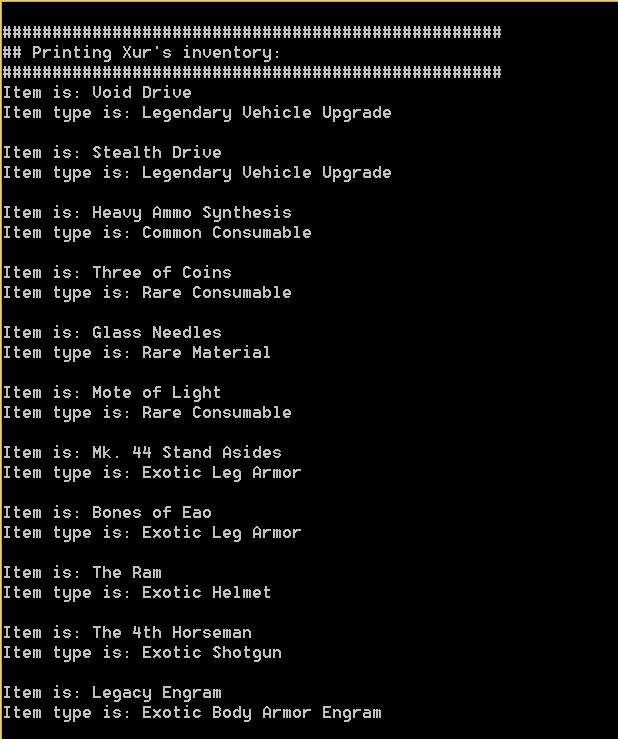
Here is what the output of our code looks like:
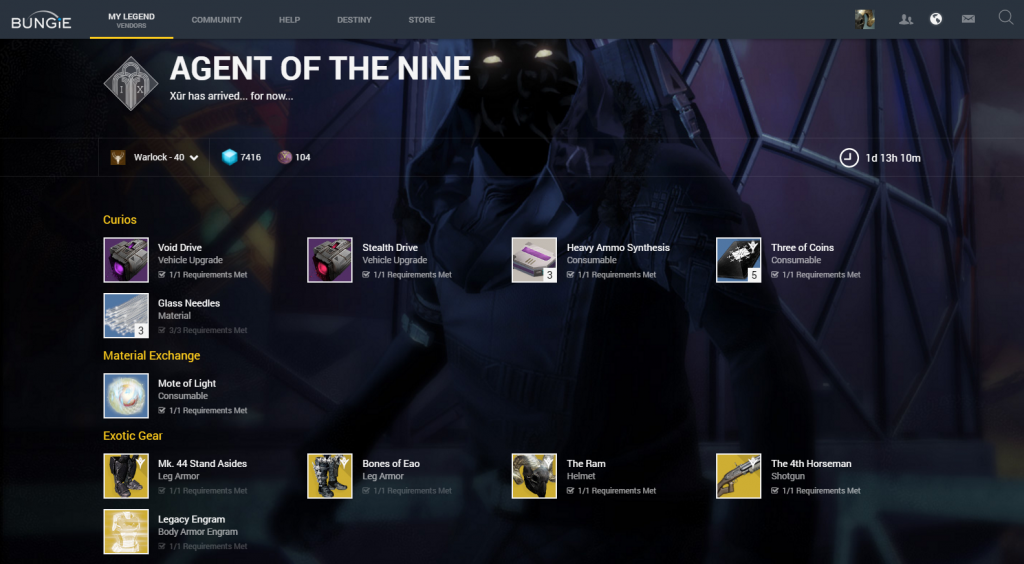
And when we checkout Xurs inventory on the Bungie.net vendors page, here’s what we see:
Yes! Our Python app can now send requests to Bungie and print the contents of Xurs inventory. (Also, if you haven’t got The Ram – get it)
There’s lots of cool stuff sent in the JSON objects, including hyperlinks to the item images and details on the price of each item. For now, this is good enough for me.
Running the code:
Here is our full set code, we can copy this into a file called “Get_Xur_inventory.py” and execute it from the command prompt like so:
> python Get_Xur_inventory.py
The code can also be found on my GitHub page here: https://github.com/AllynH/Destiny_Get_Xur_inventory
I’ll keep the repo up to date with any improvements or changes.
from lxml import html
import requests
import json

# Uncomment this line to print JSON output to a file:
#f = open('output.txt', 'w')

HEADERS = {"X-API-Key":'YOUR-X-API-Key'}

base_url = "https://www.bungie.net/platform/Destiny/"
xur_url = "https://www.bungie.net/Platform/Destiny/Advisors/Xur/"
hashType = "6"

# Send the request and store the result in res:
print "\n\n\nConnecting to Bungie: " + xur_url + "\n"
print "Fetching data for: Xur's Inventory!"
res = requests.get(xur_url, headers=HEADERS)

# Print the error status:
error_stat = res.json()['ErrorStatus']
print "Error status: " + error_stat + "\n"

# Uncomment this line to print JSON output to a file:
#f.write(json.dumps(res.json(), indent=4))

print "##################################################"
print "## Printing Xur's inventory:"
print "##################################################"

for saleItem in res.json()['Response']['data']['saleItemCategories']:
	mysaleItems = saleItem['saleItems']
	for myItem in mysaleItems:
		hashID = str(myItem['item']['itemHash'])
		hashReqString = base_url + "Manifest/" + hashType + "/" + hashID
		res = requests.get(hashReqString, headers=HEADERS)
		item_name = res.json()['Response']['data']['inventoryItem']['itemName']
		print "Item is: " + item_name
		item_type = res.json()['Response']['data']['inventoryItem']['itemTypeName']
		item_tier = res.json()['Response']['data']['inventoryItem']['tierTypeName']
		print "Item type is: " + item_tier + " " + item_type + "\n"
Here are a few ideas for the next steps:
- Add e-mail function, so the script mails me automatically when Xur lands.
- Create a web server, so we can access the app from a web page.
- Find Xurs location and add it to the output.
- Play some Trials of Osiris and get ready for the Rise Of Iron expansion
I’m hoping to expand on this program and add features as I go, leave me a comment and let me know if there’s anything you’d like to see, or if you fancy carrying me to the Lighthouse!


This is really helpful. I hit one error with the weapon/ornament bundles that Xur now sells. The inventory items don’t have ‘itemTypeName’ keys in their dictionary so if you try to access you will get a KeyError. I fixed it as follows, just to get it to run:
try:
item_type = fubar[‘itemTypeName’]
except KeyError:
item_type = “weapon with ornament”
Nice catch,
I’ve changed the code to this:
item_type = inventoryItem.get(‘itemTypeName’, ‘Consumable’)
That will default to an item_type of ‘Consumable’, if there is no item type.
I’ve put ‘Consumable’ because this has happened a lot, whenever Bungie introduce new items, they usually stay as ‘Classified’ for some period of time, even when they are unclassified – they can still be missing an itemTypeName. More often than-not these items are Consumables. (Also – I’m guessing the Weapon & Ornament bundle is a consumable but I’ve never bought one…)
I thought I’d changed this in my GitHub code but I’ll update the blog and GitHub code with the changes.